โ—ˆ PUZZLE DOSSIER ARCHIVE

Servant of the Lake Puzzle Solutions

Find any of the 77 main-story puzzle answers by remembered object, room, day, or task, with hints before exact solutions.

Search task, room, or object:
Day:
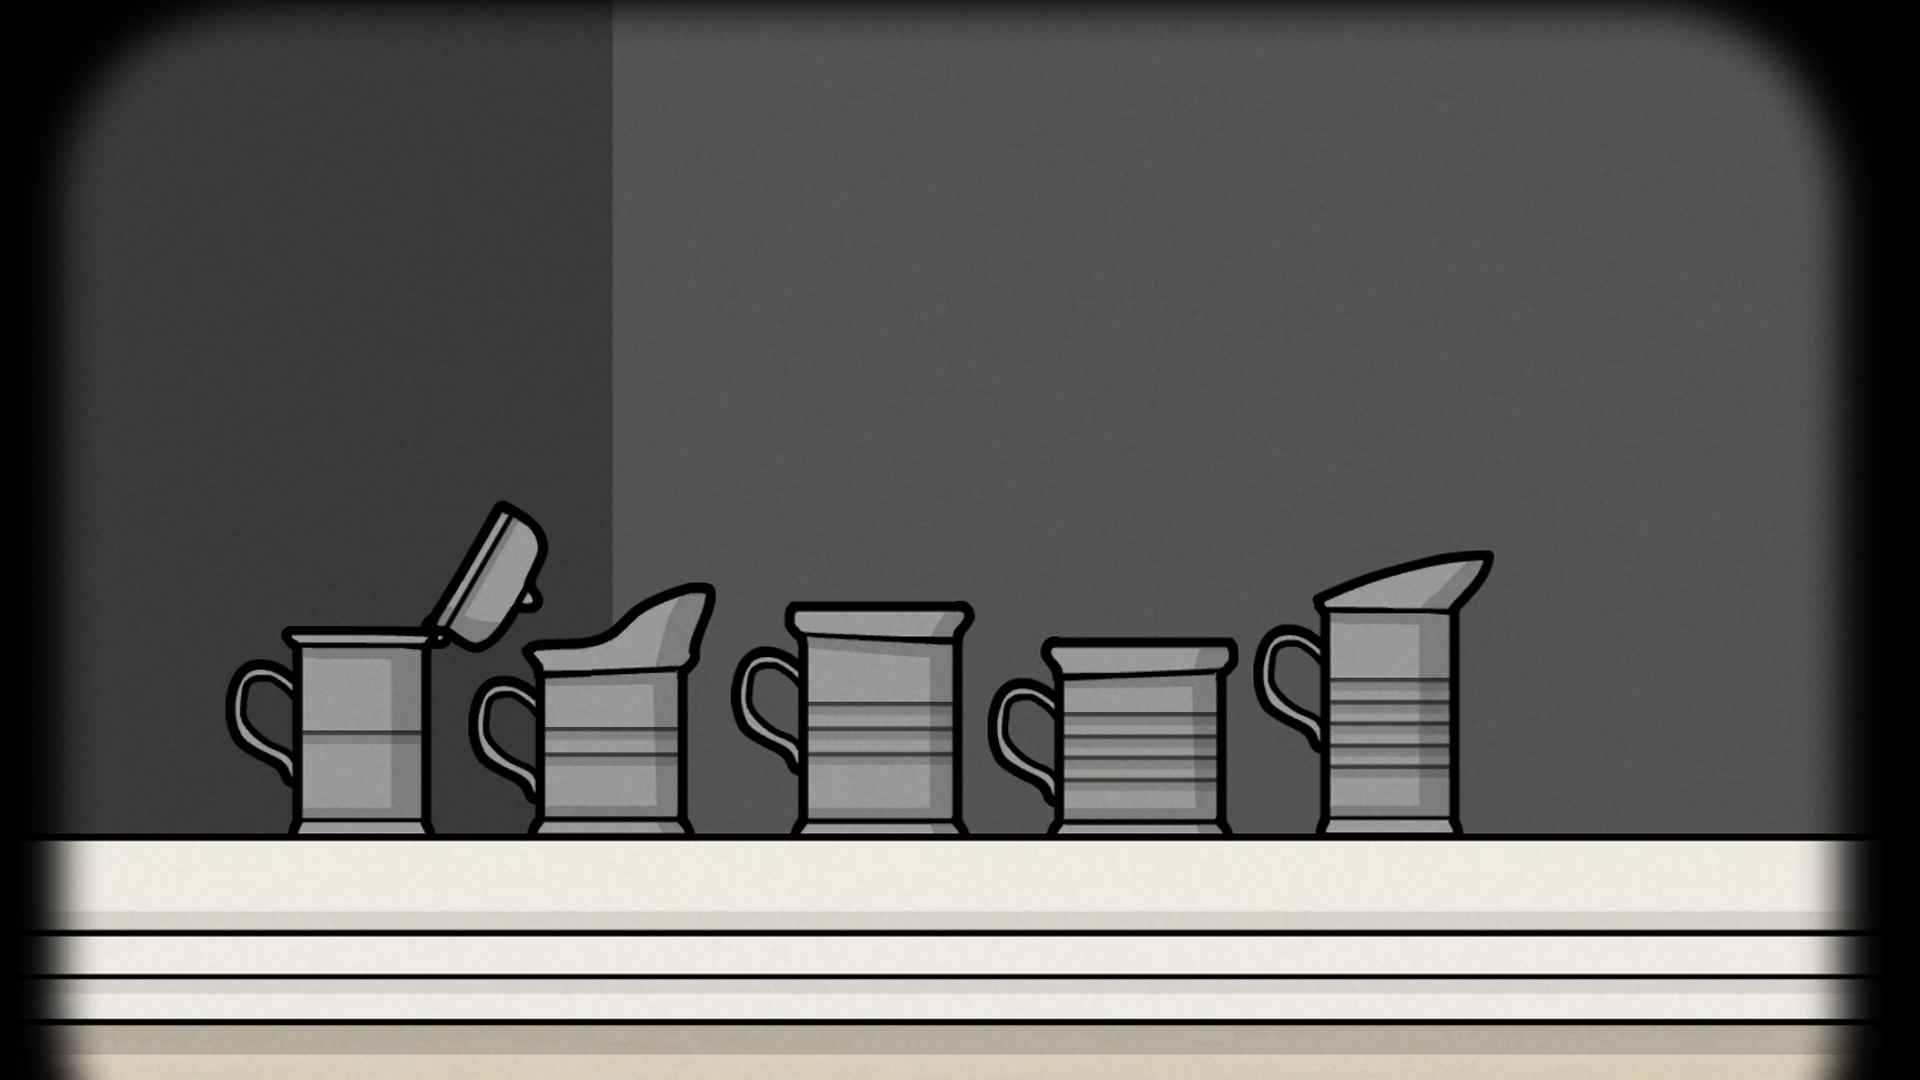
Accepted tin-cup order๐Ÿ” Enlarge Clue
Day 1
Tin cup order
TASK // The Arrival

Order the estate's five cups by their stripe counts to reveal the payment coin.

Day
Day 1
Location
Frontyard right window
Prerequisites
Collect both missing cups from the carriage and left window.
โœ‰ Solution

Arrange five cups by stripe count, 1 through 5 from left to right.

Accepted: Coin available from the opened cup.
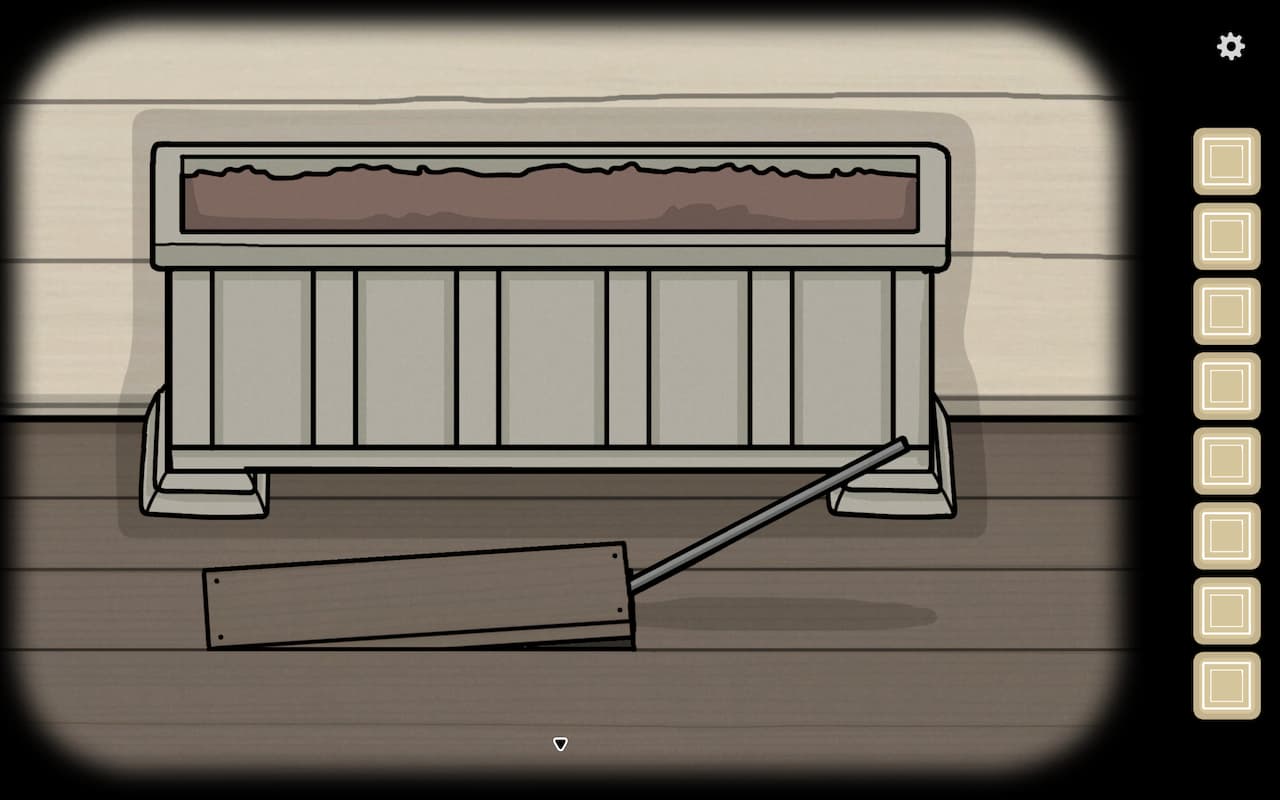
Loose estate floorboard๐Ÿ” Enlarge Clue
Day 1
Estate entrance key
TASK // The Arrival

Obtain the fallen iron bar and use the loose courtyard board to reach the entrance key.

Day
Day 1
Location
Frontyard loose floorboard
Prerequisites
Solve the cup puzzle, feed the horse and pay the coachman so the iron bar falls.
โœ‰ Solution

Feed the horse and pay the driver; use the fallen iron bar on the loose board to obtain the entrance key.

Accepted: The estate door opens.

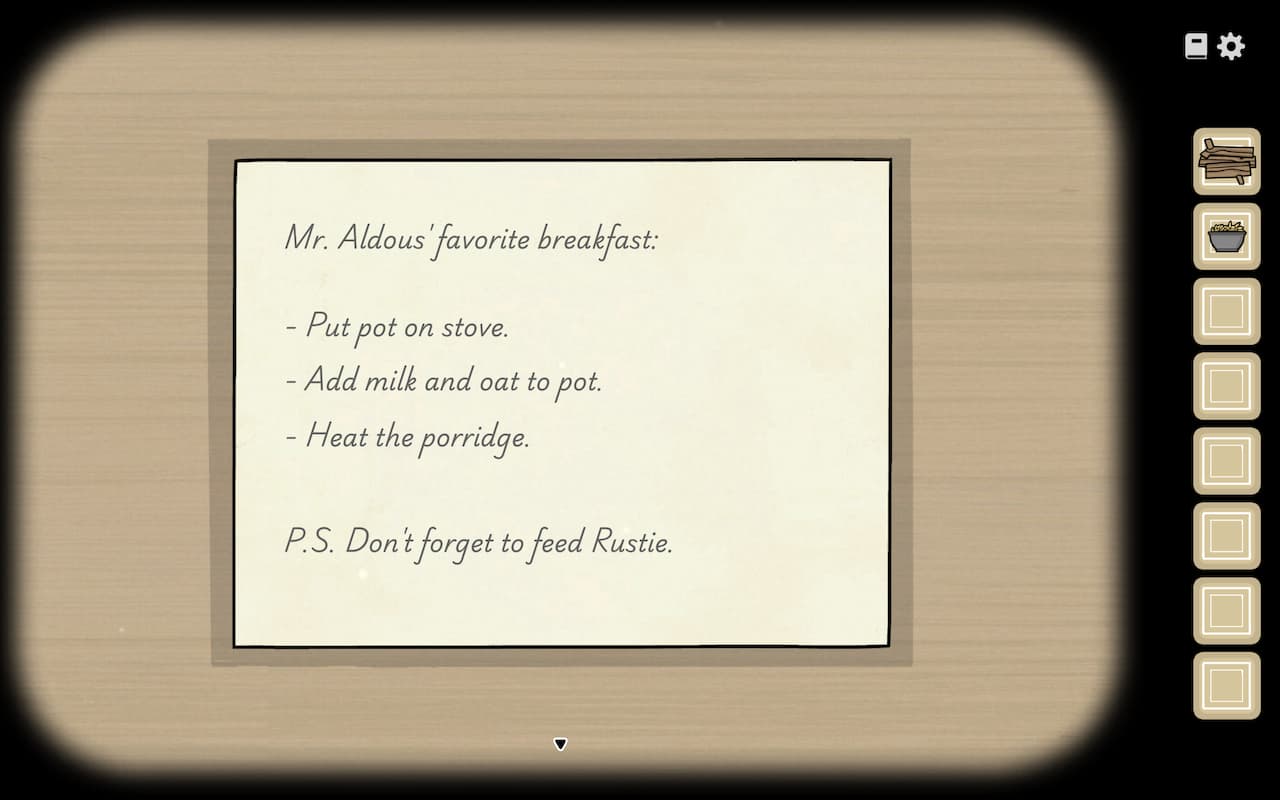
Breakfast preparation note๐Ÿ” Enlarge Clue
Day 1
Cooking the porridge
TASK // Preparing Breakfast

Collect the breakfast ingredients, obtain matches from Rustie, and cook Aldous's porridge.

Day
Day 1
Location
Servant's Room stove
Prerequisites
Collect wood, oats, milk and pan; obtain matches by feeding the mouse to Rustie.
โœ‰ Solution

Collect wood, oats, milk and the pan; feed the dead mouse to the cat for matches, light the stove and cook milk with oats.

Accepted: Cooked porridge enters the inventory.

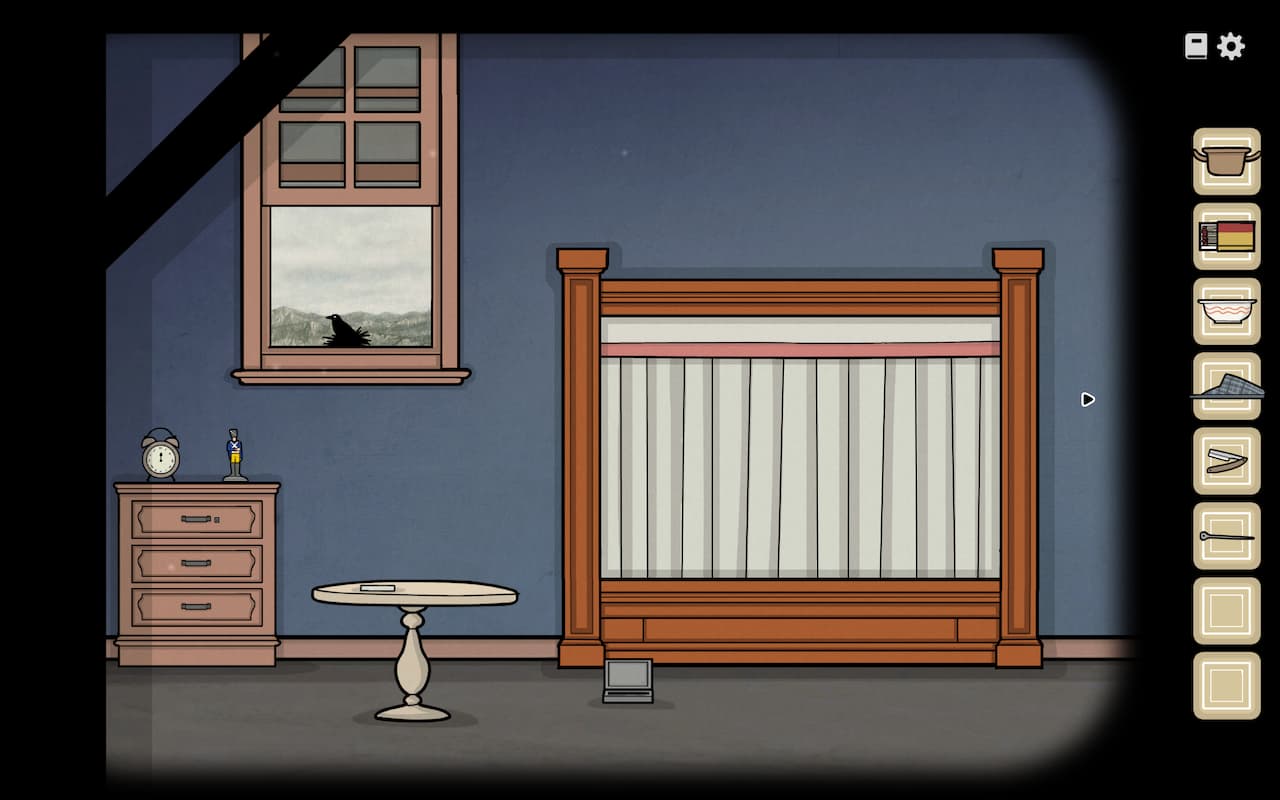
Aldous's bedroom and alarm context๐Ÿ” Enlarge Clue
Day 1
Aldous's alarm clock
TASK // Waking Up Aldous

Find the missing alarm hand and use the ordinary morning setting to wake Aldous.

Day
Day 1
Location
Aldous's Bedroom alarm clock
Prerequisites
Open the bed curtains and take the clock hand from the soldier.
โœ‰ Solution

Install the soldier's clock hand and set the alarm to 7:00.

Accepted: Aldous wakes.

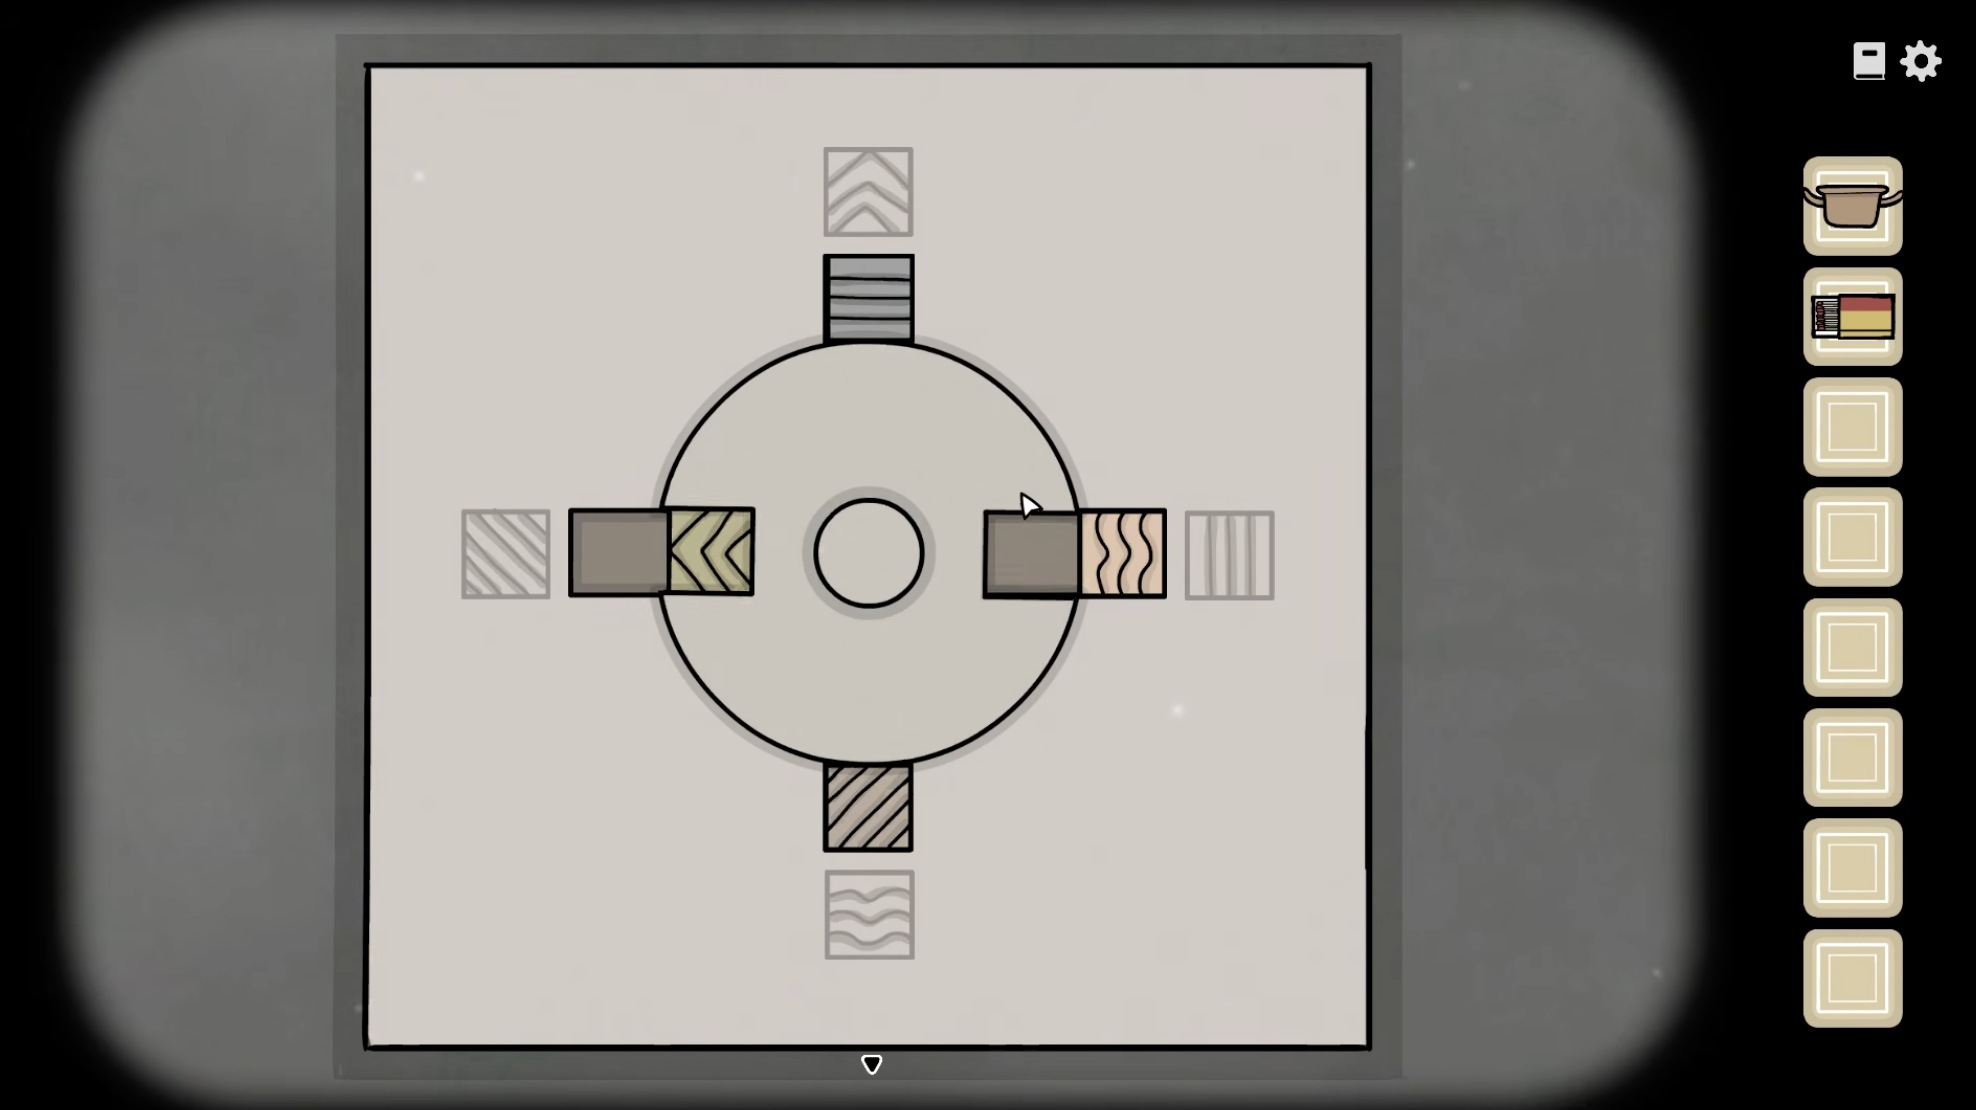
Razor-box rotating wheel and pattern guides๐Ÿ” Enlarge Clue
Day 1
Aldous's razor box
TASK // Waking Up Aldous

Use the patterned edge guides and rotating wheel to unlock Aldous's razor.

Day
Day 1
Location
Aldous's Bedroom floor box
Prerequisites
Reach Waking Up Aldous and inspect the patterned box.
โœ‰ Solution

Match the outer guides: chevrons at the top, diagonal stripes at the left, vertical stripes at the right and waves at the bottom. Use the side staging slots while cycling pieces with the wheel.

Accepted: The box opens and provides the razor.

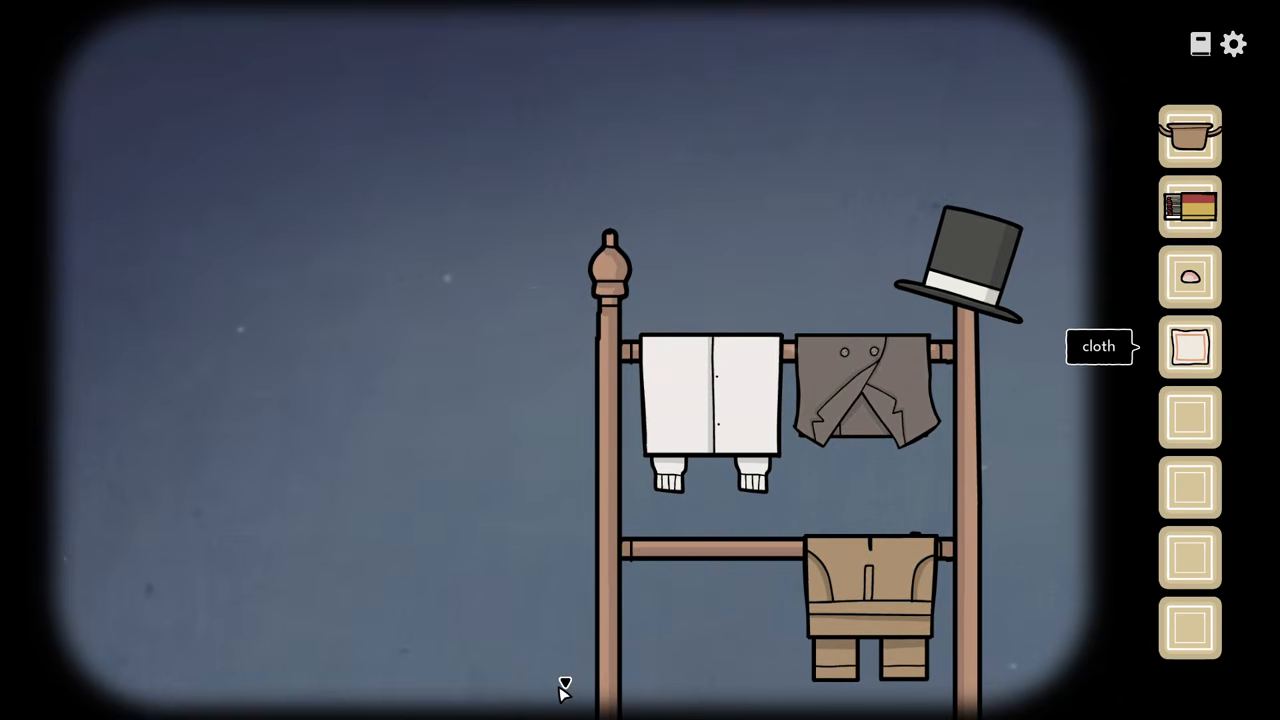
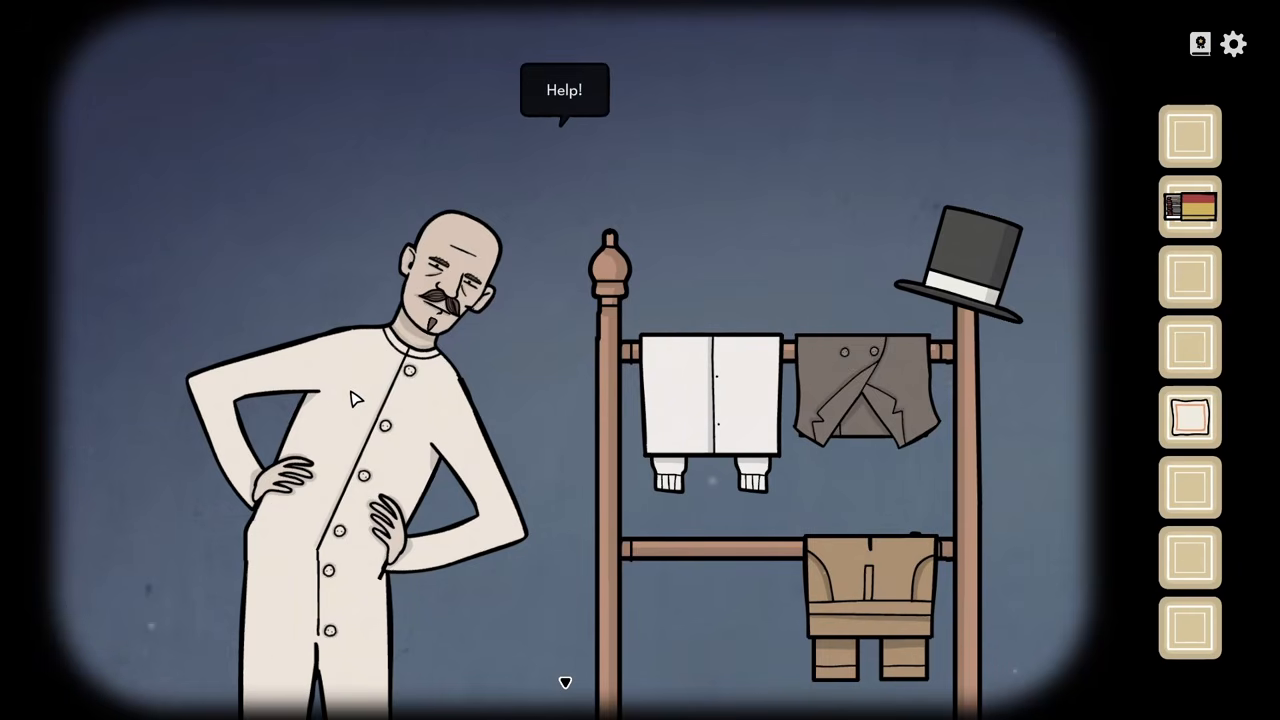
Clothes rail and collected cleaning cloth๐Ÿ” Enlarge Clue
Day 1
Cleaning Aldous's ear
TASK // Waking Up Aldous

Clean Aldous after the shave and exchange the earlobe with the crow for a drawer key.

Day
Day 1
Location
Aldous's Bedroom bed and window
Prerequisites
Unlock the razor and shave Aldous; obtain the cloth hidden on the clothes rail.
โœ‰ Solution

After shaving, take the earlobe and the cloth hidden among the clothes; clean the wound and give the earlobe to the crow for the drawer key.

Accepted: The locked top drawer can be opened for berries.

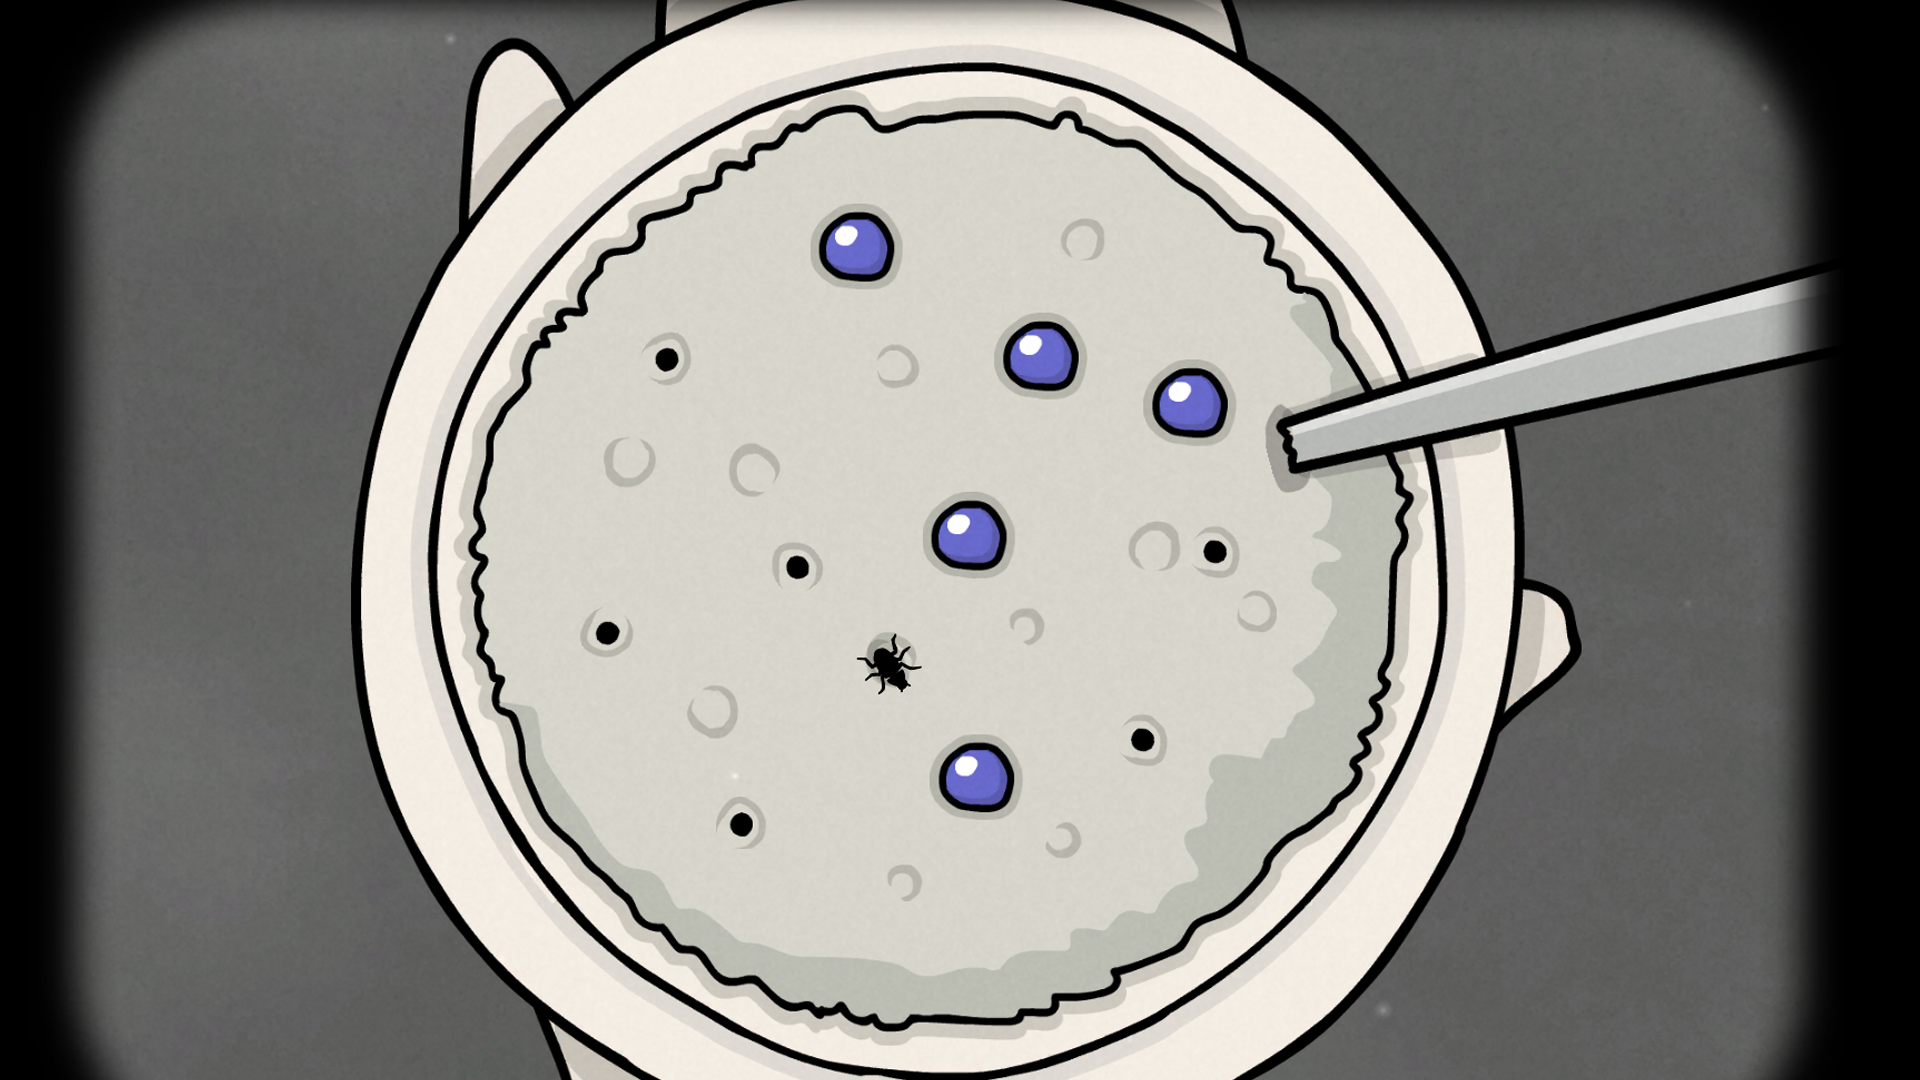
Porridge berry and insect scene๐Ÿ” Enlarge Clue
Day 1
Porridge berry and insect puzzle
TASK // Waking Up Aldous

Trap the moving insect with berries, then finish feeding Aldous his porridge.

Day
Day 1
Location
Aldous's Bedroom porridge bowl
Prerequisites
Wake and shave Aldous, obtain the drawer key and berries, and prepare the bowl with porridge and spoon.
โœ‰ Solution

Cover each hole as the insect leaves it with a berry; trap and squash the insect before feeding Aldous.

Accepted: The porridge can be spoon-fed to Aldous.

Aldous's exercise strain๐Ÿ” Enlarge Clue
Day 1
Aldous's exercise sequence
TASK // Waking Up Aldous

Copy the toy soldier's movements to finish Aldous's morning exercise.

Day
Day 1
Location
Aldous's Bedroom soldier and dressing area
Prerequisites
Finish Aldous's breakfast and inspect the soldier's movements.
โœ‰ Solution

Copy the soldier's movements: left, right, down, right, right, down.

Accepted: The exercise is accepted and Aldous can be dressed.

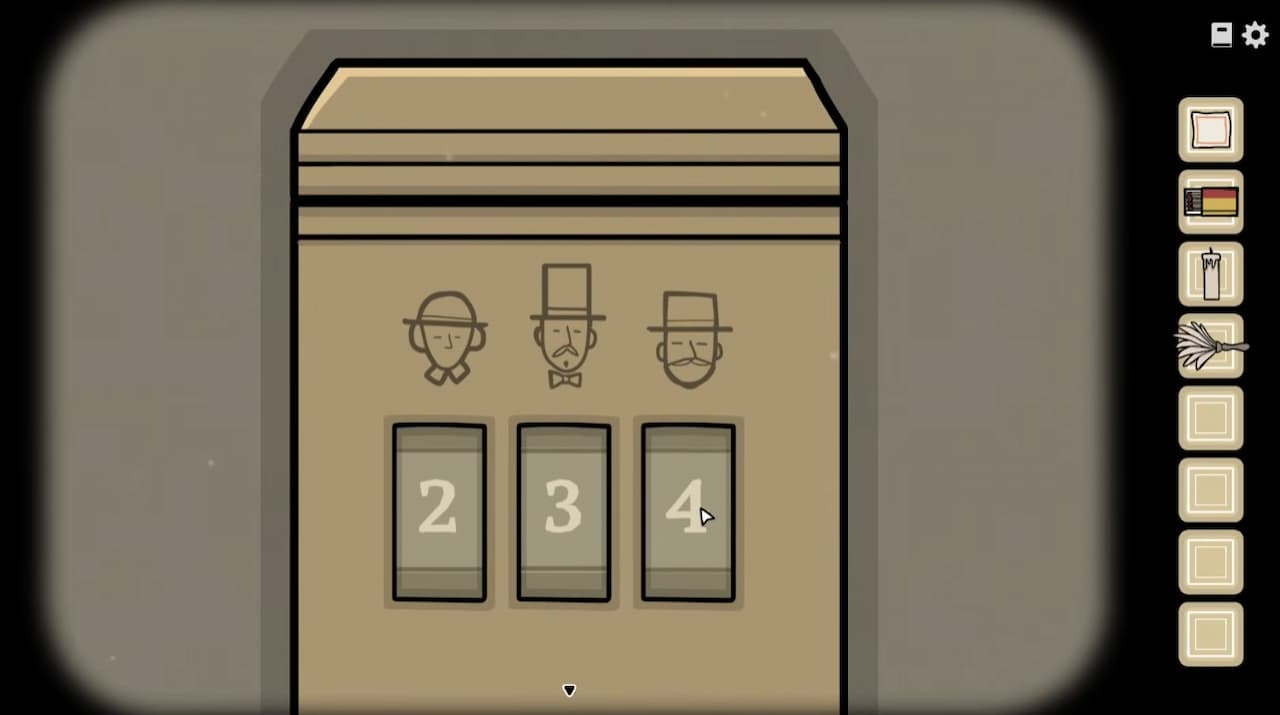
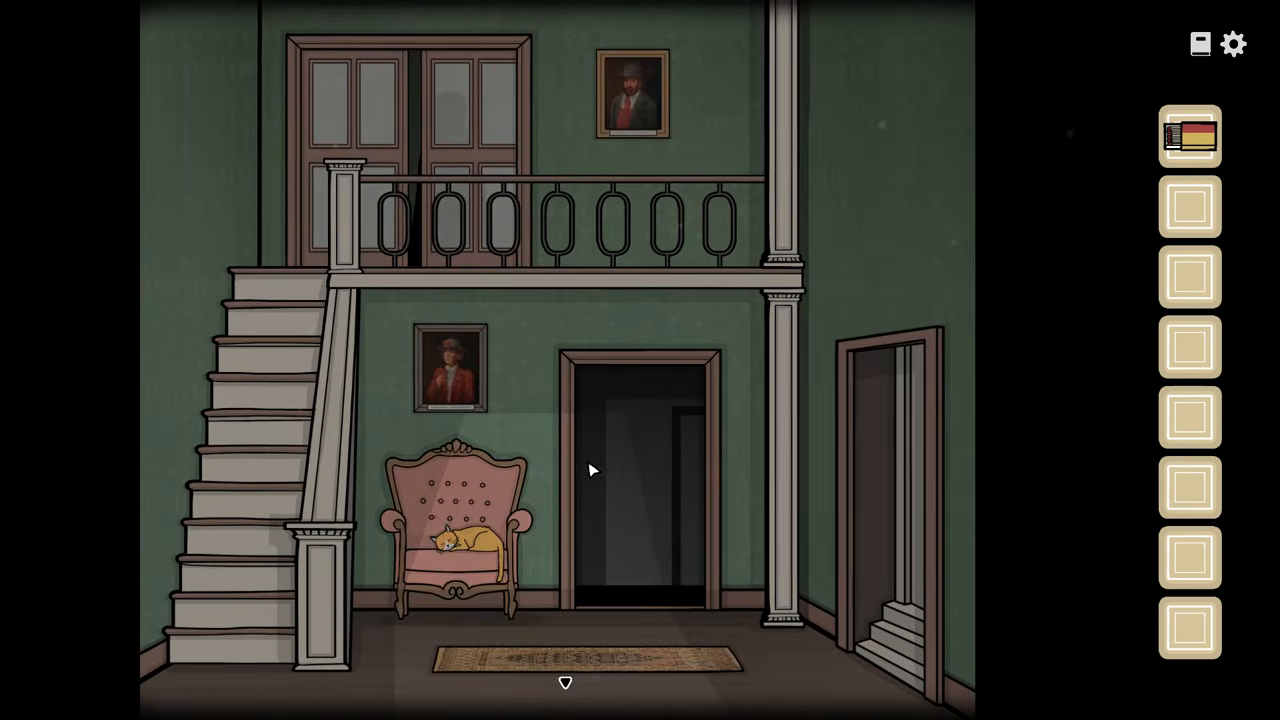
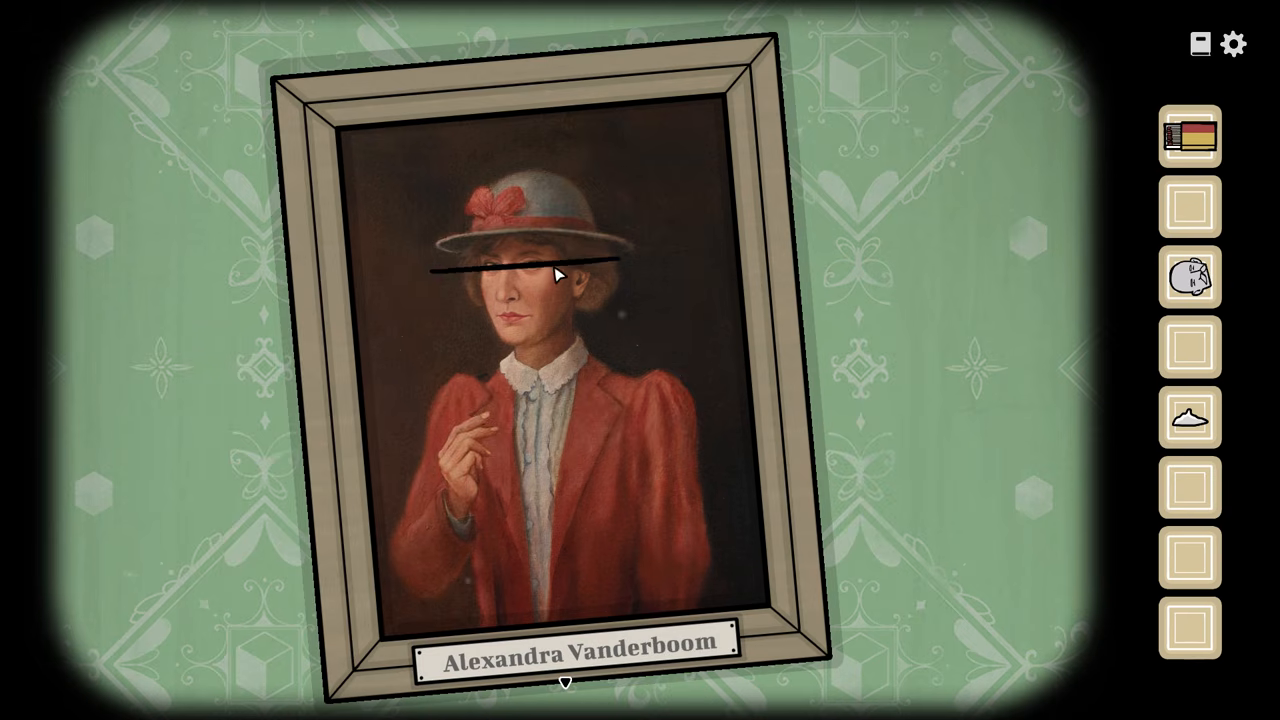
Portrait clue lockbox๐Ÿ” Enlarge Clue
Day 1
Portrait candle-box code
TASK // Preparing the Reception

Read the three cleaned portraits to unlock the reception candle box.

Day
Day 1
Location
Hallway portraits and box near Aldous's Bedroom
Prerequisites
Obtain the duster and clean all three sibling portraits.
โœ‰ Solution

Alexandra gives 2, Aldous 4 and William 3; the candle-box code is 243.

Accepted: The locked box opens and provides a candle.

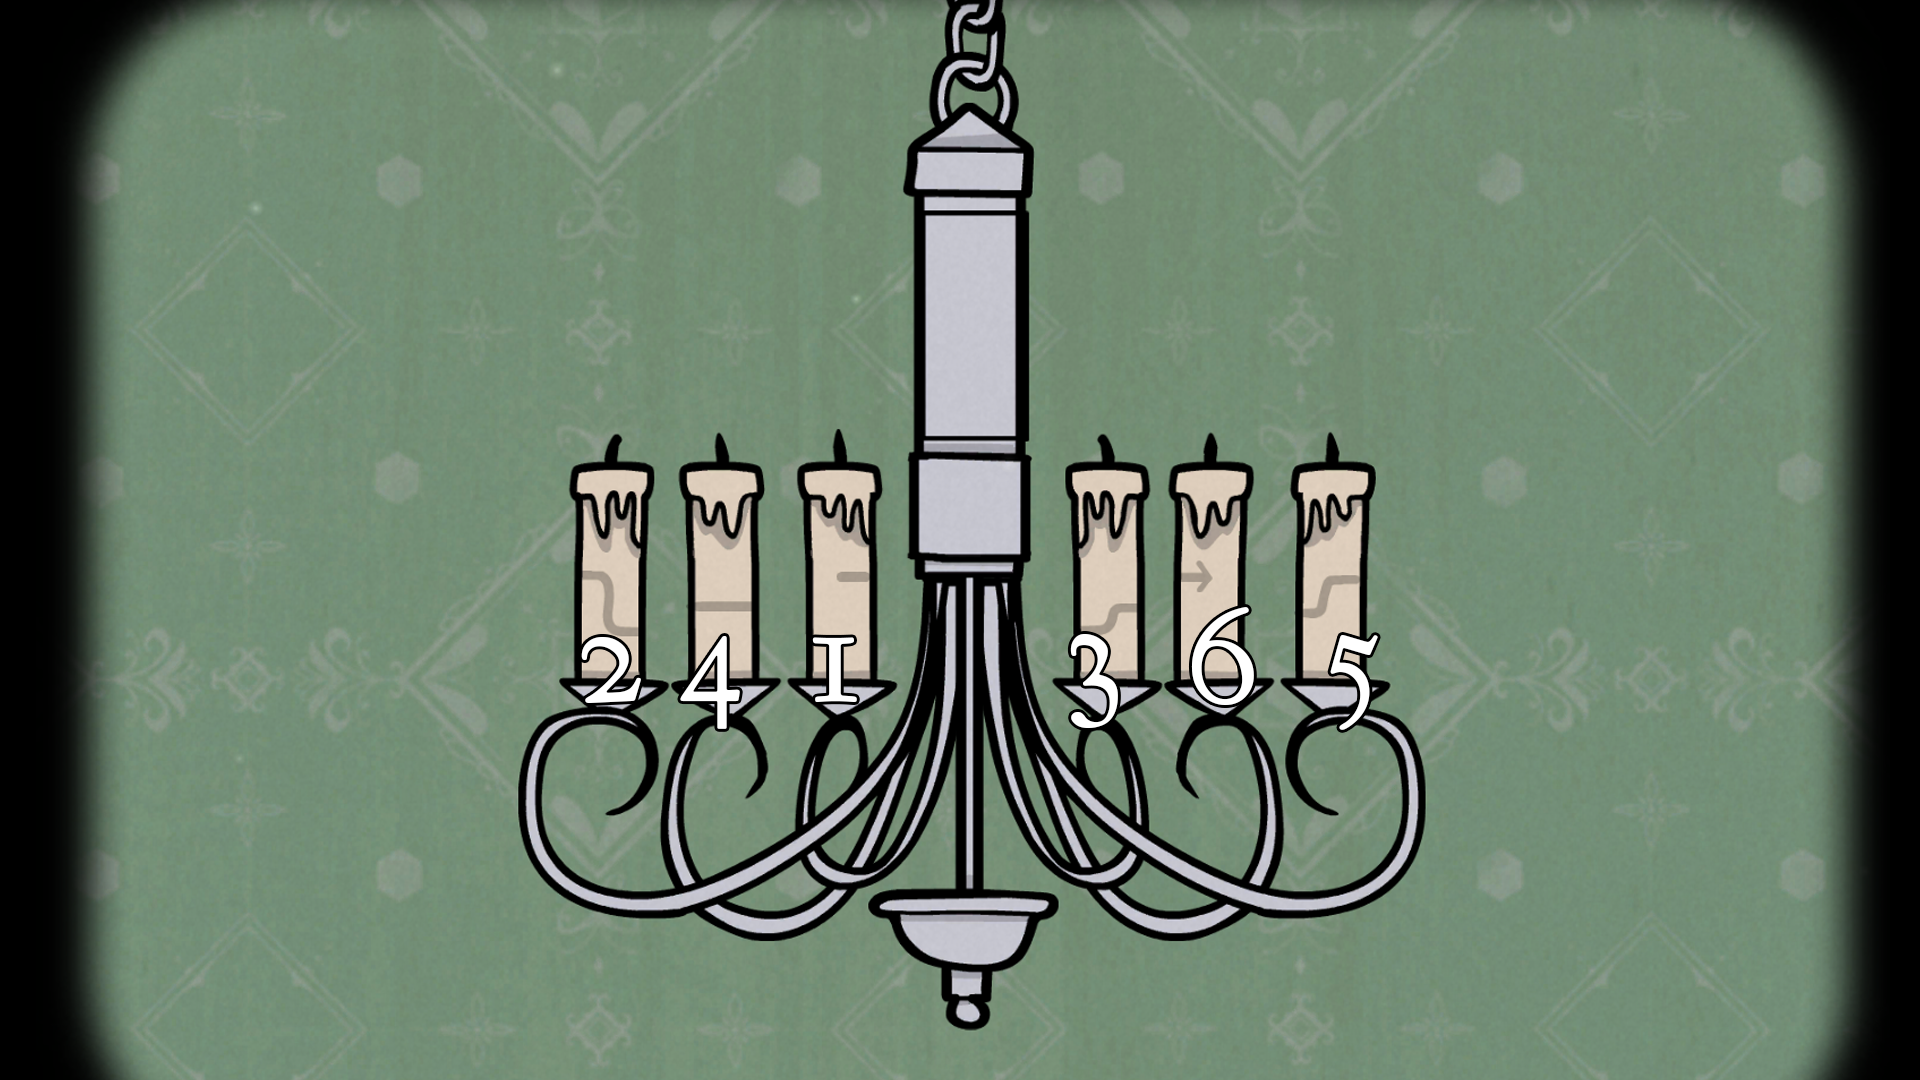
Annotated candle lighting order๐Ÿ” Enlarge Clue
Day 1
Candelabra lighting order
TASK // Preparing the Reception

Follow the candle markings to complete the reception lighting sequence.

Day
Day 1
Location
Entrance hall chandelier
Prerequisites
Collect all three candles and retain the matches.
โœ‰ Solution

Follow the path across the candle markings; independent illustrated instructions give 3, 1, 4, 2, 6, 5 from left-numbered candles.

Accepted: All required candles burn and the garden task opens.

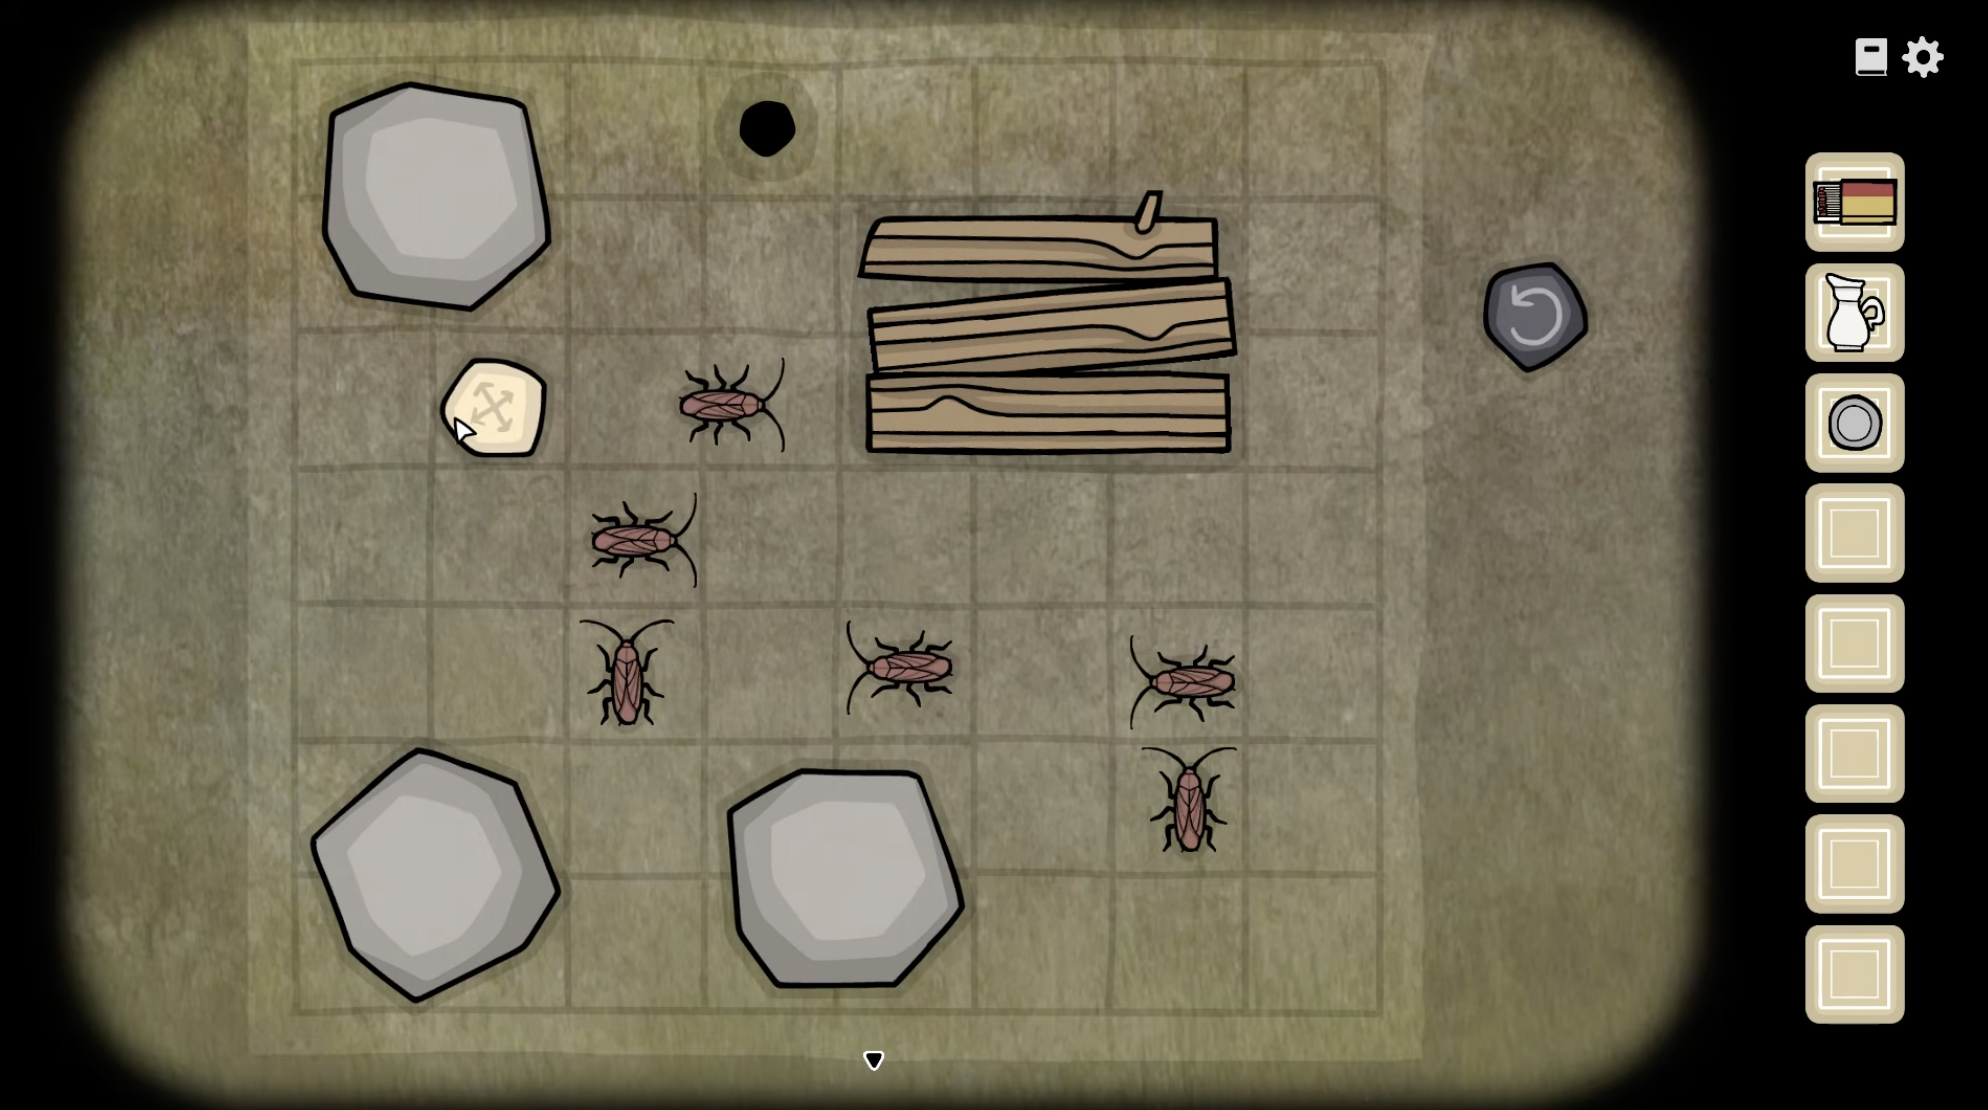
Cockroach board and movable white stone๐Ÿ” Enlarge Clue
Day 1
Cockroach board
TASK // Welcoming the Guests

Steer the cockroaches into the board's hole using the movable white stone.

Day
Day 1
Location
Backyard wood pile
Prerequisites
Enter the garden during Welcoming the Guests and inspect the movable white stone.
โœ‰ Solution

Move the white stone to drive every cockroach into the hole; avoid trapping one or sending it off the board.

Accepted: The wood pile falls and reveals a stone tablet.

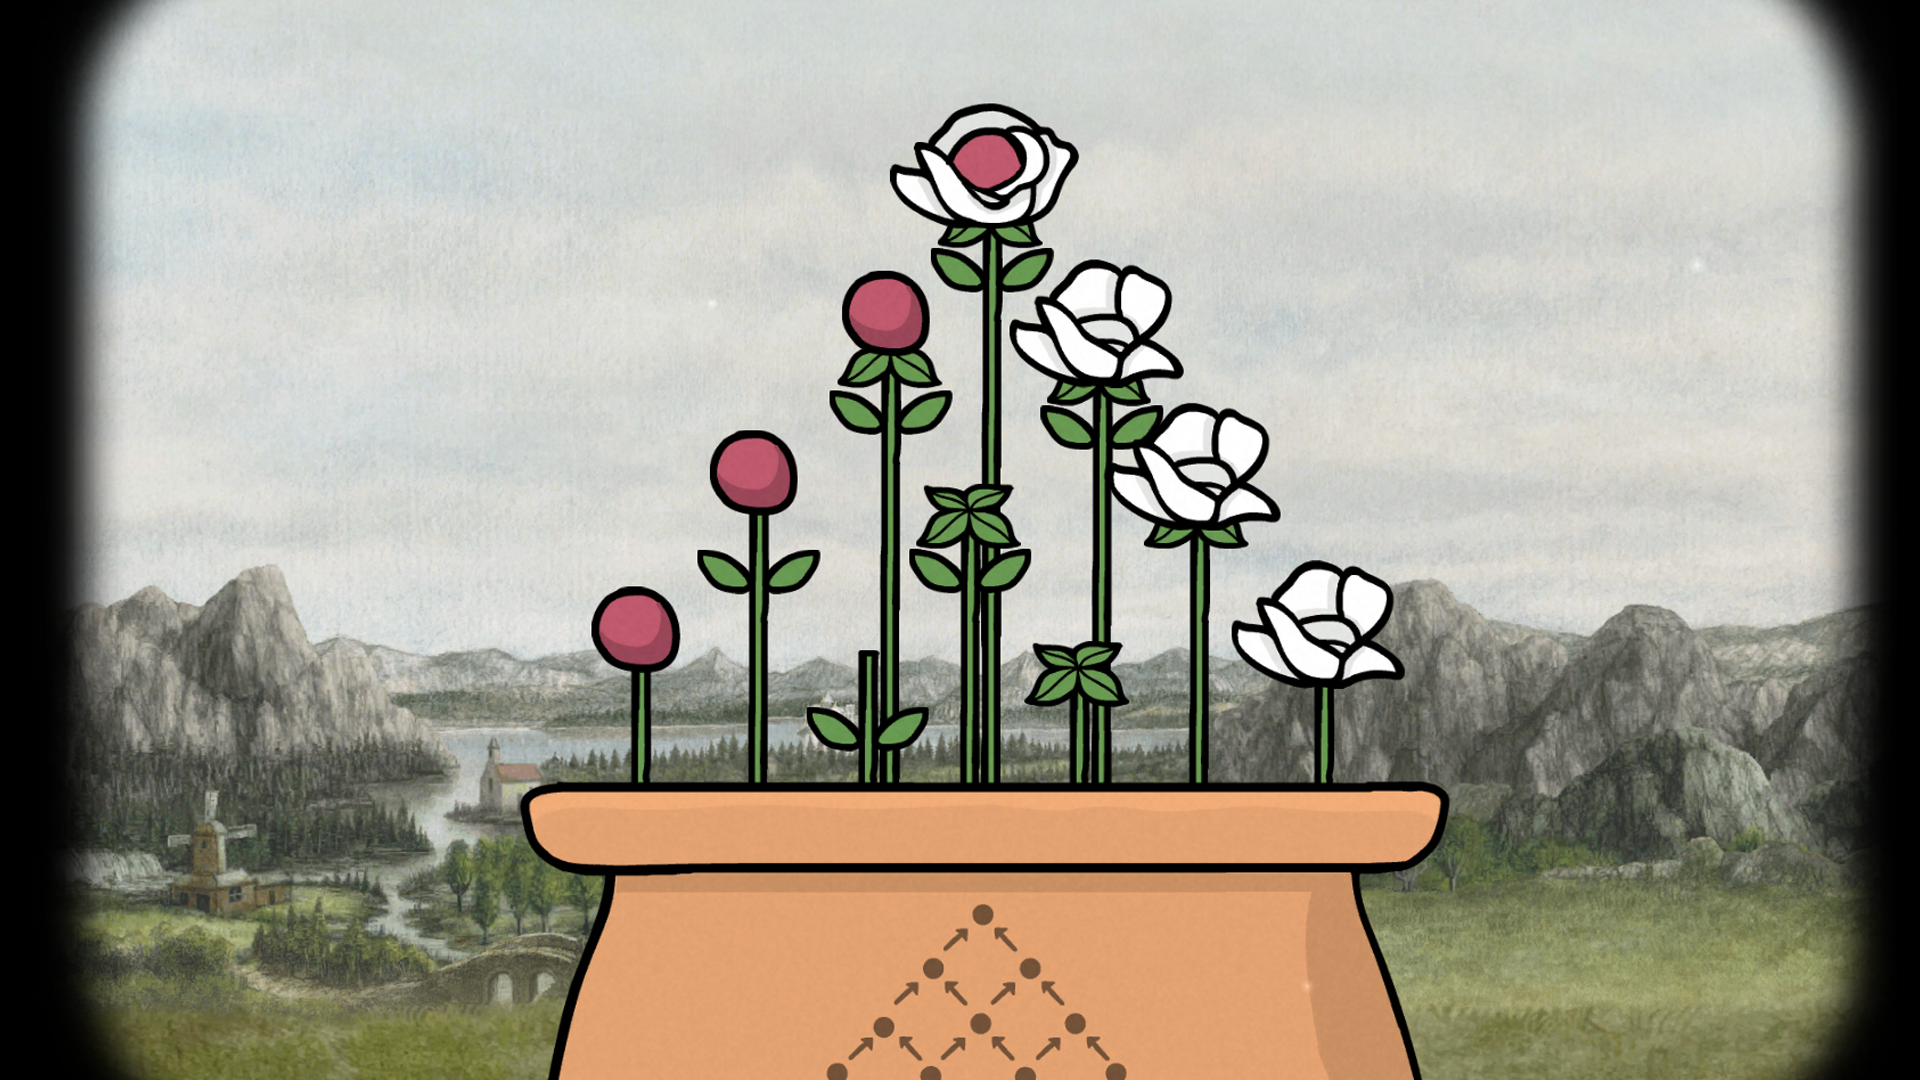
Accepted flower pyramid๐Ÿ” Enlarge Clue
Day 1
Flower pyramid
TASK // Welcoming the Guests

Match bloom and leaf details across four rows to obtain the bouquet and porch tablet.

Day
Day 1
Location
Backyard flower pot
Prerequisites
Enter the garden during Welcoming the Guests and inspect the pot's combination diagram.
โœ‰ Solution

Top: white bloom with red centre and both leaf pairs. Second row: red bud with both leaf pairs, then white bloom with both pairs. Third: red bud with lower leaves, four-leaf stem, white bloom with upper leaves. Base: plain red bud, lower-leaf stem, upper-leaf stem, plain white bloom.

Accepted: Bouquet and stone tablet become available.

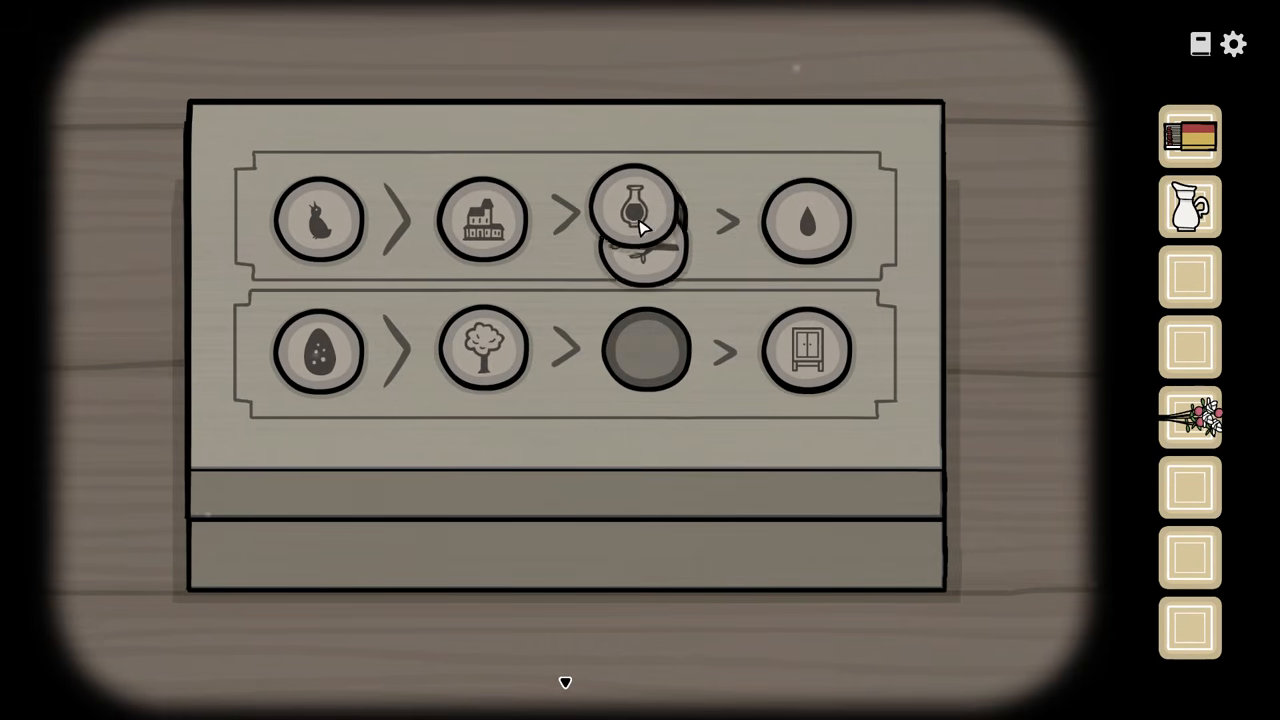
Stone-tablet box icon sequence๐Ÿ” Enlarge Clue
Day 1
Porch stone-tablet box
TASK // Welcoming the Guests

Arrange both nested symbol chains to release the porch flag.

Day
Day 1
Location
Backyard porch box
Prerequisites
Collect tablets from the mailbox, roach board and flower pot.
โœ‰ Solution

Arrange one chain as house, cupboard, elixir, droplet; the other as tree, nest, egg, bird.

Accepted: The box provides the flag.

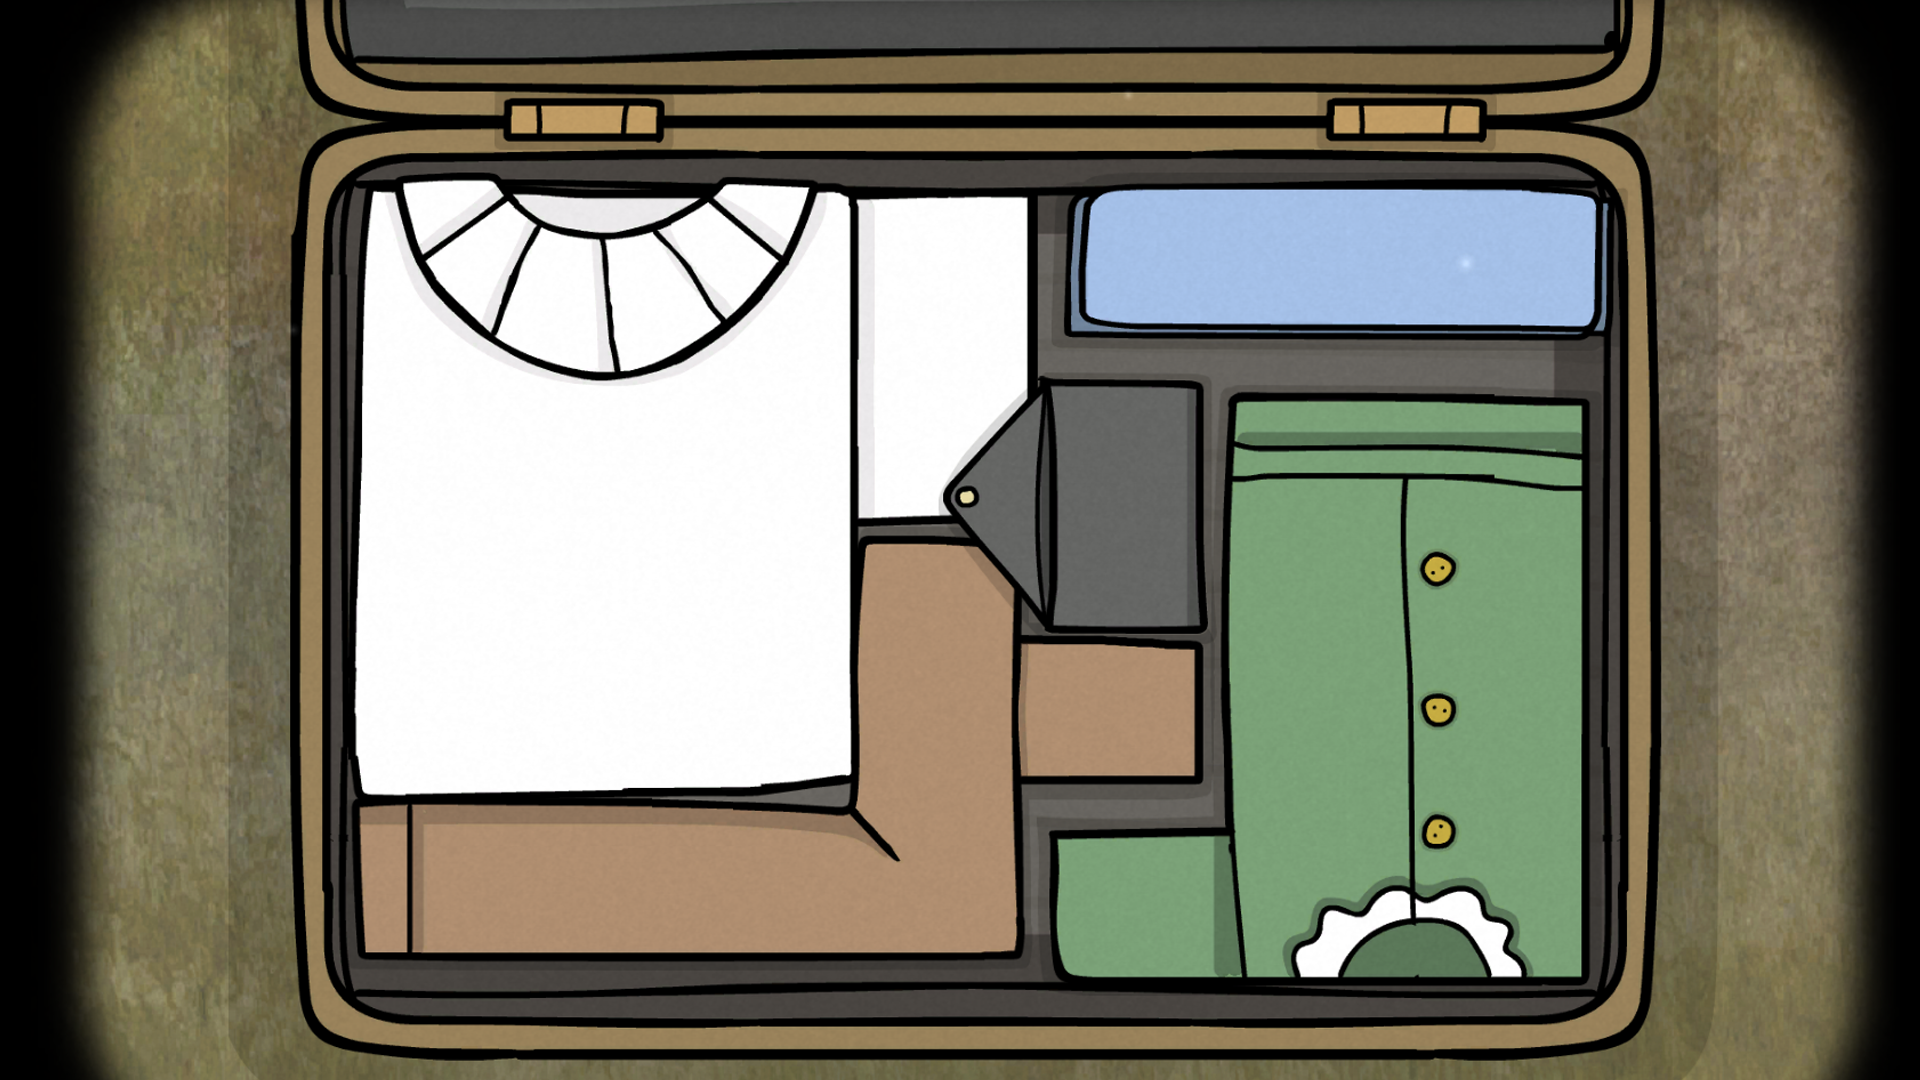
Alexandra's arrival suitcase๐Ÿ” Enlarge Clue
Day 1
Alexandra's arrival suitcase code
TASK // Welcoming the Guests

Use the wicker basket's clue to unlock Alexandra's arrival luggage.

Day
Day 1
Location
Backyard carriage luggage
Prerequisites
Raise the flag to bring the visitors; remove the wicker basket and suitcase.
โœ‰ Solution

Shake the wicker basket to reveal 374; use it on the arrival suitcase.

Accepted: The suitcase opens.

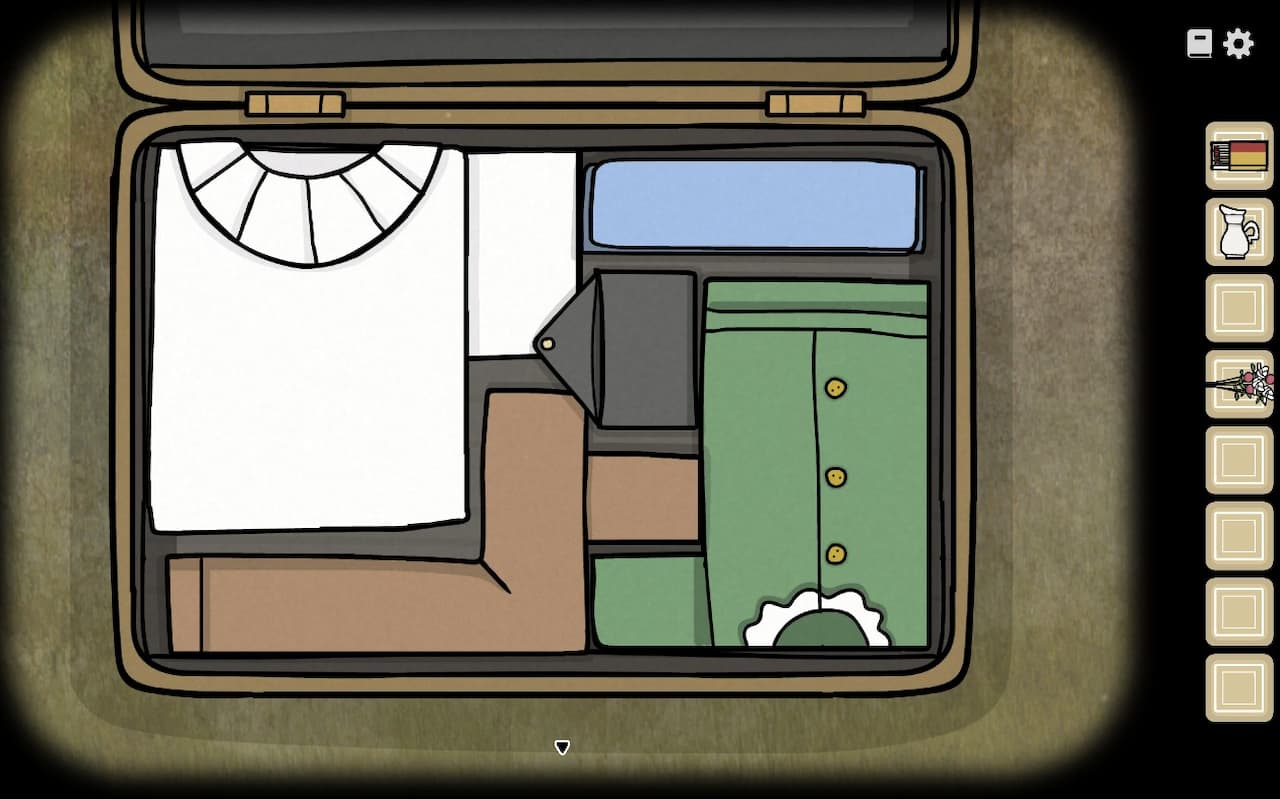
Accepted luggage packing๐Ÿ” Enlarge Clue
Day 1
Suitcase luggage arrangement
TASK // Welcoming the Guests

Fit Alexandra's clothing into the arrival case without overlapping pieces.

Day
Day 1
Location
Alexandra's arrival suitcase
Prerequisites
Unlock the arrival suitcase with 374.
โœ‰ Solution

Fit every clothing shape without overlap, matching the retained completed arrangement.

Accepted: The purse can be opened for payment.

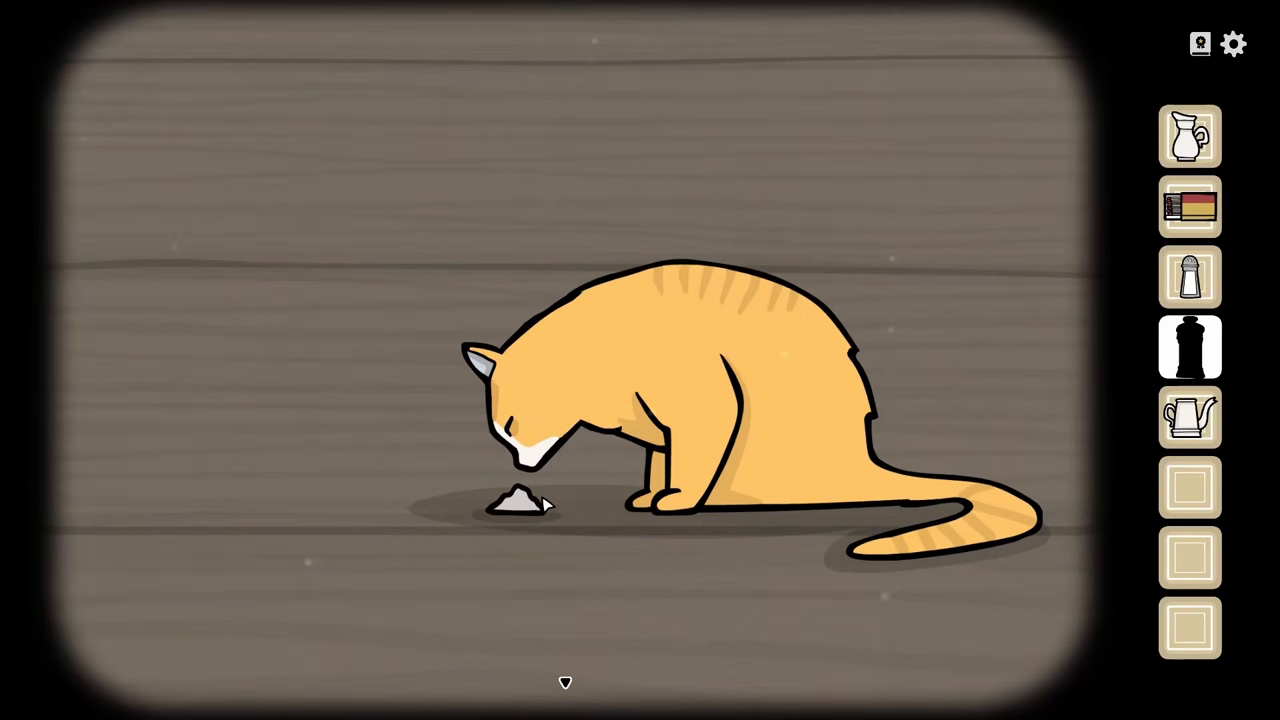
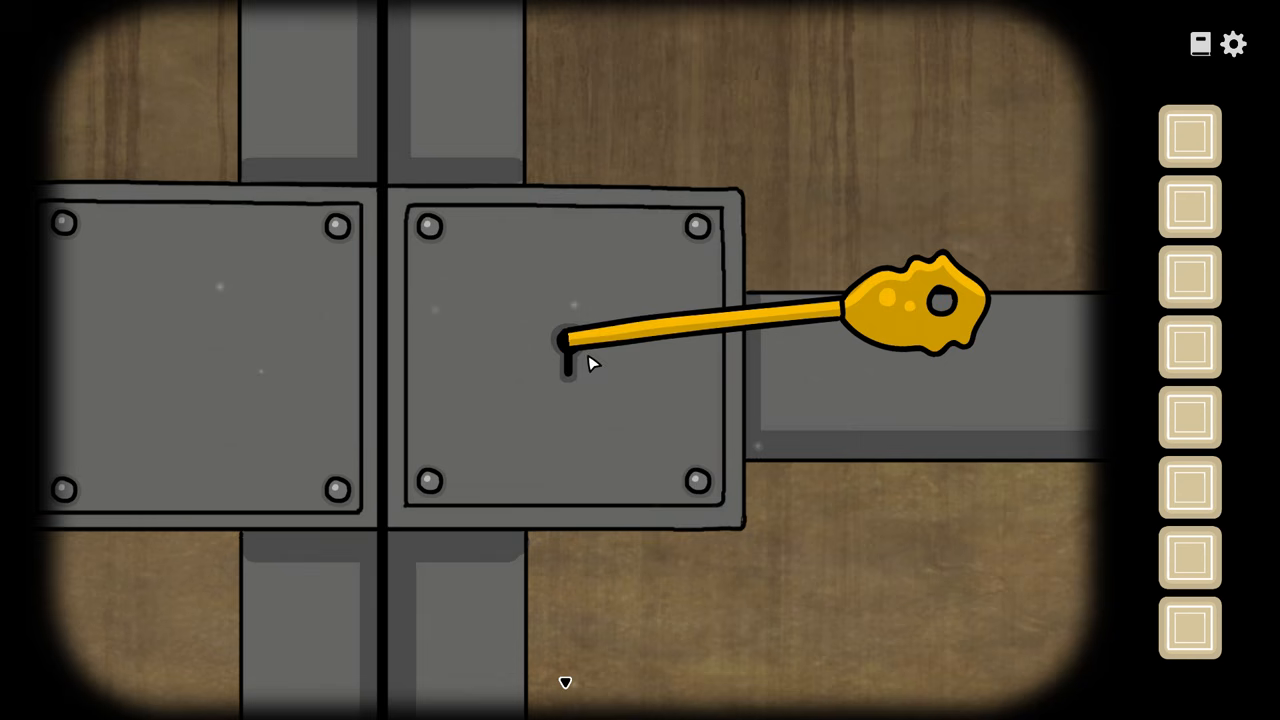
Rustie licking the sticky substance used to repair Alexandra's teacup๐Ÿ” Enlarge Clue
Day 1
Alexandra's tea
TASK // Serving Tea

Follow Alexandra's changing tea request and repair the cup when the serving breaks it.

Day
Day 1
Location
Hallways with Alexandra and Servant's Room
Prerequisites
Collect tea, hot water, milk, sugar and cup; obtain Rustie's adhesive for the cup repair.
โœ‰ Solution

Use tea, hot water, milk and sugar while following Alexandra's changing request; repair the broken cup when needed and repeat the serving.

Accepted: Alexandra accepts the drink and the living room opens.

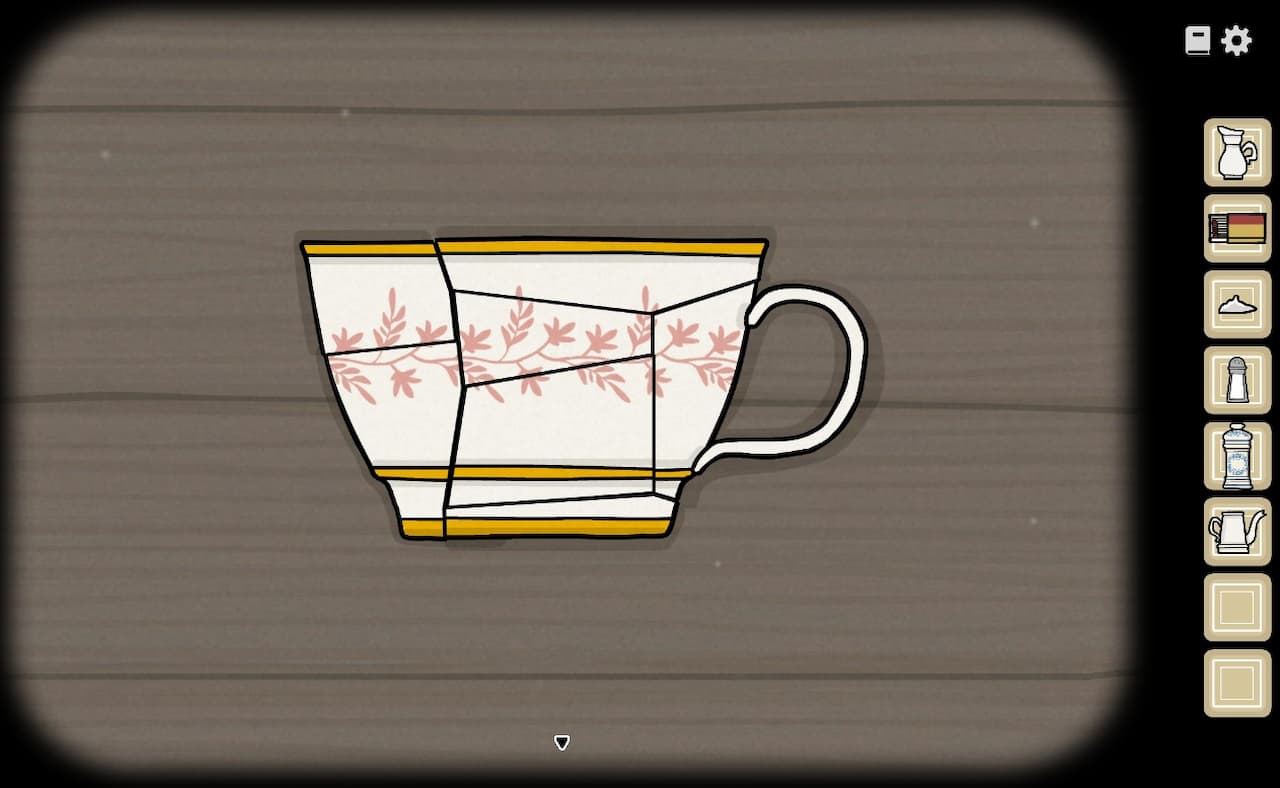
Broken teacup pieces๐Ÿ” Enlarge Clue
Day 1
Broken teacup
TASK // Serving Tea

Reassemble the cup's broken pieces and secure them with Rustie's adhesive.

Day
Day 1
Location
Alexandra's broken teacup
Prerequisites
Reach the broken-cup response and obtain Rustie's sticky substance.
โœ‰ Solution

Fit the broken pieces back together and secure them with Rustie's sticky substance.

Accepted: The cup can be used again.

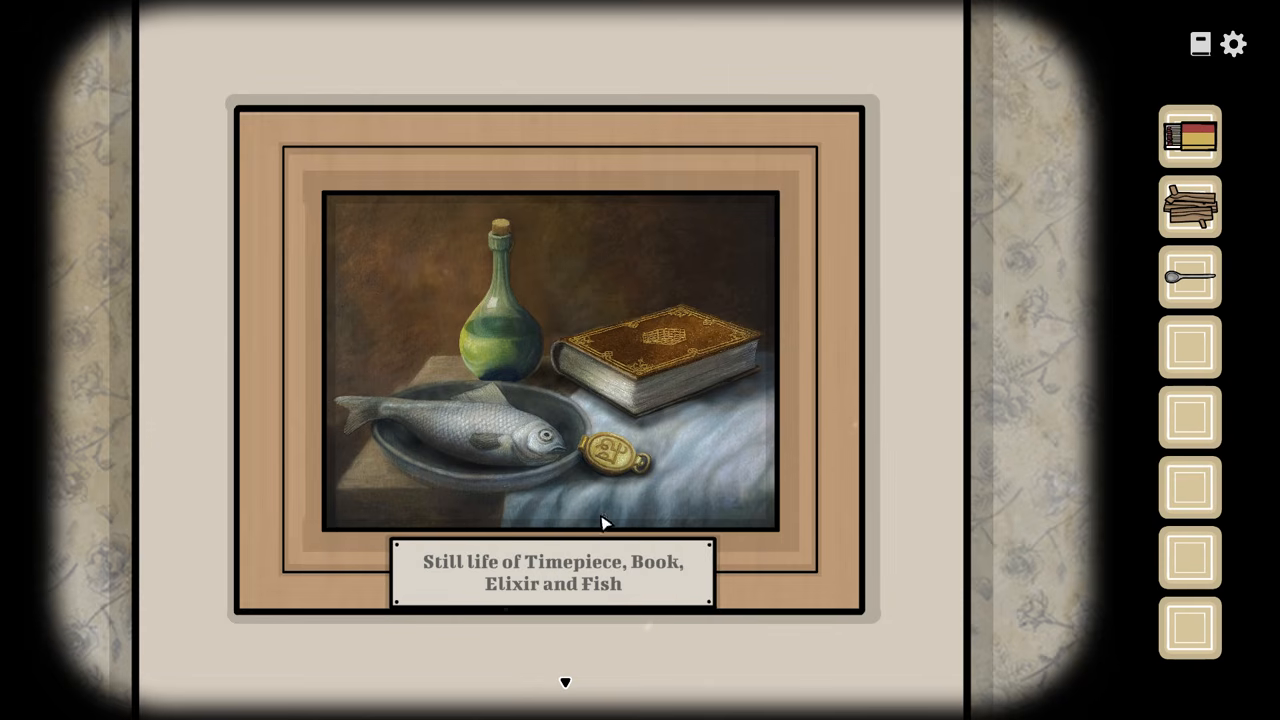
Timepiece, book, elixir and fish painting๐Ÿ” Enlarge Clue
Day 1
Reunion painting sequence
TASK // Opening the Reunion

Read the fireplace painting's title to release the reunion fish.

Day
Day 1
Location
Living Room above the fireplace
Prerequisites
Reach Opening the Reunion and inspect the painting title.
โœ‰ Solution

Select timepiece, book, elixir, fish in that order.

Accepted: Fish enters the inventory.

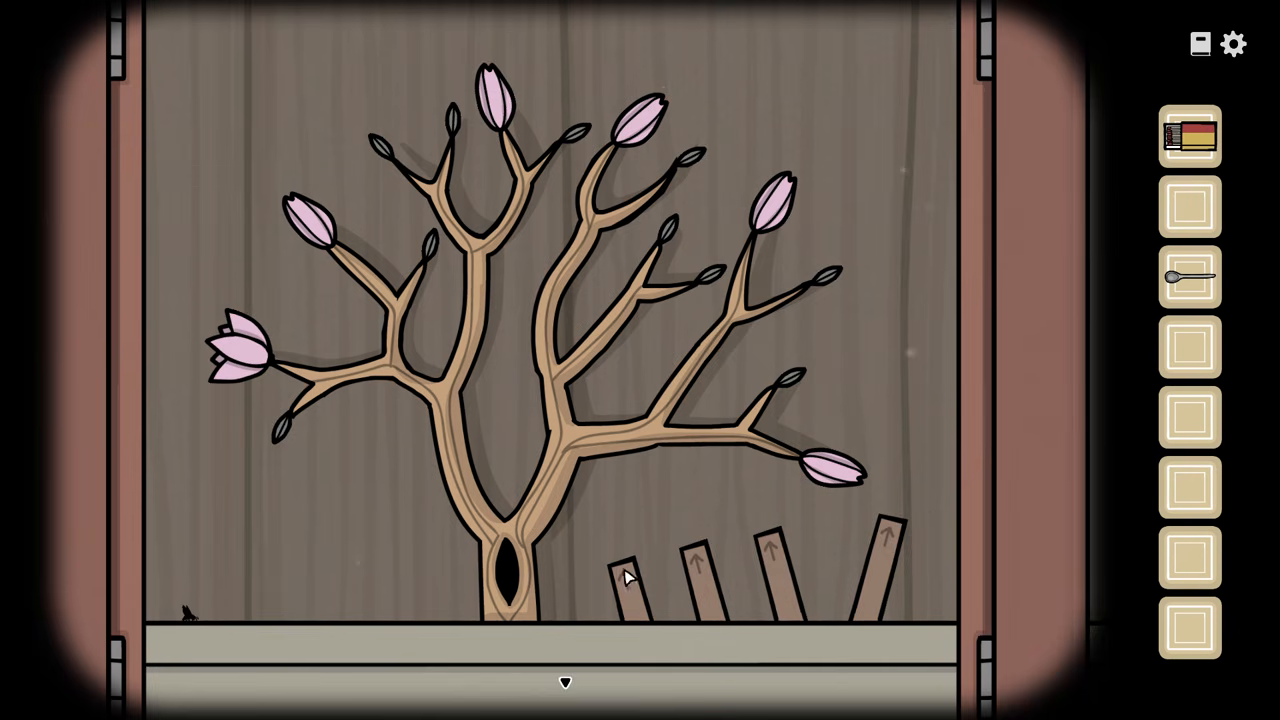
Fly-and-tree direction board๐Ÿ” Enlarge Clue
Day 1
Fly and tree directions
TASK // Opening the Reunion

Follow six directional routes to open the tree buds and collect fly eggs.

Day
Day 1
Location
Living Room cabinet tree
Prerequisites
Open the cabinet and inspect the directional sticks beside the tree.
โœ‰ Solution

Use LLLR, LLRL, LRRL, RLLL, RRLL and RRRR to reach the six buds.

Accepted: All buds open and the fly eggs can be collected.

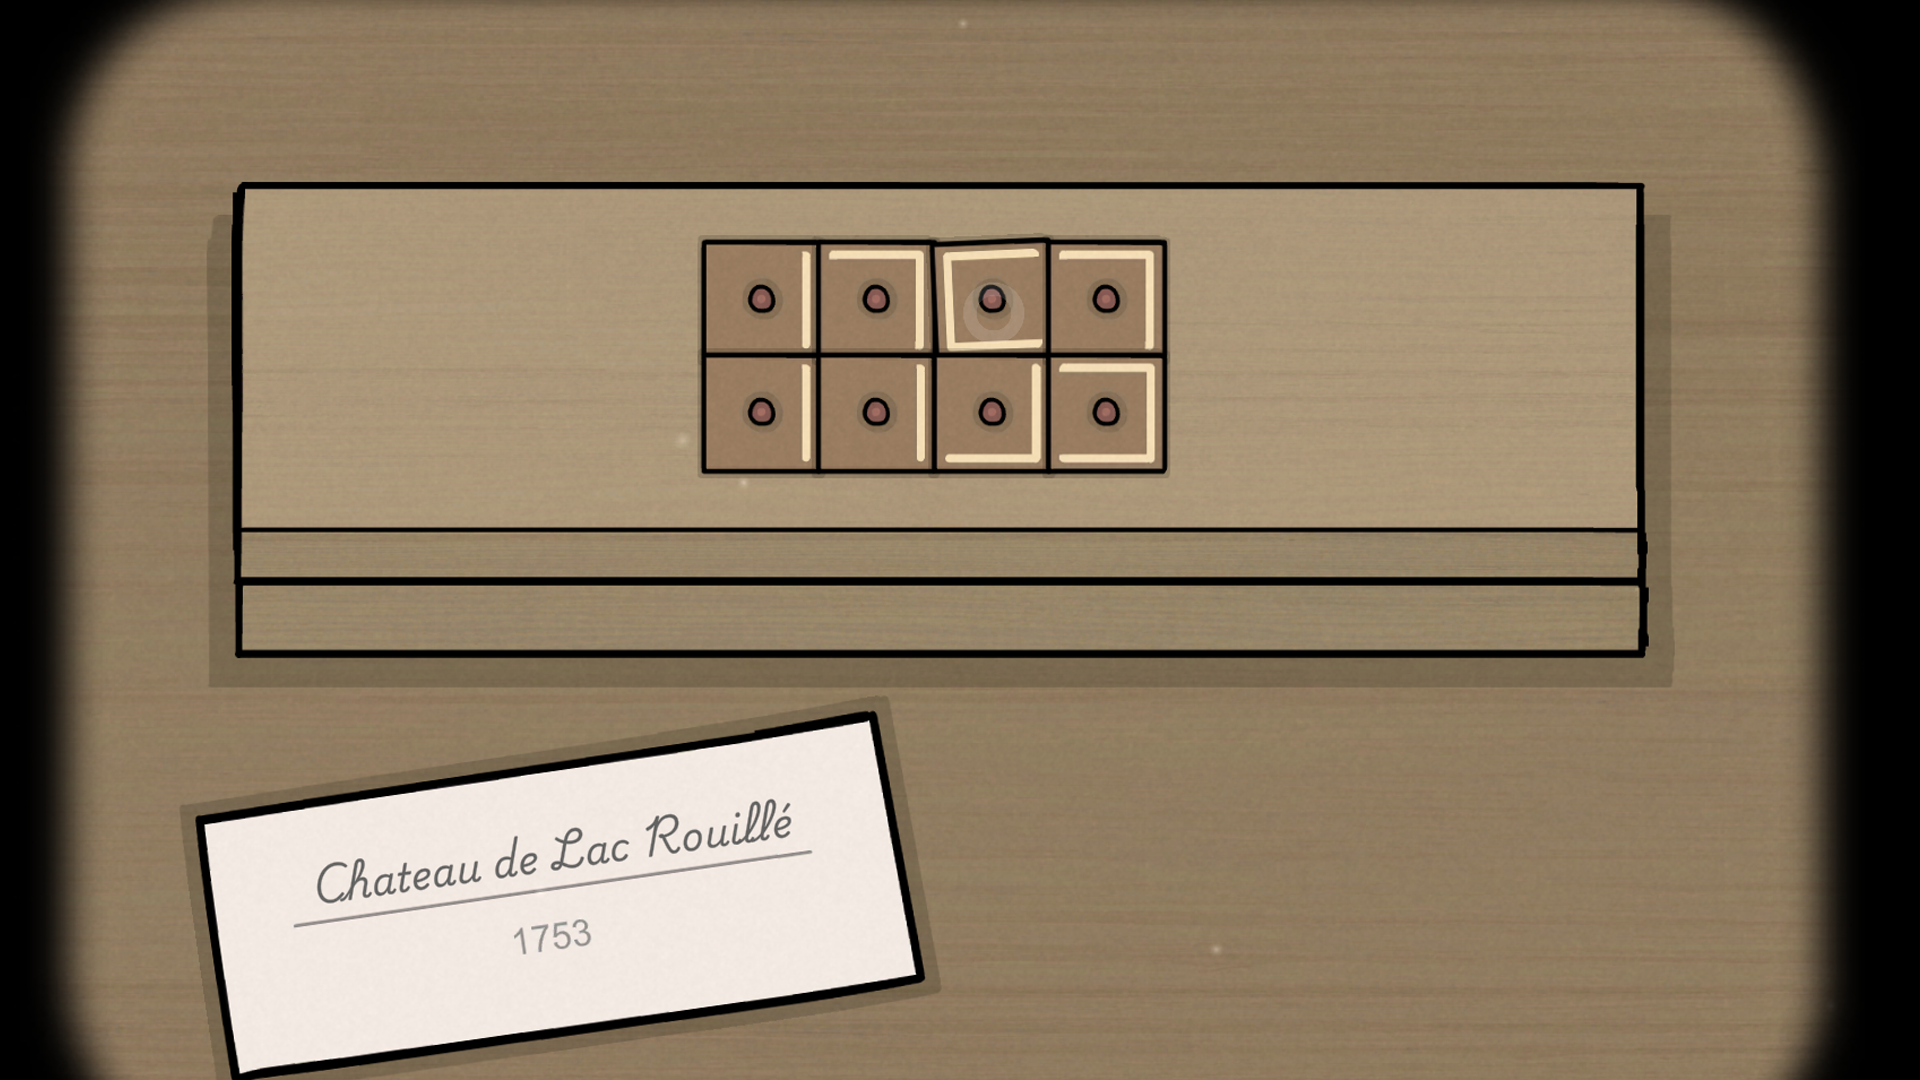
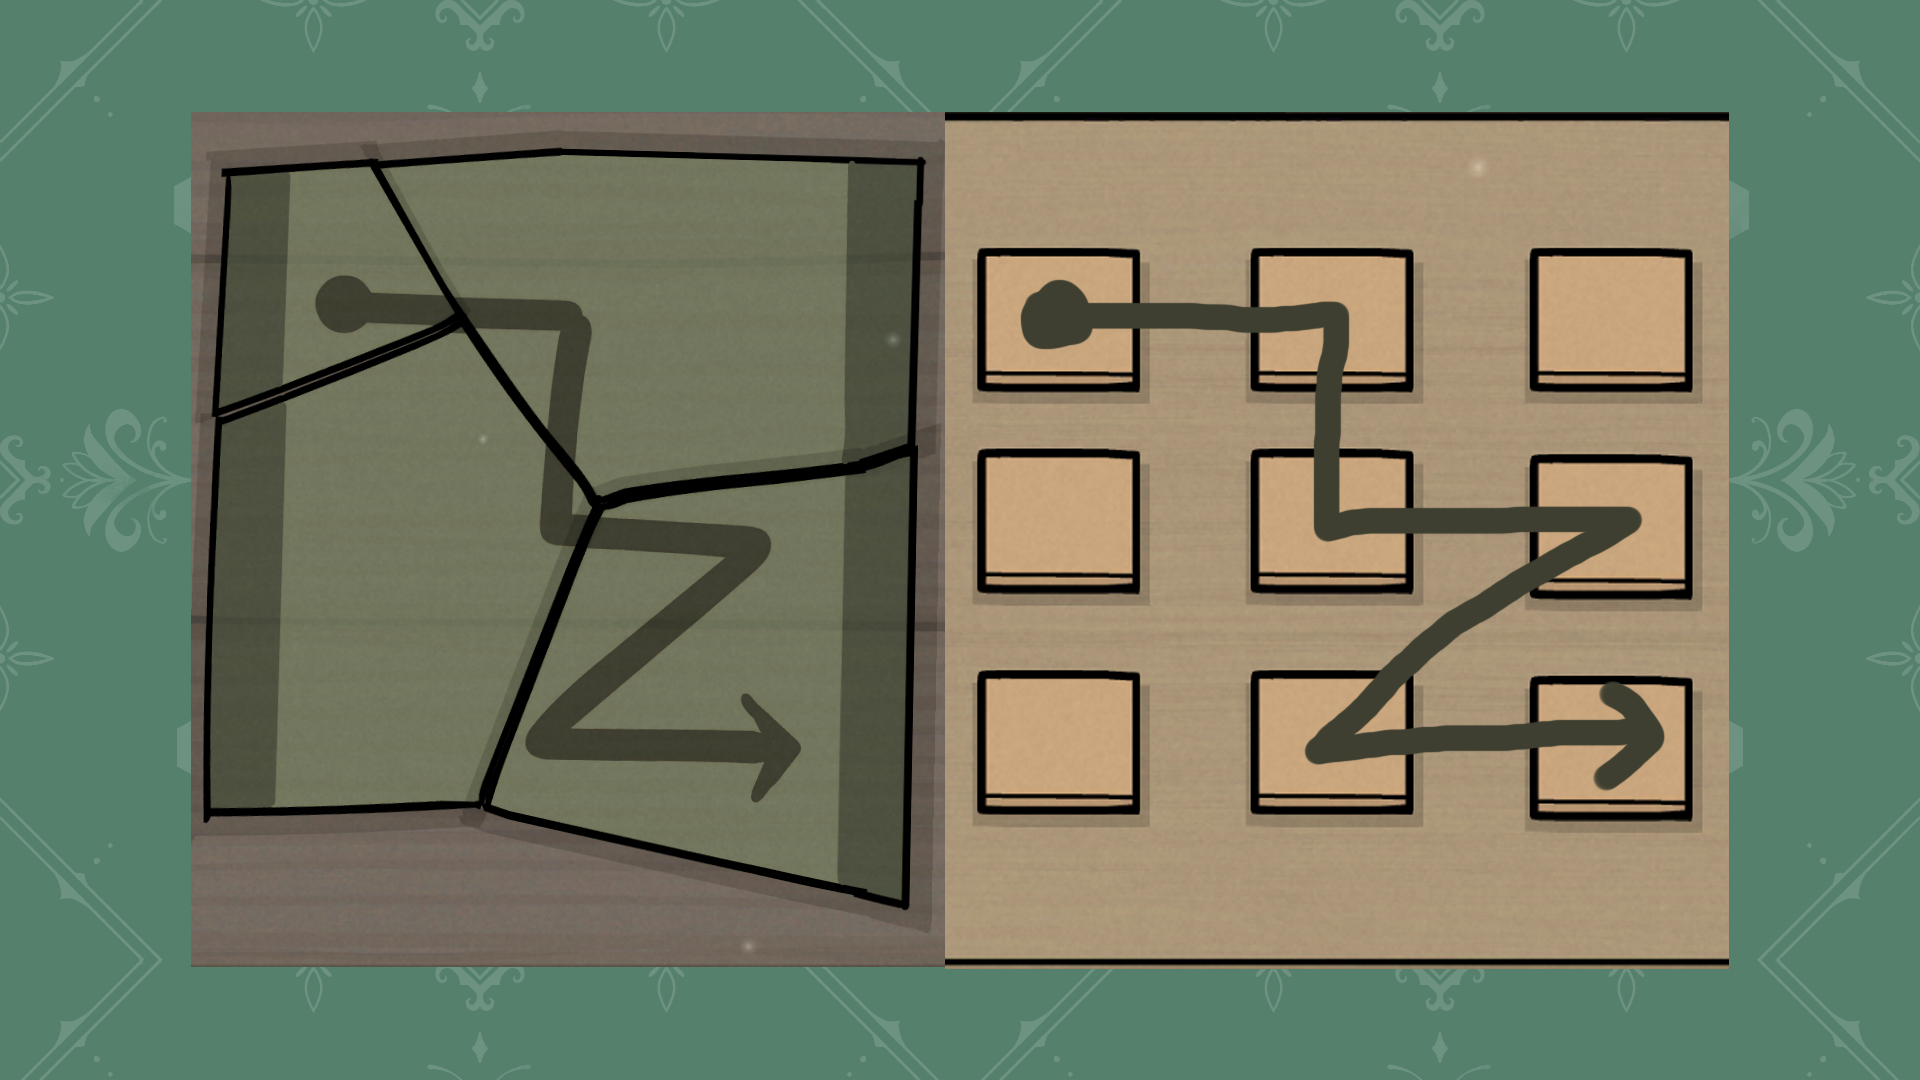
Reunion wine-box year 1753๐Ÿ” Enlarge Clue
Day 1
Reunion wine-box year
TASK // Opening the Reunion

Rearrange the reunion box segments to show the year on its note.

Day
Day 1
Location
Living Room upper cabinet box
Prerequisites
Inspect the wine note and its displayed year.
โœ‰ Solution

Rearrange the segments to show the clue's year; the independent illustrated route identifies 1753.

Accepted: The champagne bottle becomes available.

Bottle-shard and cigar-box pattern๐Ÿ” Enlarge Clue
Day 1
Broken-bottle cigar-box pattern
TASK // Opening the Reunion

Reconstruct William's bottle and transfer its revealed pattern to the cigar cabinet.

Day
Day 1
Location
Living Room broken bottle and lower cabinet
Prerequisites
Serve William his drink and reconstruct the resulting broken bottle.
โœ‰ Solution

Reassemble the bottle shards and copy their pattern to the box; the independently described buttons are 1, 2, 5, 6, 8, 9.

Accepted: The cigar box opens.

William's mouth-fire puzzle๐Ÿ” Enlarge Clue
Day 1
William's mouth fire
TASK // Opening the Reunion

Aim water with William's teeth to put out the flames in his mouth.

Day
Day 1
Location
Living Room William's mouth
Prerequisites
Give William the cigar and light it with matches.
โœ‰ Solution

Use the side teeth to aim and the middle tooth to release water, extinguishing every flame.

Accepted: The fire is extinguished and the spoon becomes available.

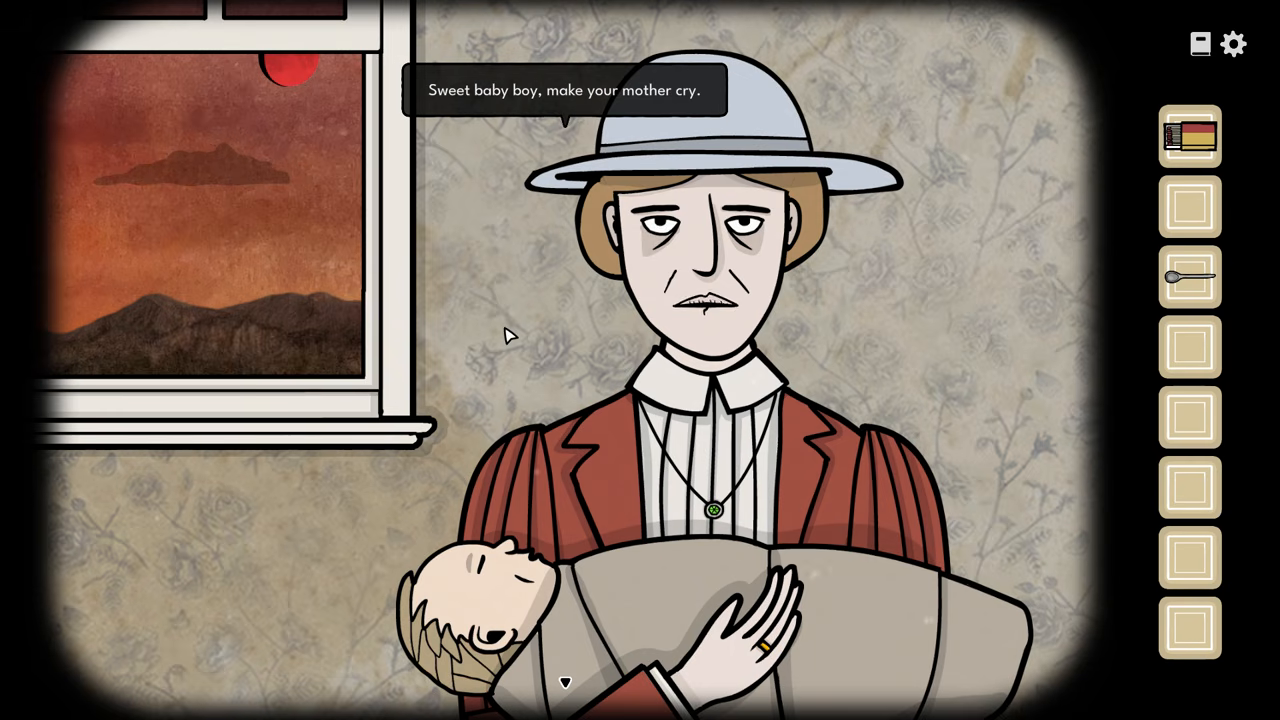
James held during the lullaby๐Ÿ” Enlarge Clue
Day 1
James's lullaby
TASK // Opening the Reunion

Respond to Alexandra's sung prompts to calm James during the reunion.

Day
Day 1
Location
Living Room Alexandra and James
Prerequisites
Serve the reunion food and start the speech; follow Alexandra's sung prompts.
โœ‰ Solution

Respond with James's eyes, moon, Alexandra's hand, ring, necklace, mouth, cloud and eyes.

Accepted: James calms down and the speech can continue.

William's changing gaze๐Ÿ” Enlarge Clue
Day 1
Waking William during the reunion
TASK // Opening the Reunion

Use William's current gaze to choose the reunion wake-up target.

Day
Day 1
Location
Living Room sleeping William
Prerequisites
Complete James's lullaby and resume Aldous's speech.
โœ‰ Solution

Watch William's gaze and click the matching tie, hat or ear. The sequence is randomized.

Accepted: William wakes and Aldous finishes the speech.

The Night Watch task-scene frame๐Ÿ” Enlarge Clue
Day 1
Night Watch anomalies
TASK // The Night Watch

Inspect the estate for anomalies and make three correct patrol responses.

Day
Day 1
Location
Estate hallways at night
Prerequisites
Listen to the maid's patrol instructions and inspect the rooms before responding.
โœ‰ Solution

Ring for shadow apparitions, missing pets, broken pictures or open doors; extinguish a candle when nothing is wrong. Complete three correct rounds.

Accepted: The maid accepts the patrol.

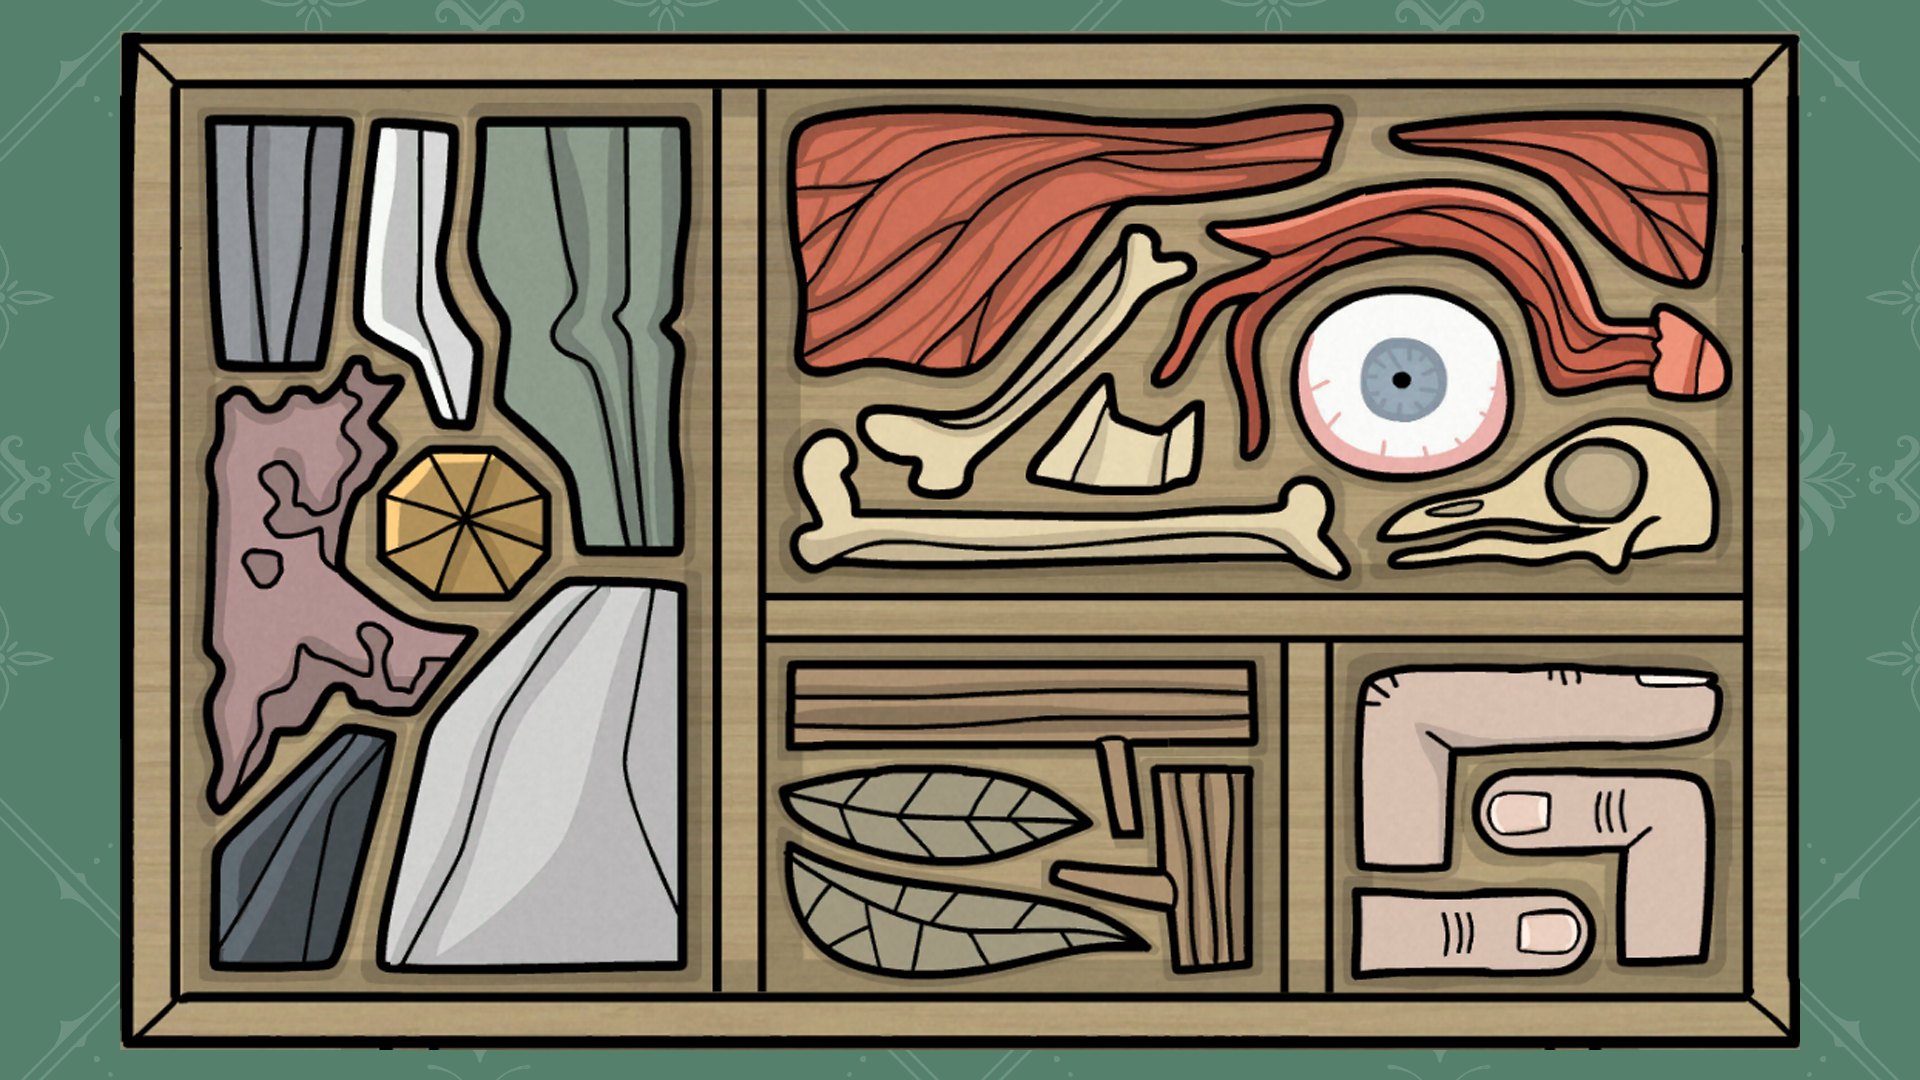
Accepted attic tray arrangement๐Ÿ” Enlarge Clue
Day 1
Attic sorting tray
TASK // Searching the Attic

Sort the attic objects by their compartment themes to obtain a candle.

Day
Day 1
Location
Attic sorting table
Prerequisites
Enter the attic using William's walking stick on the trapdoor.
โœ‰ Solution

Fit every object into its matching themed compartment; the retained image records the accepted tray arrangement.

Accepted: A drawer opens with a candle.

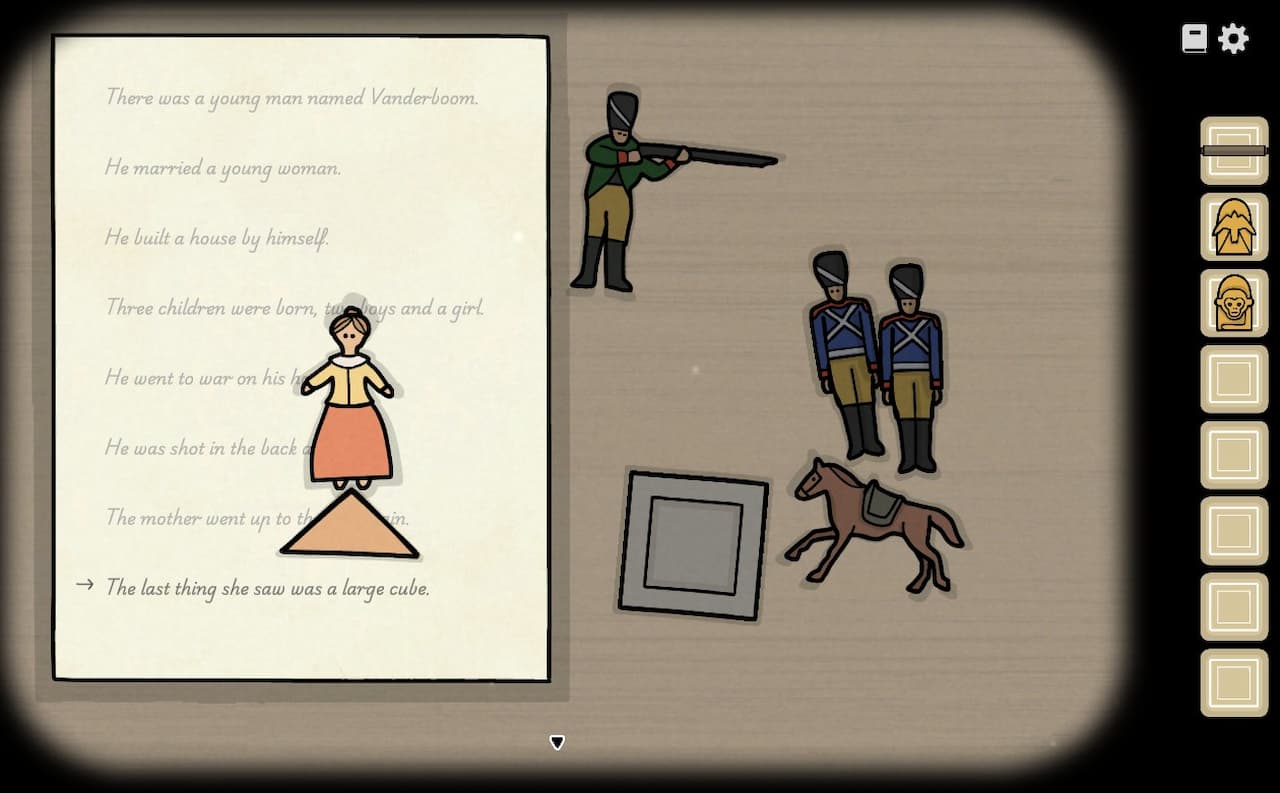
Attic story note and toys๐Ÿ” Enlarge Clue
Day 1
Attic Vanderboom story box
TASK // Searching the Attic

Act out the letter with the toy figures to reveal the attic's small key.

Day
Day 1
Location
Attic toy box
Prerequisites
Light the lantern, open the box and read its narrative note.
โœ‰ Solution

Stage the note's scenes with the soldier, woman, horse, rifleman, triangle and square in story order; the final square conceals a key.

Accepted: The small key becomes available.

Accepted main-story constellation box๐Ÿ” Enlarge Clue
Day 1
Attic constellation box
TASK // Searching the Attic

Reveal the outdoor star patterns and match them to the main-story attic symbols.

Day
Day 1
Location
Attic window and grey box
Prerequisites
Inspect the box's house, moon and water symbols; move the outdoor clouds.
โœ‰ Solution

House: the five-star pattern; red moon: the triangle; black lake: the six-star pattern. Set the three box patterns under their matching symbols.

Accepted: The last small statue becomes available.

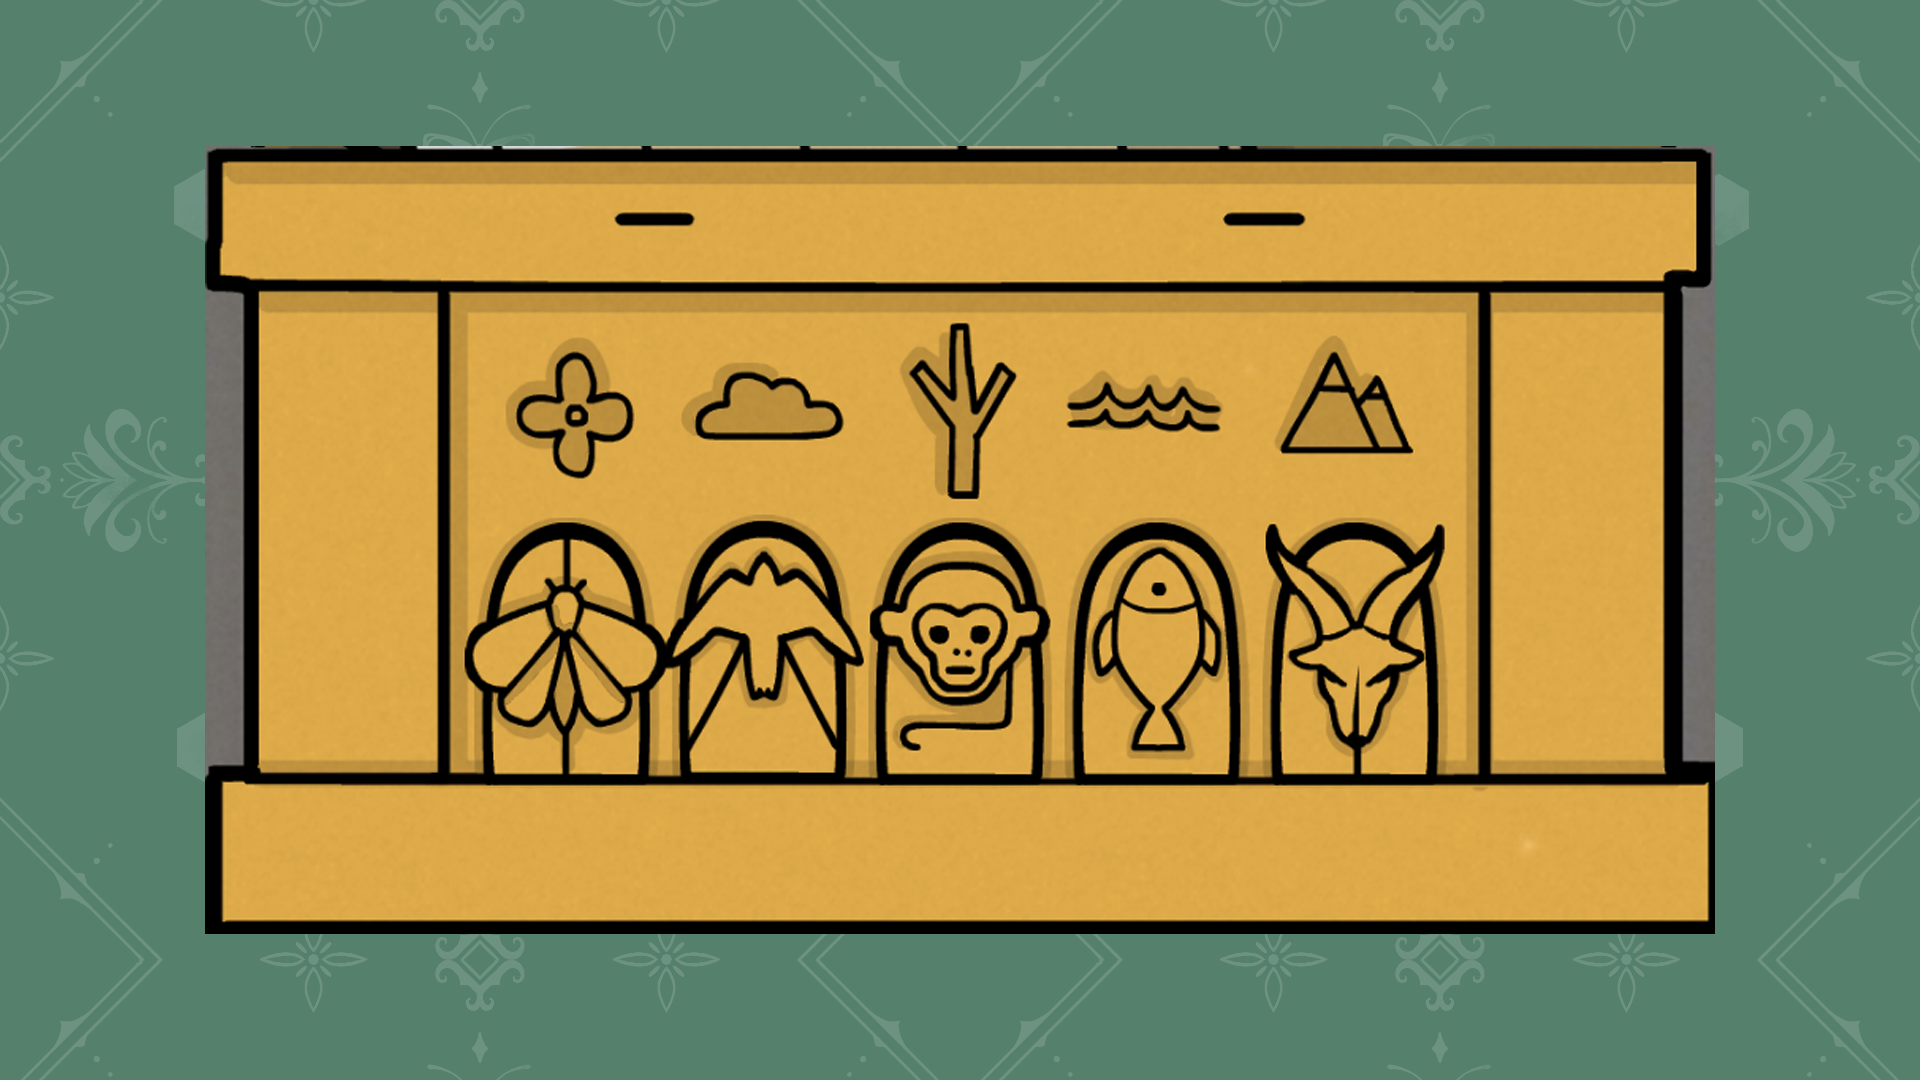
Accepted animal-statue habitats๐Ÿ” Enlarge Clue
Day 1
Attic animal-statue box
TASK // Searching the Attic

Place five animal statues in their habitats to recover the scroll and ladder rung.

Day
Day 1
Location
Attic golden box
Prerequisites
Collect the butterfly, bird, monkey, fish and goat statues from the room's preceding puzzles and containers.
โœ‰ Solution

Match butterfly to flower, bird to cloud, monkey to tree, fish to water and goat to mountain. All five placements are shown in the actual completed image.

Accepted: The box provides the scroll and second ladder rung.

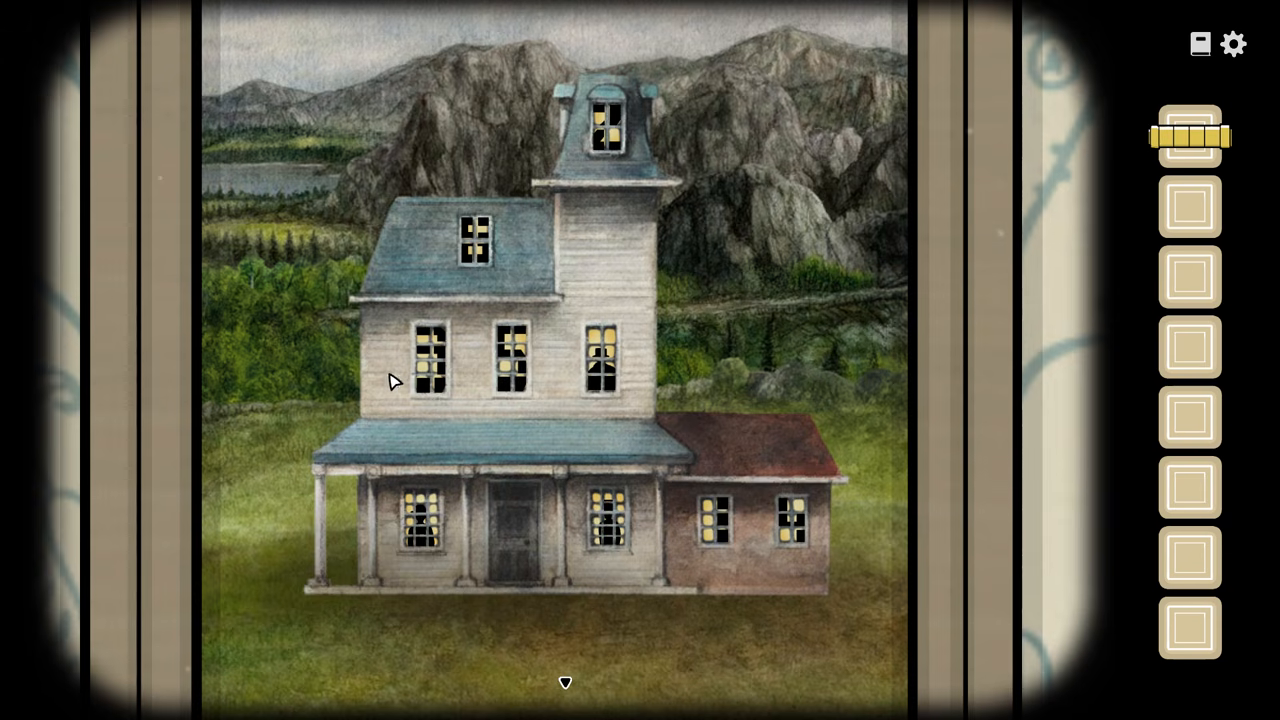
Preparing Coffee task-scene frame๐Ÿ” Enlarge Clue
Day 2
Coffee bean-box code
TASK // Preparing Coffee

Use the illuminated house and portrait directions to open the coffee-bean box.

Day
Day 2
Location
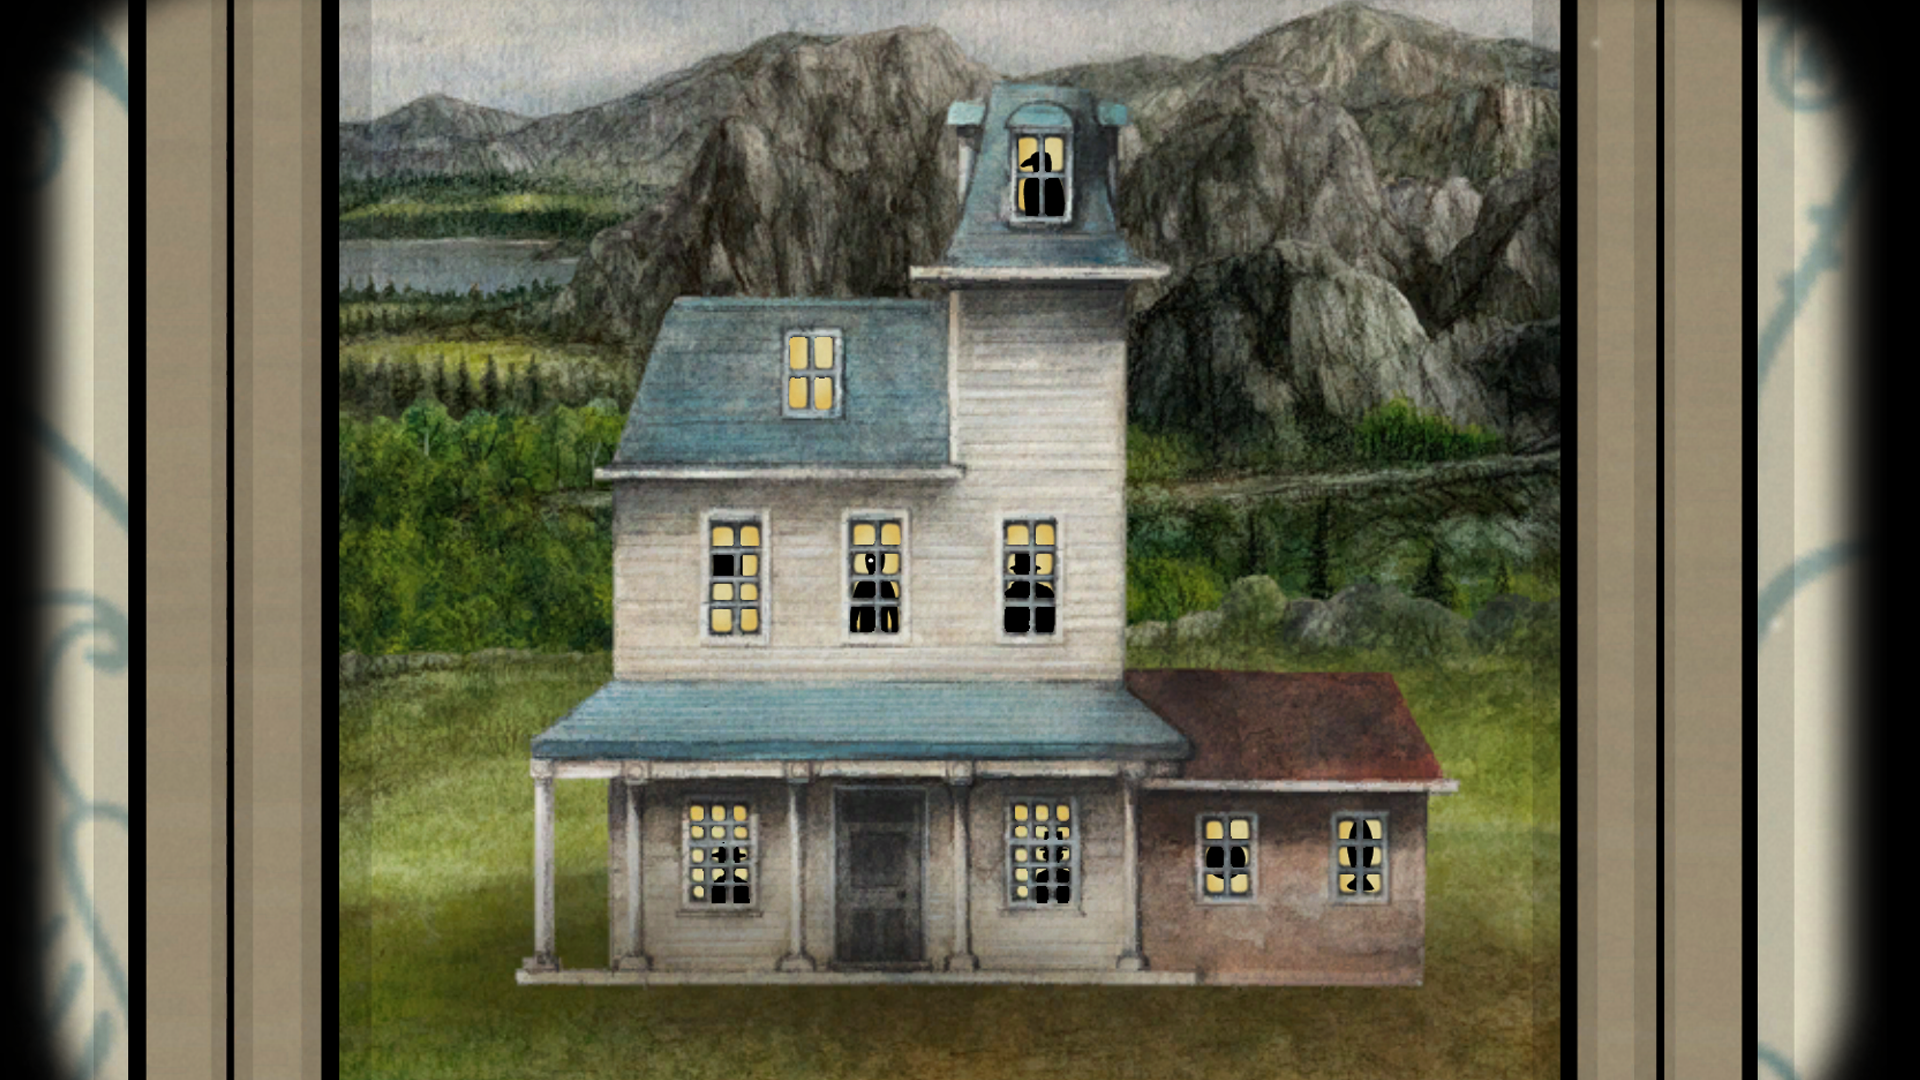
Hallway house painting and Servant's Room box
Prerequisites
Light all windows in the house painting and read the siblings' pointing directions.
โœ‰ Solution

Light the house painting's windows and compare the portrait pointing directions; use 315.

Accepted: Coffee beans become available.

William's family portrait clue๐Ÿ” Enlarge Clue
Day 2
William's grandfather clock
TASK // Waking up William

Find the wardrobe pocket watch and set William's grandfather clock.

Day
Day 2
Location
William's Guest Room clock
Prerequisites
Inspect the pocket watch hidden among the wardrobe clothes.
โœ‰ Solution

Inspect the wardrobe's pocket watch and set the clock to nine o'clock.

Accepted: The clock's lower puzzle can be accessed.

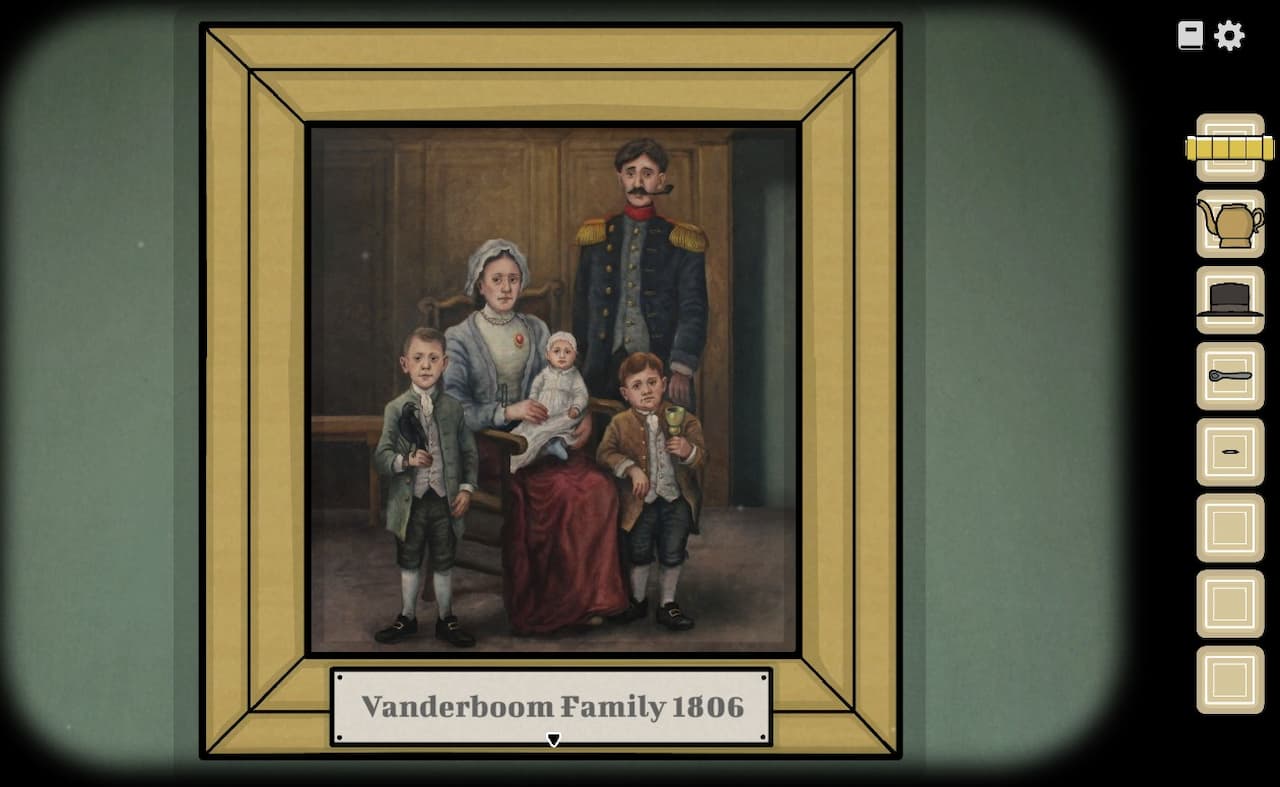
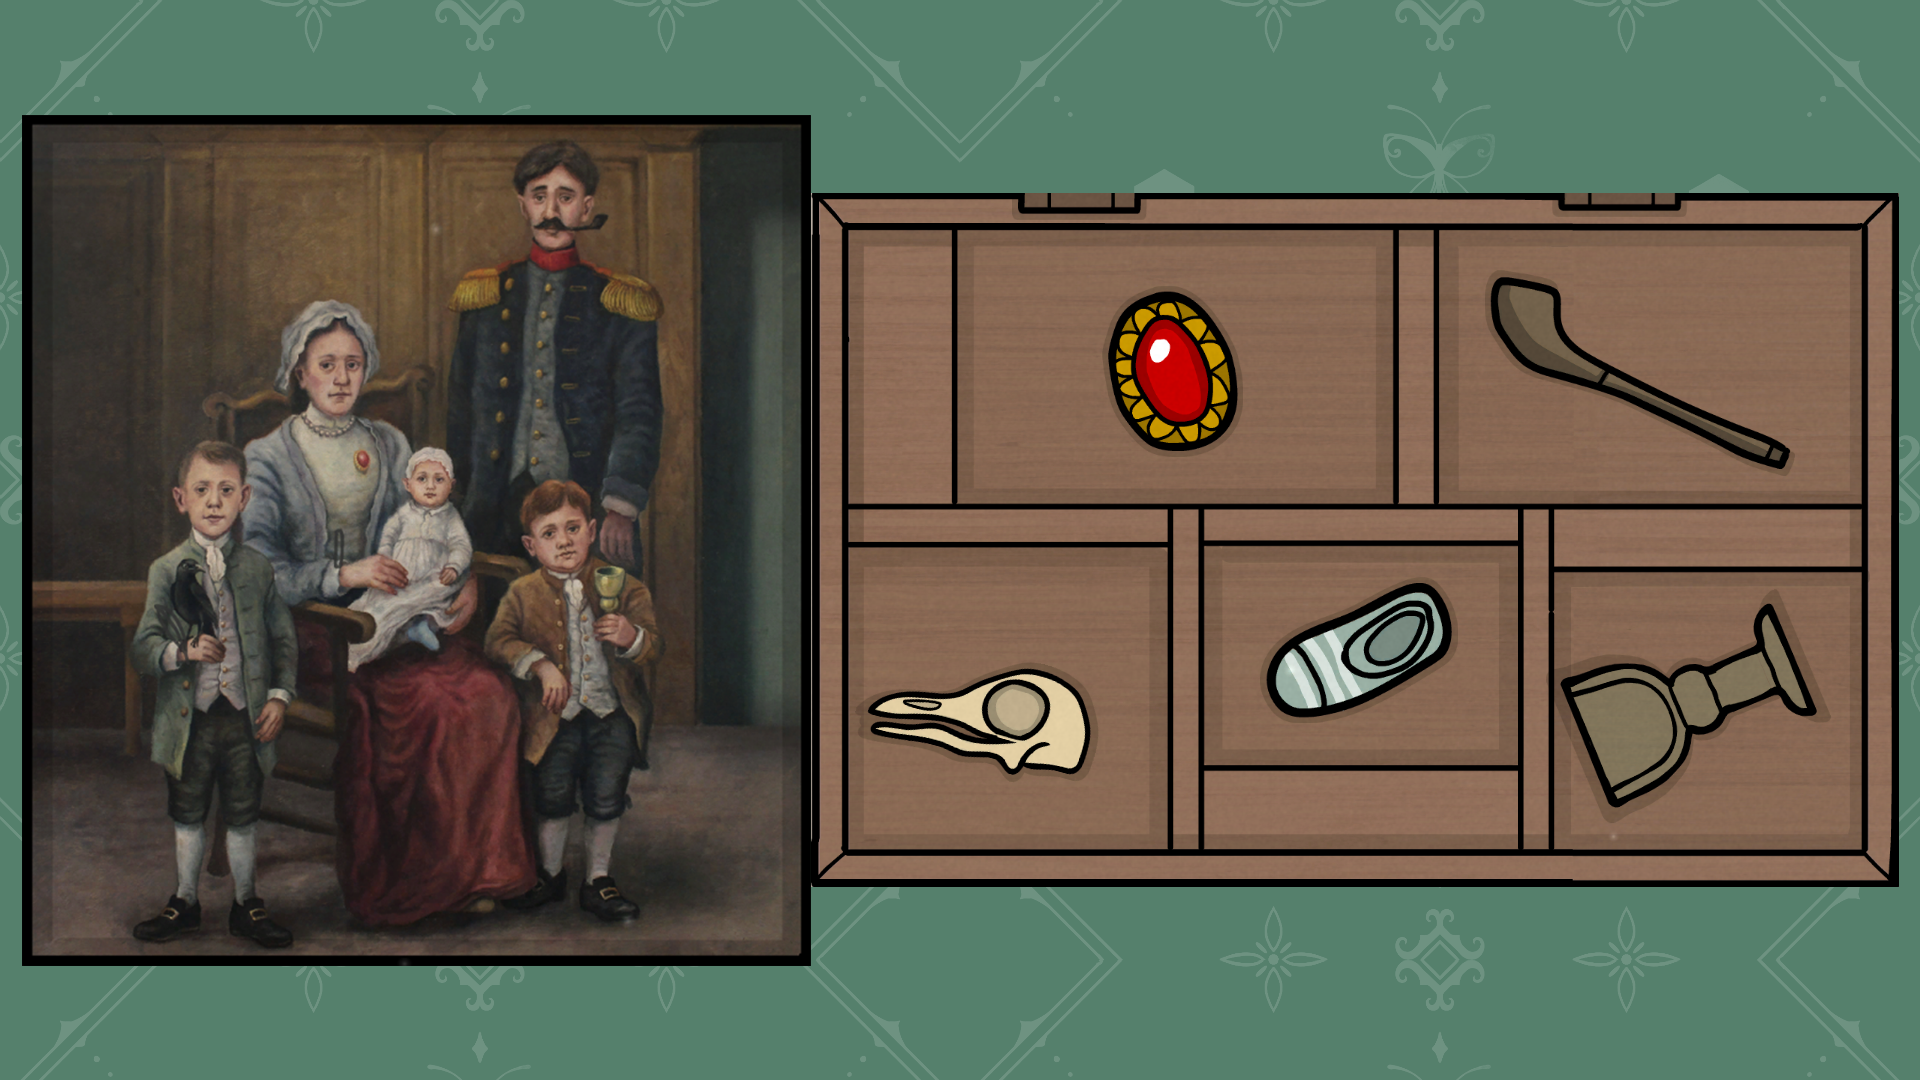
Family portrait and clock-box placements๐Ÿ” Enlarge Clue
Day 2
Family portrait clock-box arrangement
TASK // Waking up William

Match the portrait objects to the lower clock-box positions to obtain the chalice.

Day
Day 2
Location
William's Guest Room lower clock box
Prerequisites
Open the clock at nine o'clock and inspect the family portrait.
โœ‰ Solution

Top-left brooch, top-right pipe, bottom-left bird, middle stone, bottom-right chalice, following the family portrait.

Accepted: The cup can be collected.

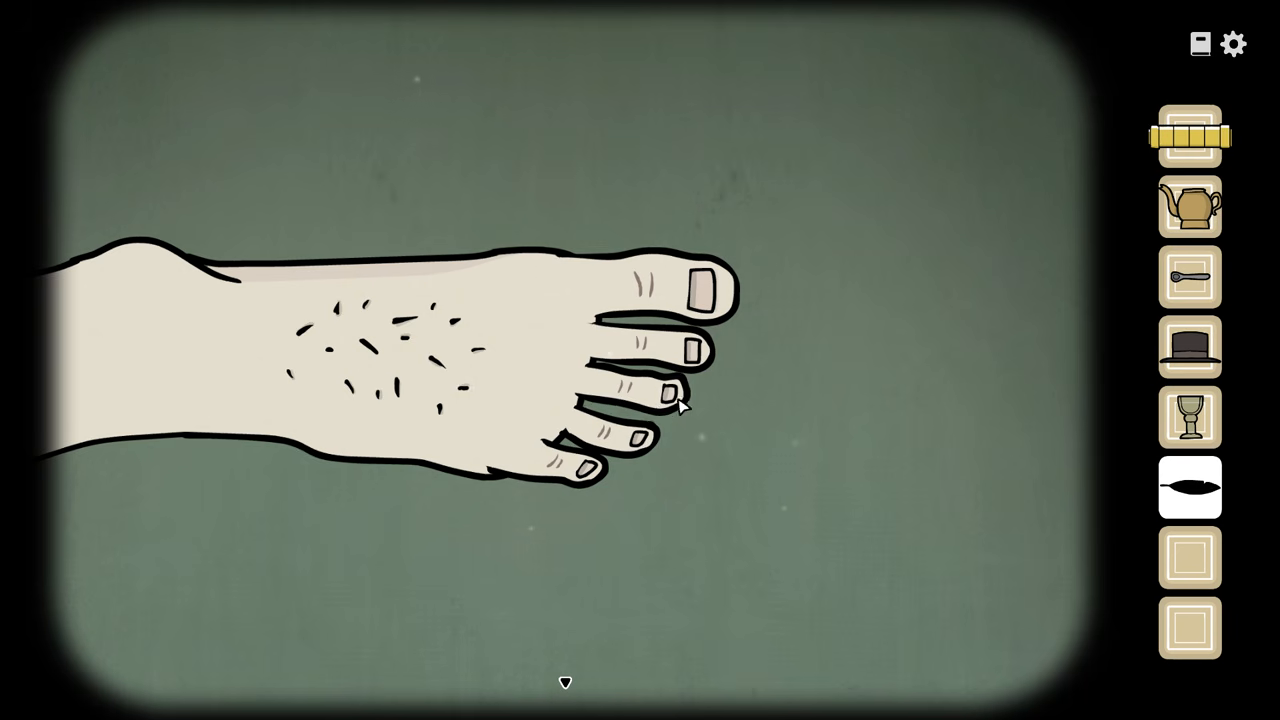
William's toe interaction๐Ÿ” Enlarge Clue
Day 2
William's toe-tickling sequence
TASK // Waking up William

Read William's toe twitch direction and count to expose the small key.

Day
Day 2
Location
William's Guest Room bed
Prerequisites
Collect the cup and seed, water the plant and feed birdseed to the parrot for a feather.
โœ‰ Solution

Tickle a toe with the feather and use its twitch count plus direction to select the next toe; follow the actual response rather than a fixed sequence.

Accepted: William moves his foot and exposes the small key.

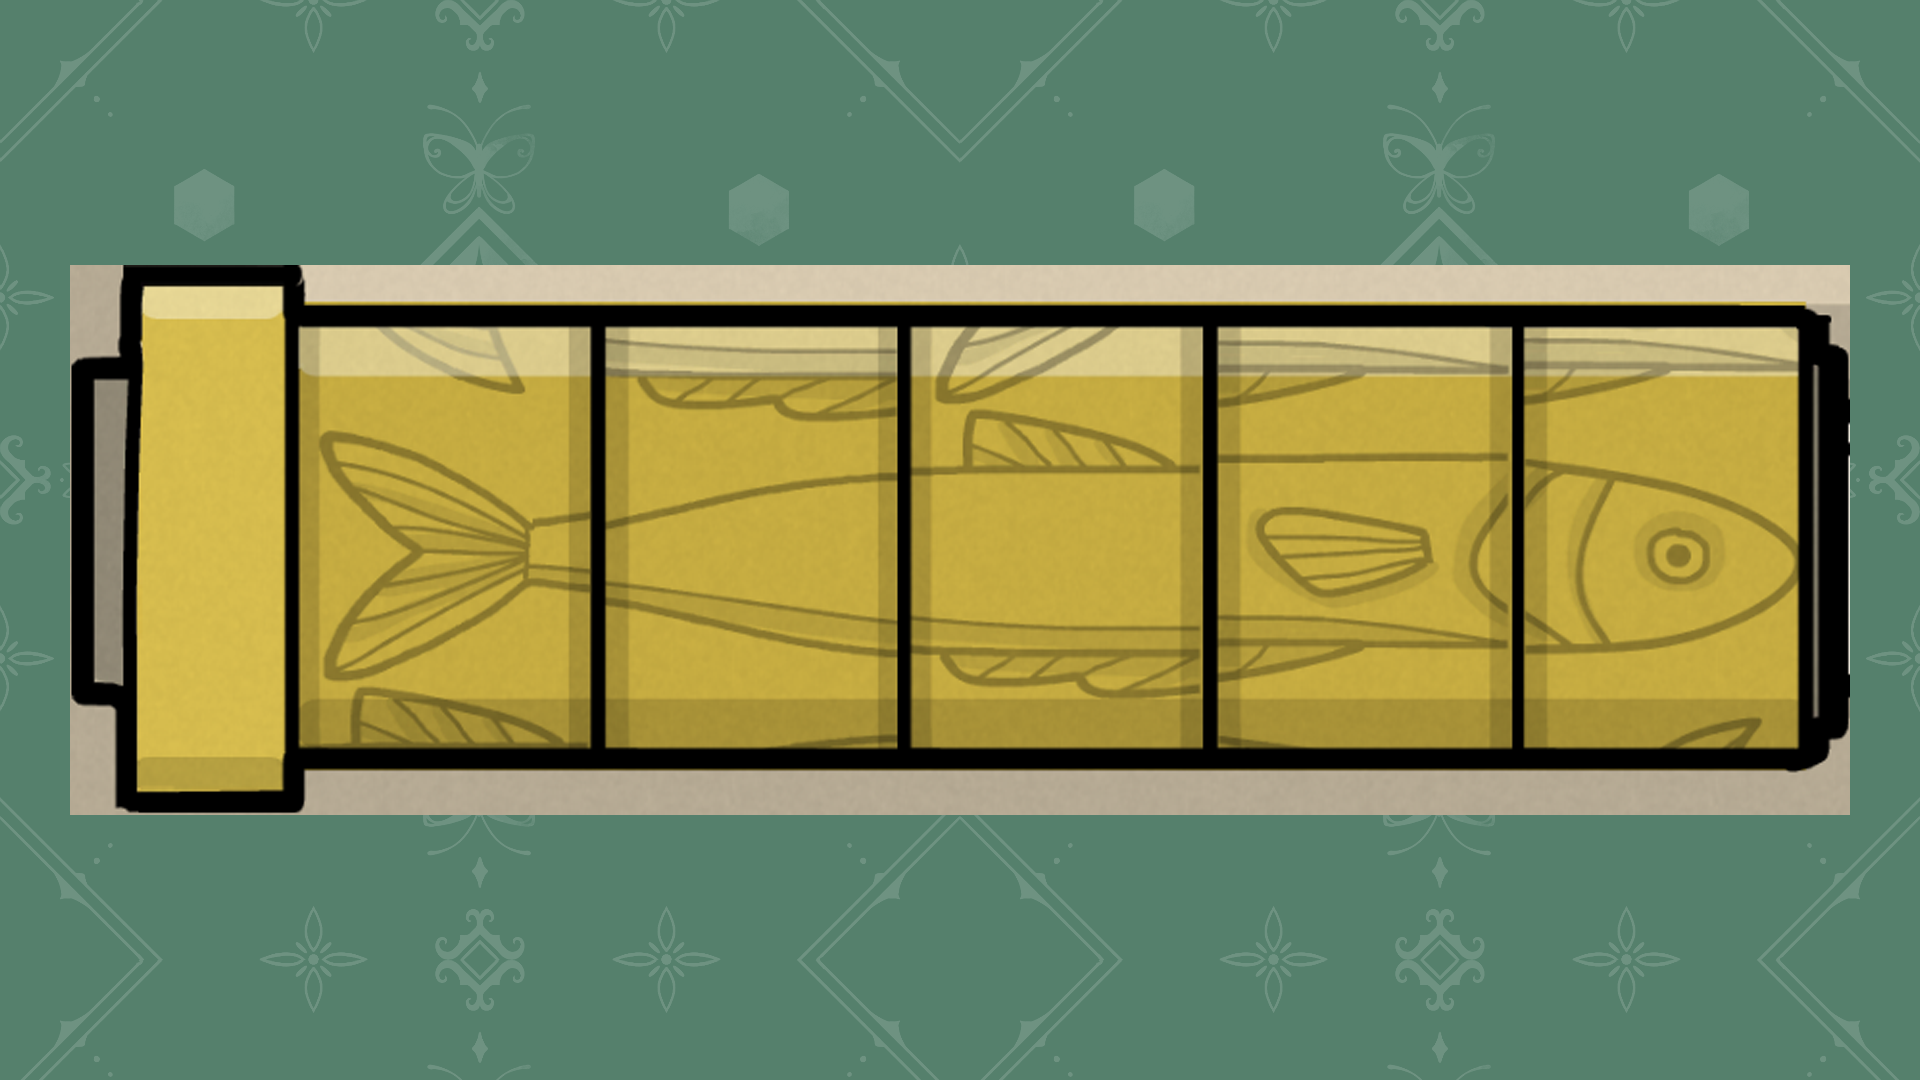
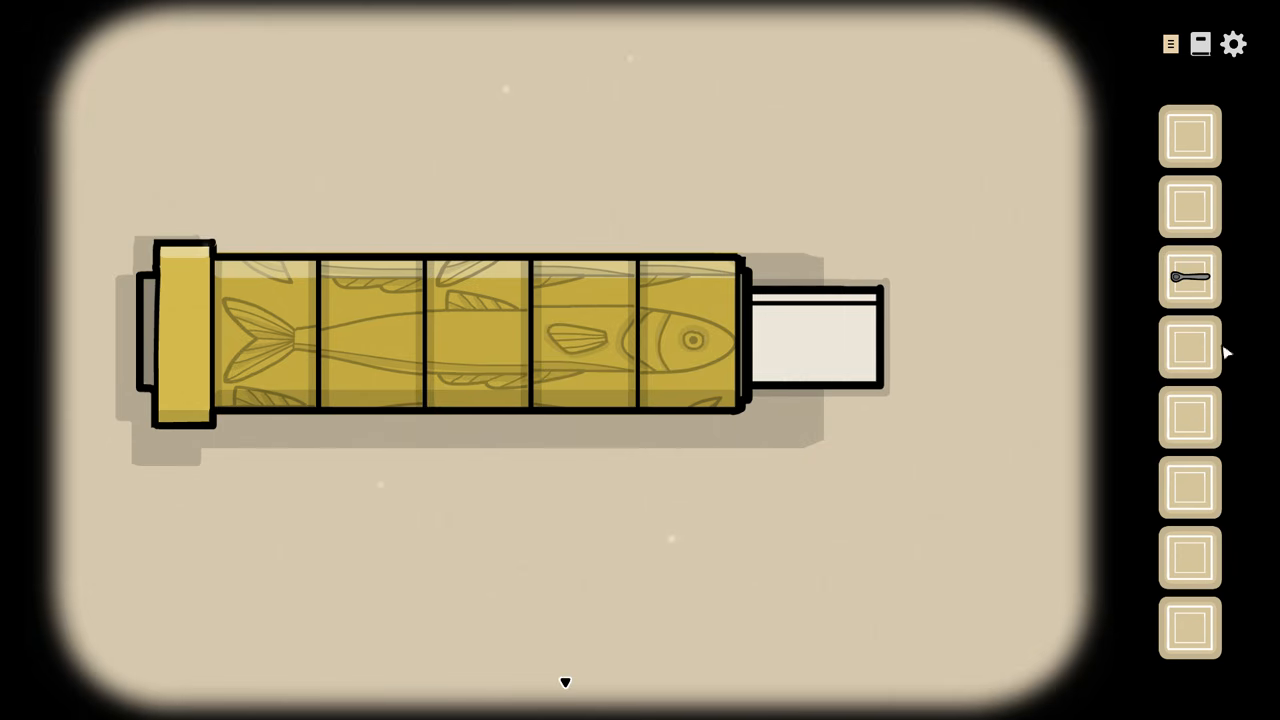
Completed rotating fish scroll๐Ÿ” Enlarge Clue
Day 2
William's rotating fish scroll
TASK // Waking up William

Rotate the scroll rings into a continuous fish to reveal William's story.

Day
Day 2
Location
William's Guest Room table
Prerequisites
Wake William, provide hat and egg, then place the scroll on the table.
โœ‰ Solution

Rotate the scroll rings to complete the fish shape.

Accepted: The scroll's illustrated story opens.

William's opened fish scroll๐Ÿ” Enlarge Clue
Day 2
William's scroll story order
TASK // Waking up William

Select the opened scroll's story pictures in narrative order.

Day
Day 2
Location
William's Guest Room opened scroll
Prerequisites
Complete the scroll's rotating fish rings and read the narrative.
โœ‰ Solution

Point to house, cave, door, timepieces, book, elixir and enlightenment in story order.

Accepted: William accepts the story and finishes the task conversation.

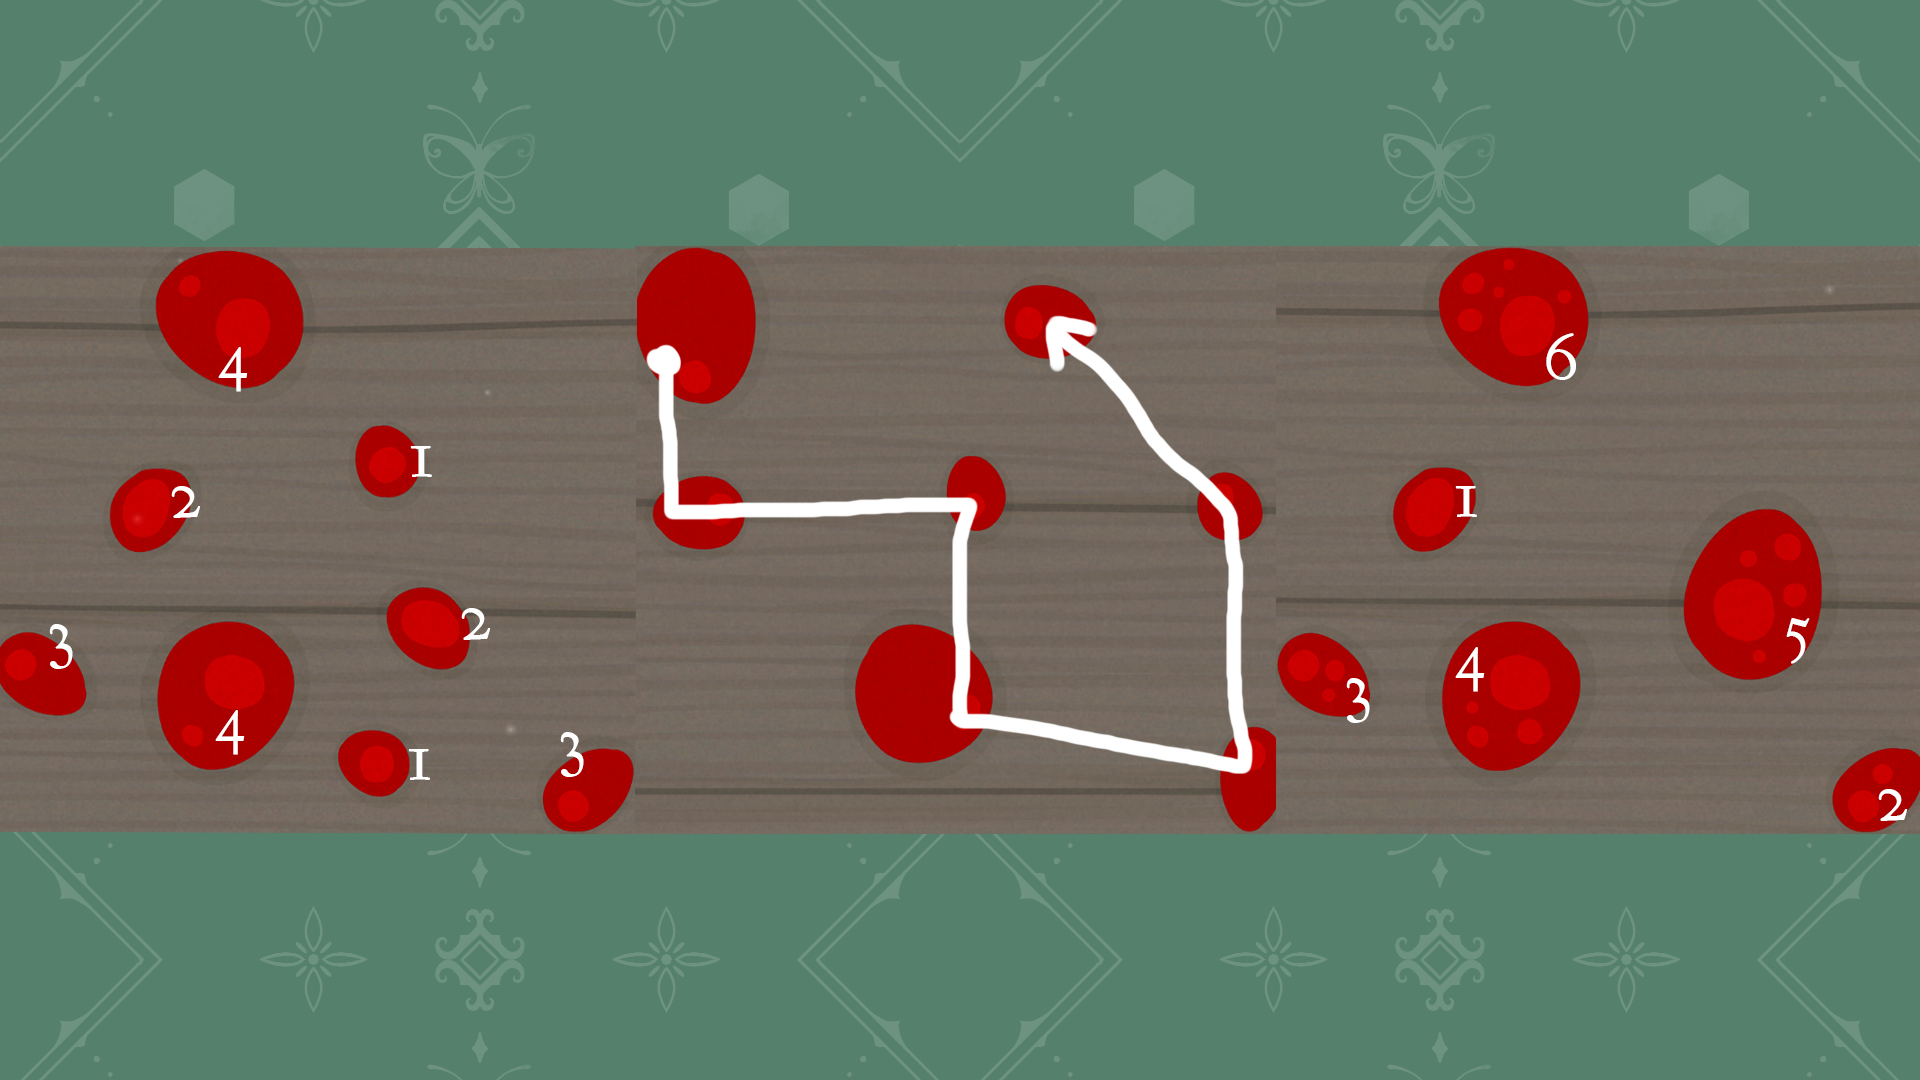
Three annotated bloodstain rules๐Ÿ” Enlarge Clue
Day 2
Bathroom-hall bloodstain directions
TASK // Cleaning the Floors

Follow the directional marks to clean the bathroom-hall stain.

Day
Day 2
Location
Bathroom hallway floor
Prerequisites
Collect the scrubber from the maid's bag and identify the directional stain.
โœ‰ Solution

Start with the directed stain and follow the direction indicated by the marks rather than stain size.

Accepted: The bathroom-hall stain clears.

Three annotated bloodstain rules๐Ÿ” Enlarge Clue
Day 2
Bloodstain circle-count order
TASK // Cleaning the Floors

Use the circles inside the stain to determine its cleaning order.

Day
Day 2
Location
Hallway floor near the maid
Prerequisites
Collect the scrubber and inspect circles inside the stain.
โœ‰ Solution

Clean in ascending order of the circles inside each stain.

Accepted: The circle-count stain clears.

Three annotated bloodstain rules๐Ÿ” Enlarge Clue
Day 2
Servant-room bloodstain pairs
TASK // Cleaning the Floors

Match the equal markings in the Servant's Room stain to clear its pairs.

Day
Day 2
Location
Servant's Room floor
Prerequisites
Collect the scrubber and identify the paired-mark stain.
โœ‰ Solution

Scrub the equal-marked pairs, progressing through the annotated 1, 2, 3 and 4 pairs; the retained current official image gives the matching positions.

Accepted: The servant-room stain clears.

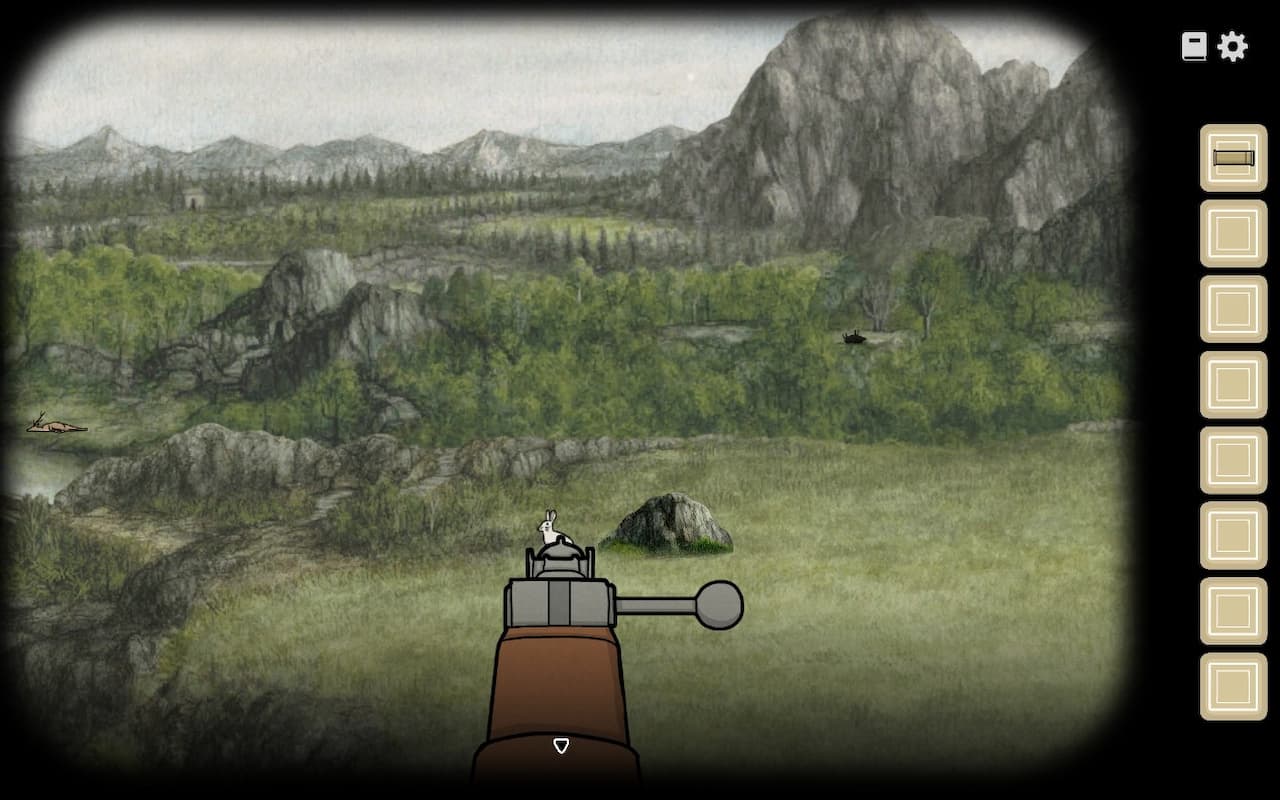
Hunting target scene๐Ÿ” Enlarge Clue
Day 2
Hunting target prerequisites
TASK // Going Hunting

Read the hunting note and reveal each eligible target before firing.

Day
Day 2
Location
Hunting ground rifle view
Prerequisites
Receive the rifle from Aldous, take bullets and read the target-location note.
โœ‰ Solution

Locate animals using the hunting note; boar and rabbit require revealing their hiding areas, and deer availability follows William's two appearances.

Accepted: Aldous returns with the hunt's meat.

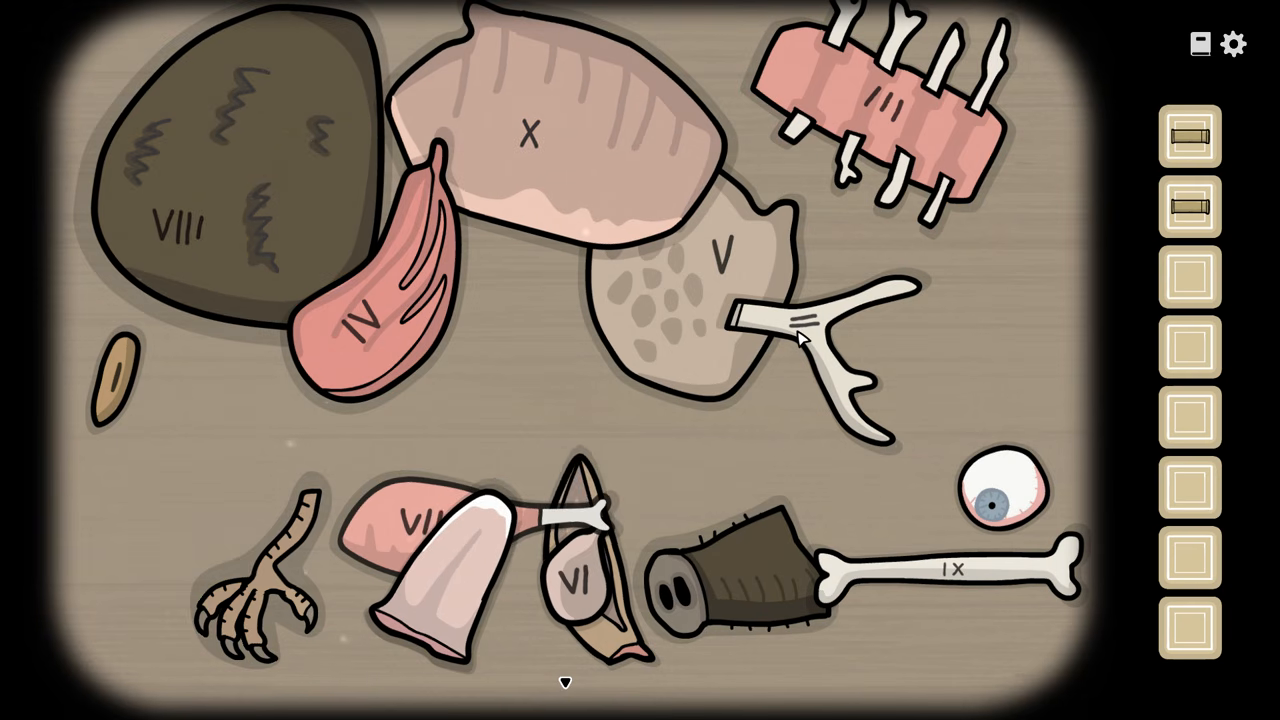
Five-senses hunting note and animal parts๐Ÿ” Enlarge Clue
Day 2
Five-senses shed code
TASK // Going Hunting

Translate the hunting senses note into the shed's five-digit lock code.

Day
Day 2
Location
Hunting ground meat table and shed
Prerequisites
Finish hunting so Aldous returns with the animal parts; inspect the senses note.
โœ‰ Solution

Read sight, smell, touch, taste and hearing as 9, 1, 2, 7, 6; use 91276.

Accepted: The shed opens.

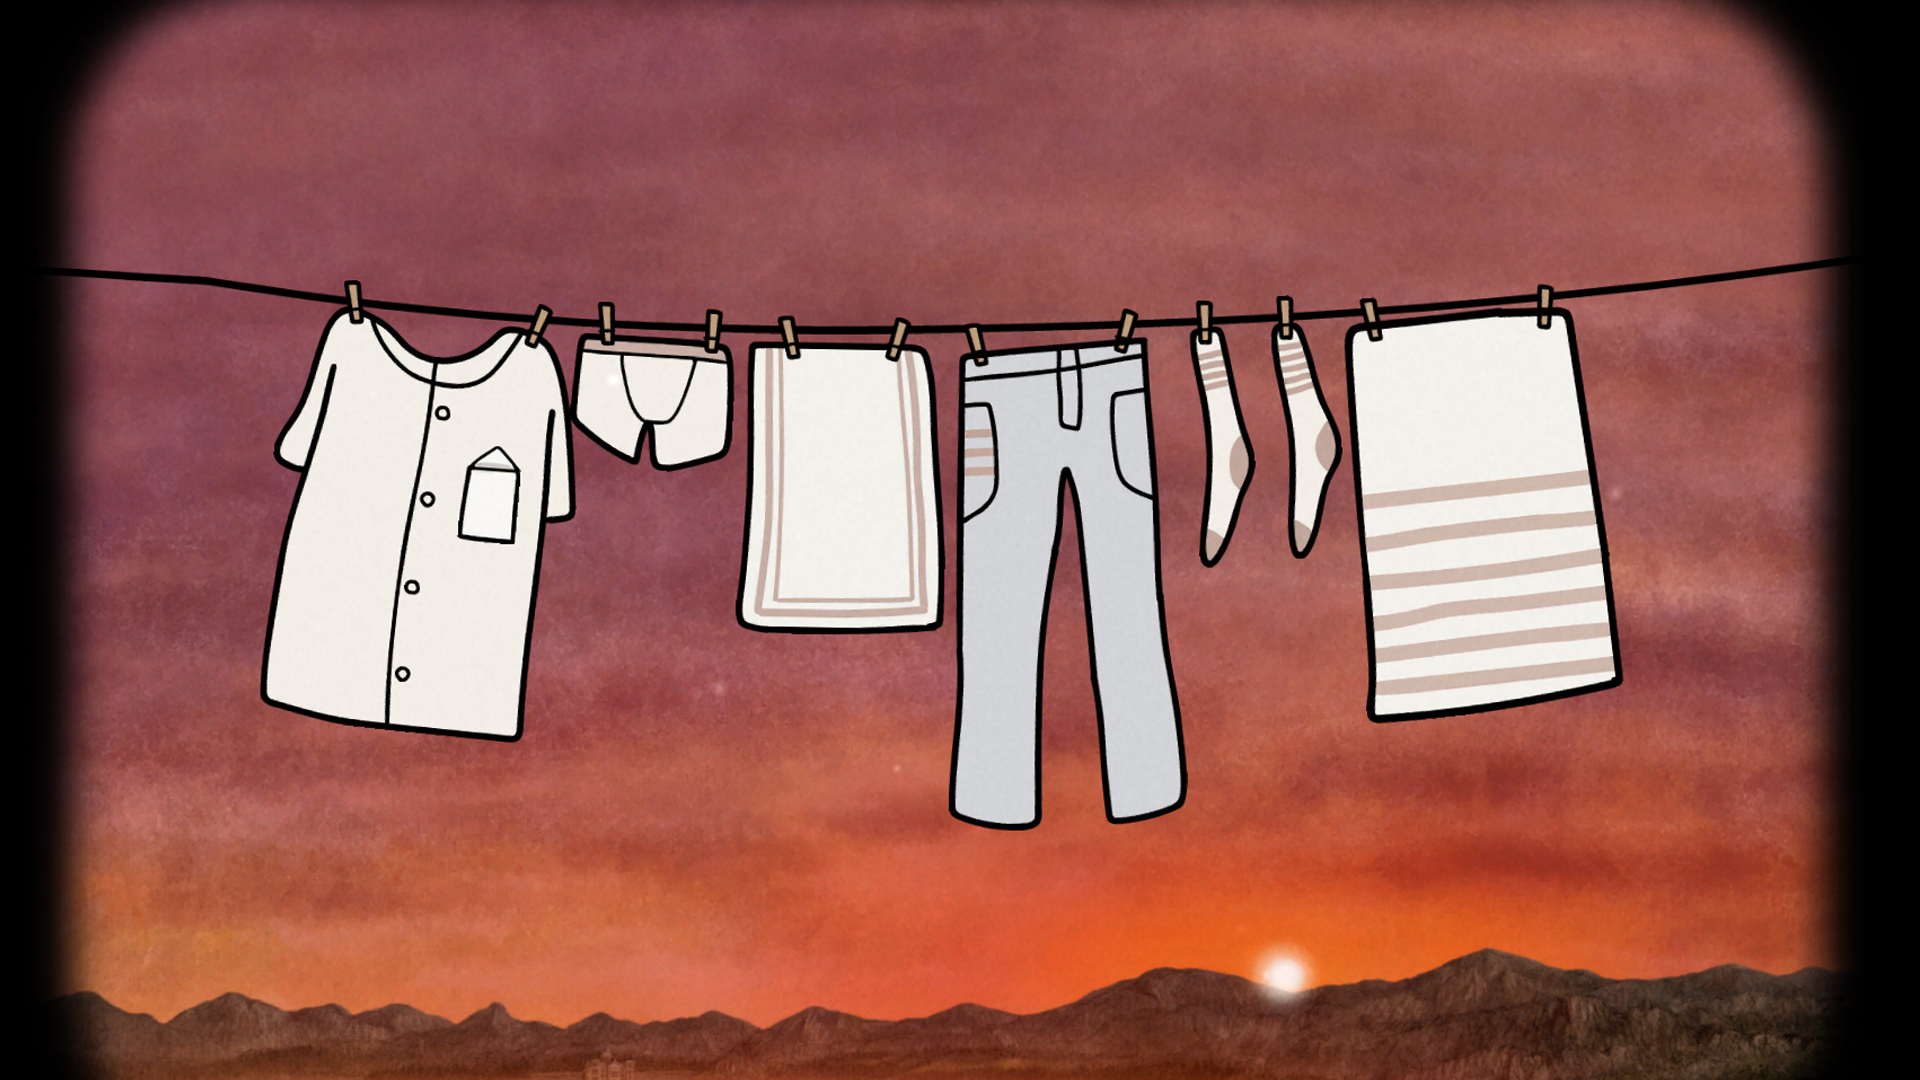
Accepted laundry stripe order๐Ÿ” Enlarge Clue
Day 2
Laundry-line order
TASK // Doing the Washing

Arrange the washed clothing by red-stripe counts and recover the bathroom key.

Day
Day 2
Location
Balcony clothes line
Prerequisites
Collect all dirty garments, exchange James for the diaper with Kate, and wash them in the tub.
โœ‰ Solution

Arrange the clothes by their red-stripe counts, then inspect the shirt for the key.

Accepted: The bathroom key becomes available.

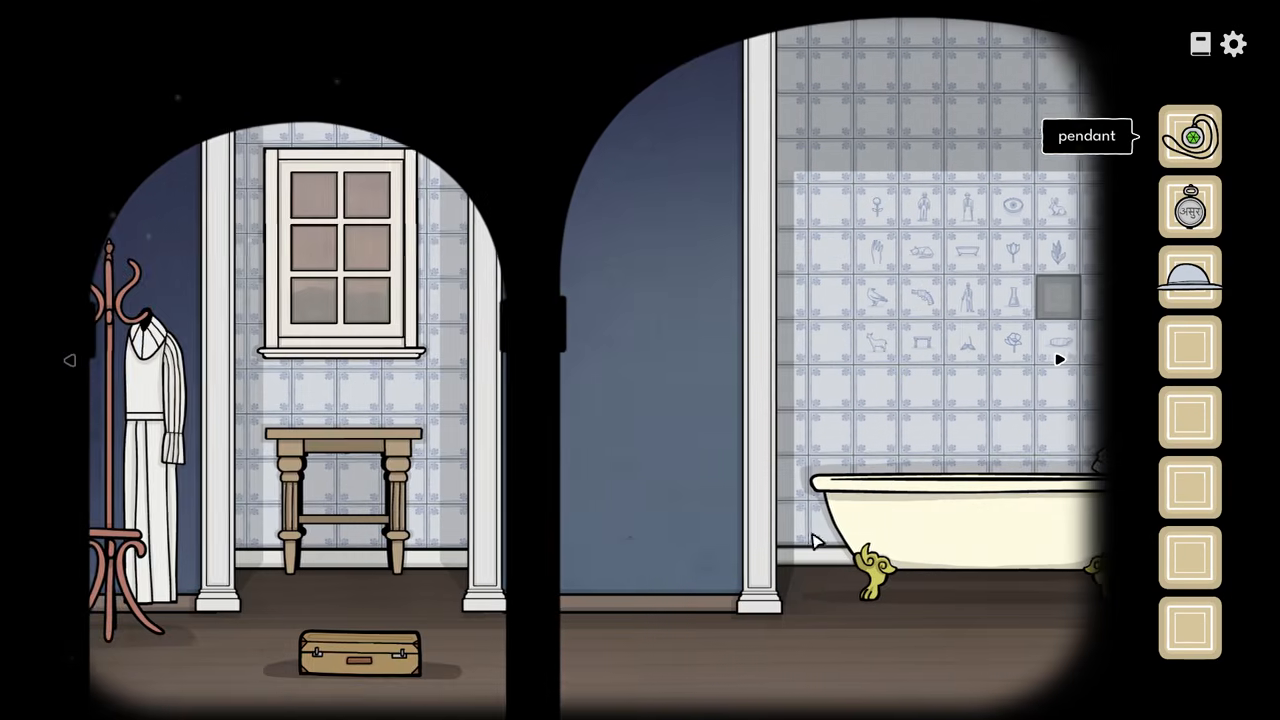
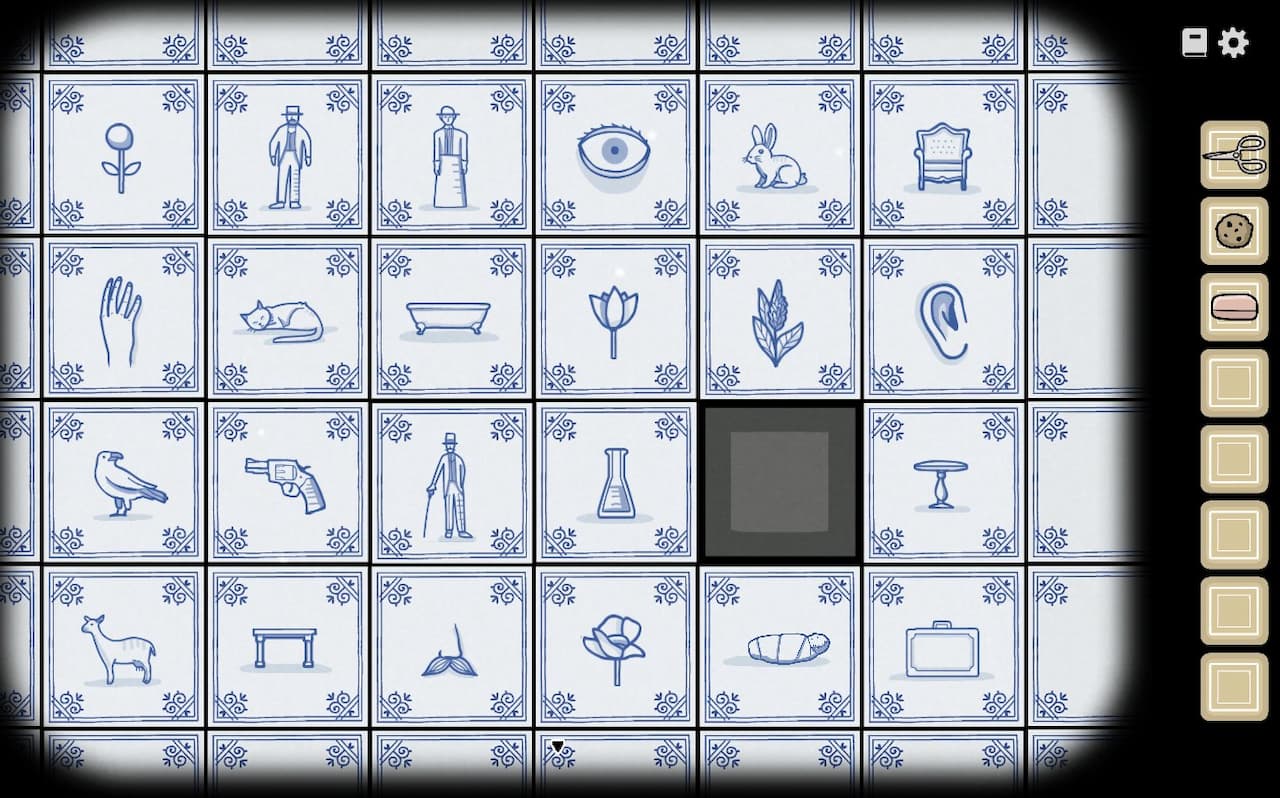
Bathroom grouped-tile wall๐Ÿ” Enlarge Clue
Day 2
Bathroom tile groups
TASK // Helping with Bathing

Find six groups of four related bathroom tiles to obtain scissors.

Day
Day 2
Location
Bathroom tiled wall
Prerequisites
Enter Helping with Bathing and inspect the complete tiled wall.
โœ‰ Solution

Match four tiles in each family, senses, carried-items, flowers, furniture and animals group.
Accepted: The scissors become available.

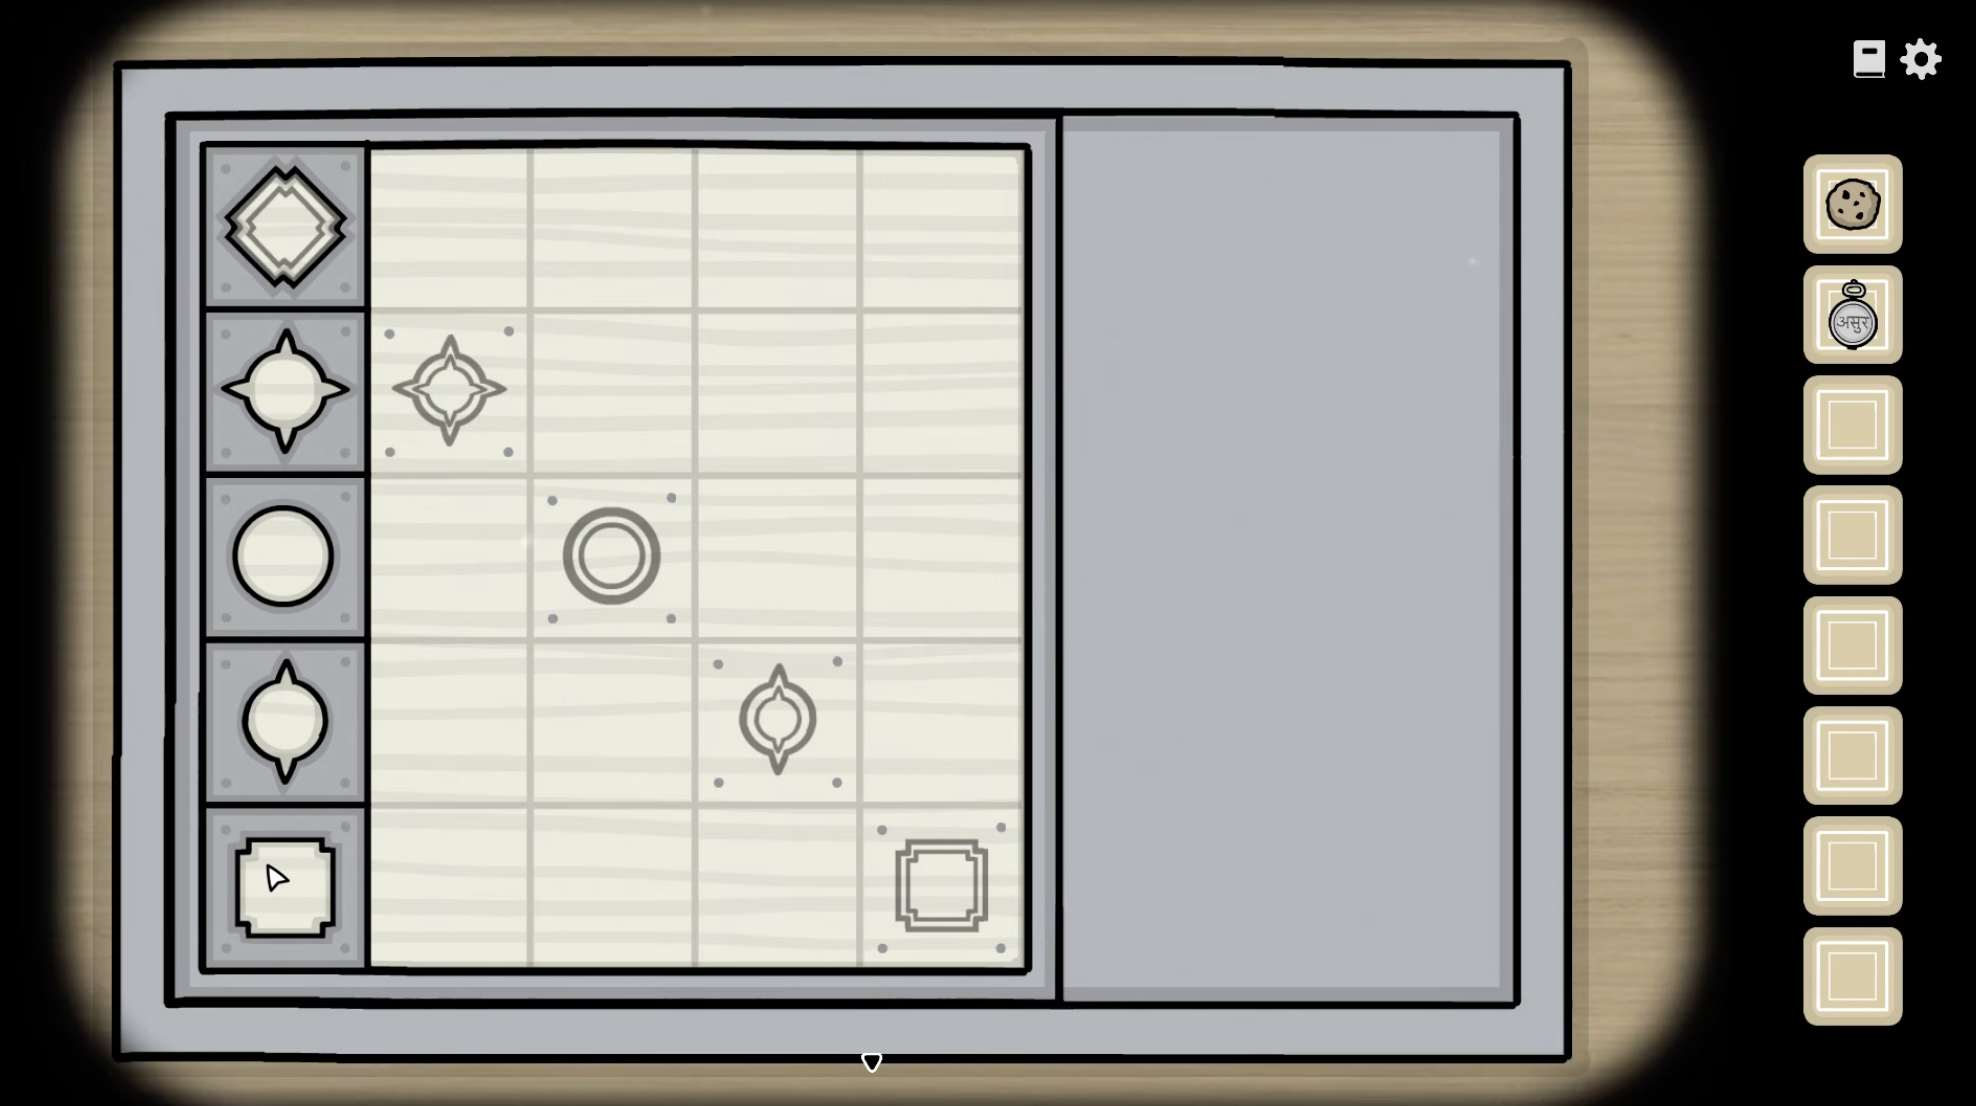
Soap-box guide outlines๐Ÿ” Enlarge Clue
Day 2
Bathroom soap-box sliding puzzle
TASK // Helping with Bathing

Align the sliding pieces' holes with the bathroom box's printed guide shapes.

Day
Day 2
Location
Bathroom table
Prerequisites
Inspect the metal box's guide outlines and perforated tiles.
โœ‰ Solution

Slide the tiles so holes and outlines match the box's guide shapes; begin with the middle piece.

Accepted: The box opens and provides soap.
Mousehole and bath-task prerequisites๐Ÿ” Enlarge Clue
Day 2
Bone-comb preparation
TASK // Helping with Bathing

Complete the cookie, hairpin, mouse, and maggot chain to prepare Alexandra's comb.
Day
Day 2
Location
Bathroom mouse hole and Alexandra
Prerequisites
Obtain scissors from the tile puzzle, cookie from the table, hairpin from Alexandra and maggot from her stitches.
โœ‰ Solution

Use the cookie to lure the mouse, hairpin to kill it and maggot from Alexandra's stitches to make the bone comb.

Accepted: Alexandra's hair can be combed.

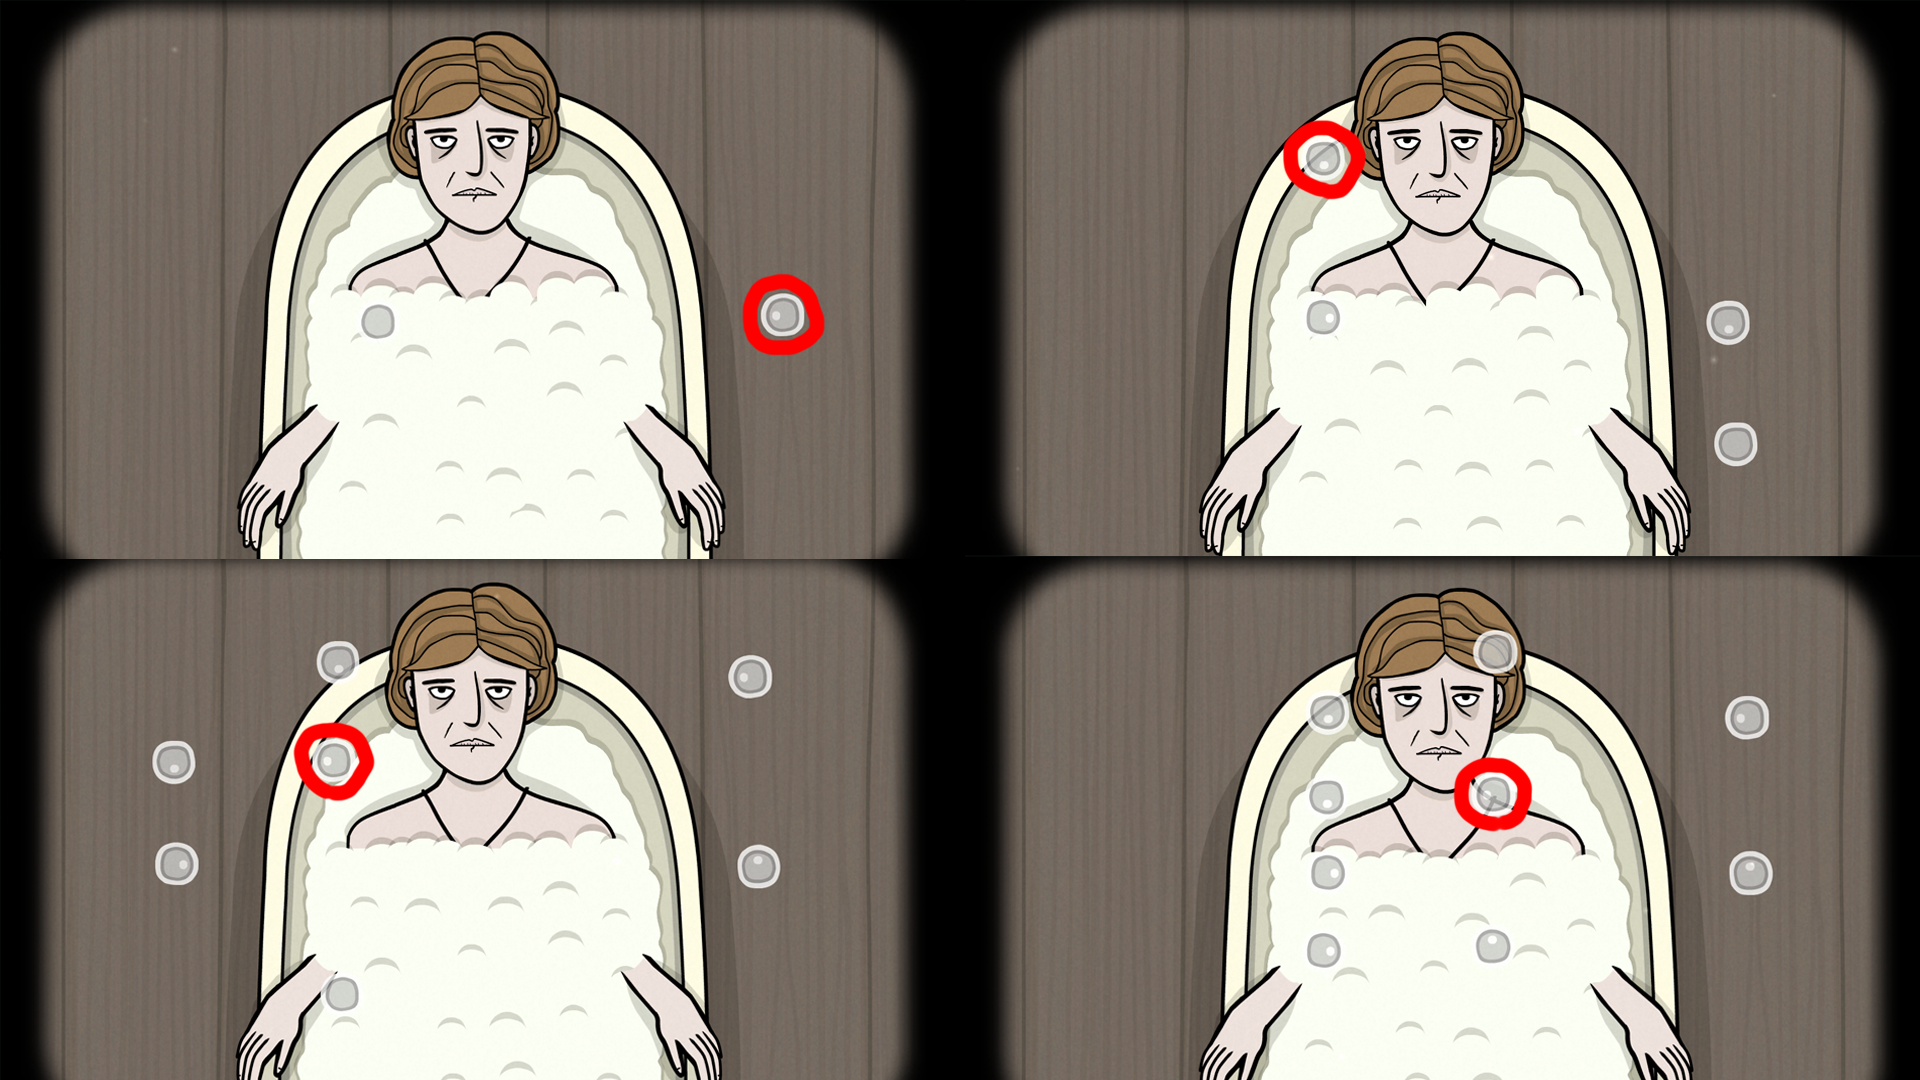
Four observed bubble-chain patterns๐Ÿ” Enlarge Clue
Day 2
Bath bubble chain
TASK // Helping with Bathing

Choose the starting bubble that clears the current collision chain.

Day
Day 2
Location
Bathroom bathtub
Prerequisites
Prepare the bath with water and soap, comb Alexandra's hair and help her into the tub.
โœ‰ Solution

Read the movement directions and pop the bubble that makes the entire chain collide and clear.

Accepted: All bubbles vanish and the next bath event occurs.

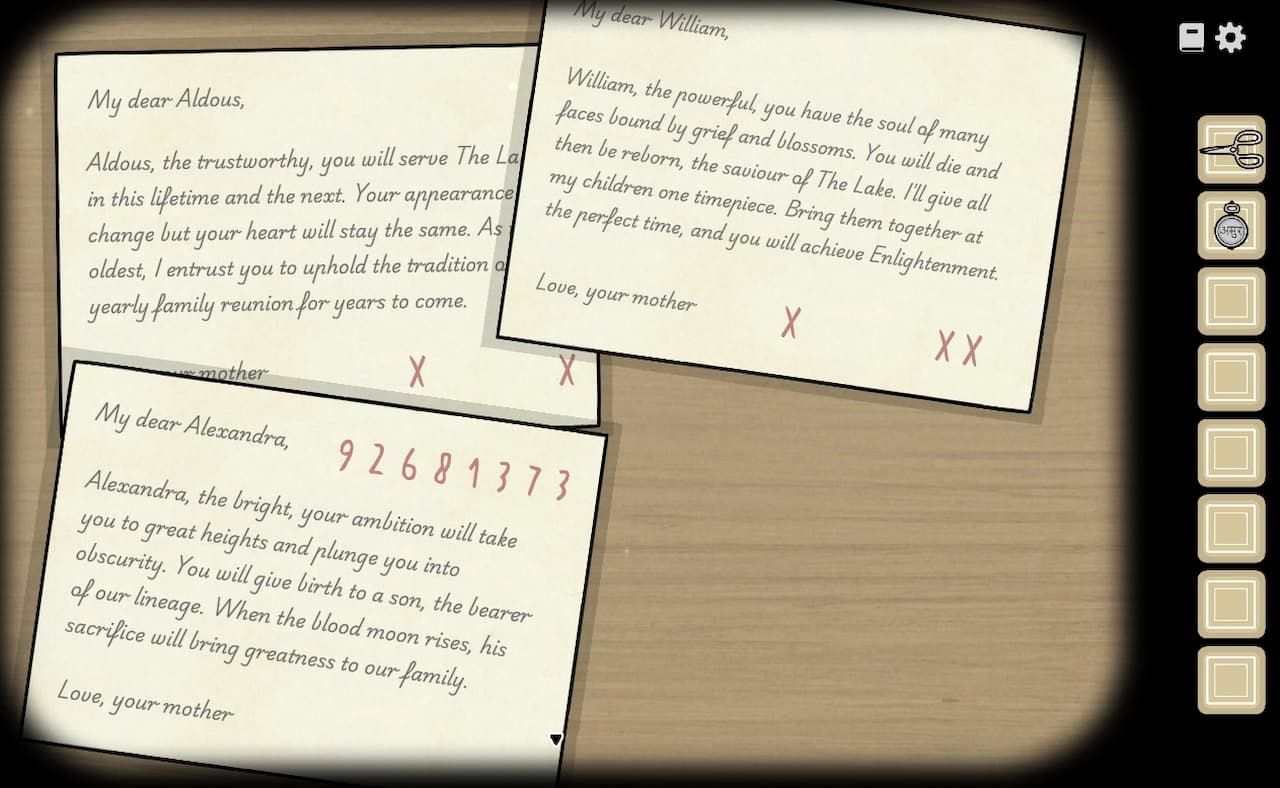
Bathroom crossed-number notes๐Ÿ” Enlarge Clue
Day 2
Bathroom suitcase code
TASK // Helping with Bathing

Combine Alexandra's two notes, open the bathroom case, and use the pendant inside.

Day
Day 2
Location
Bathroom notes table and suitcase
Prerequisites
Finish the bath events, take the pendant and retrieve the notes from Alexandra's gown and hat.
โœ‰ Solution

Align the two notes to eliminate crossed-out digits; use 281, then place the pendant in the inner box.

Accepted: The bronze timepiece becomes available.

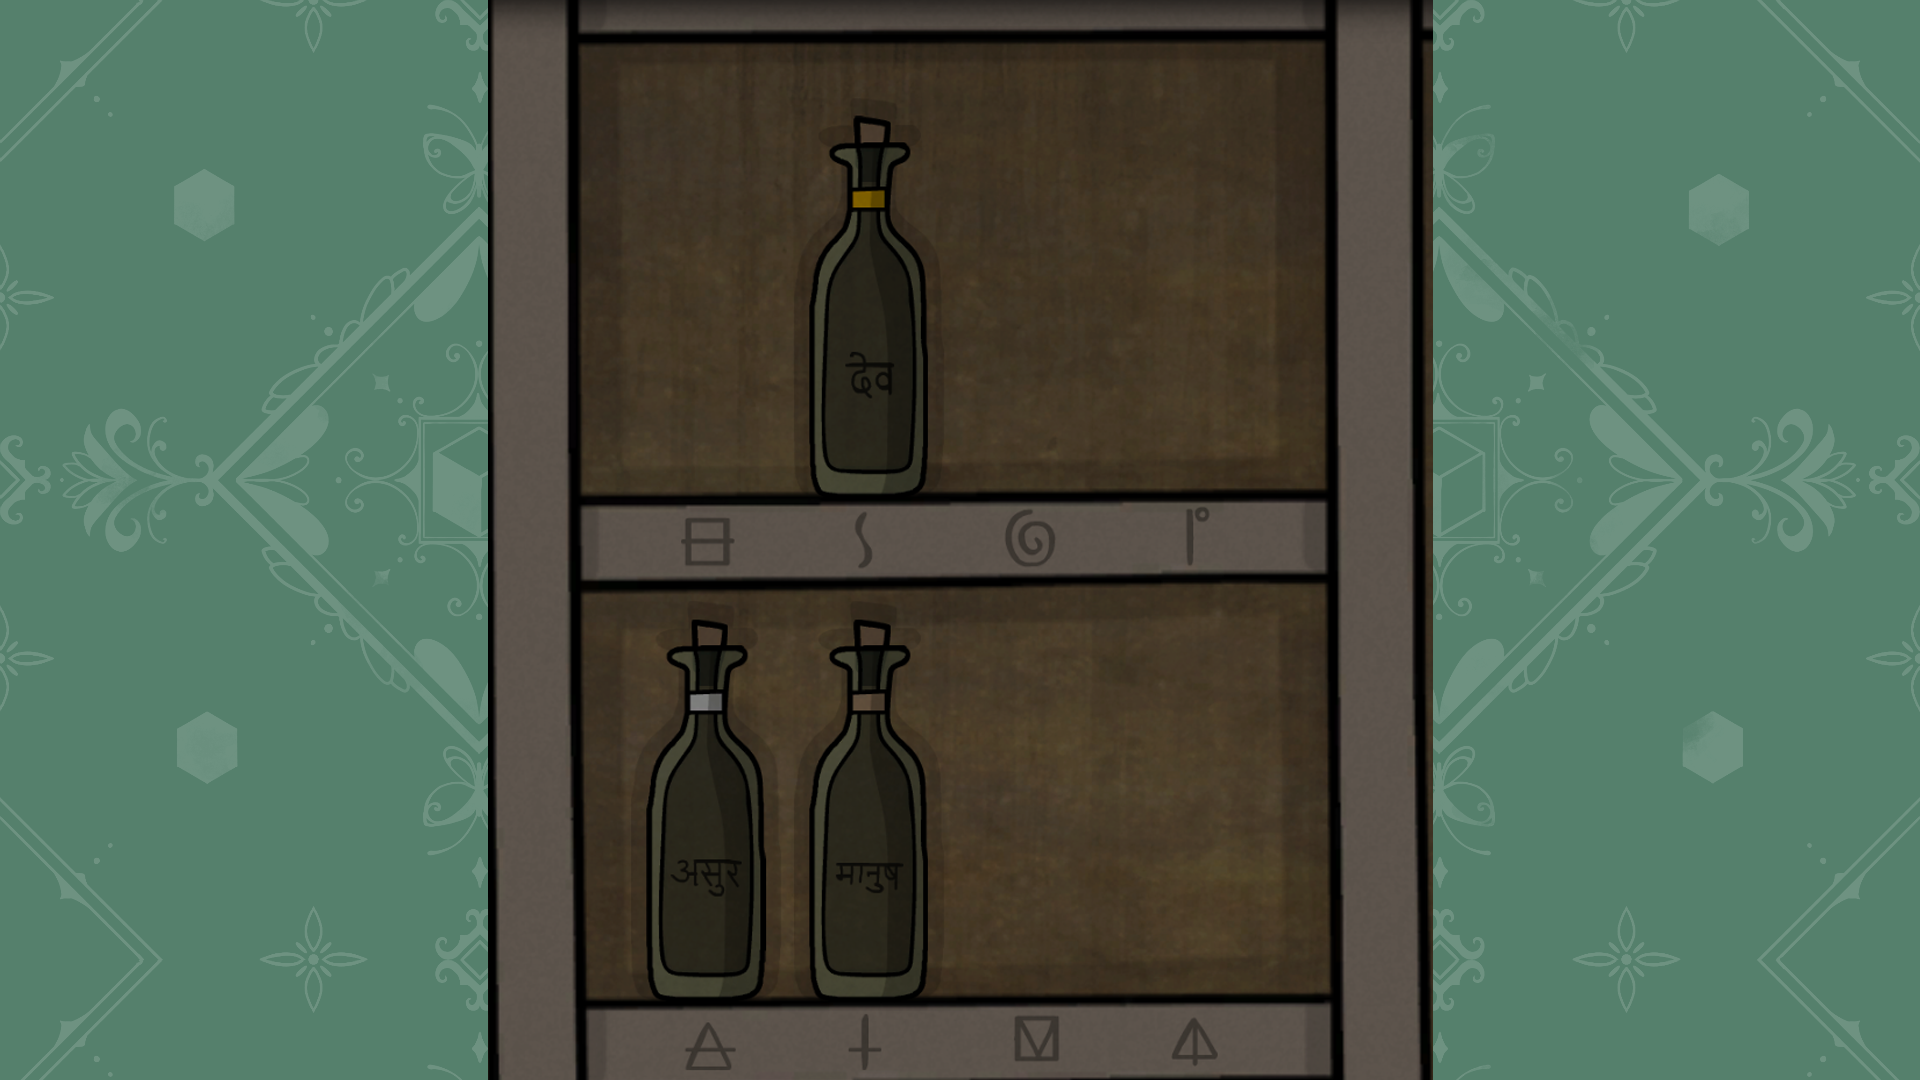
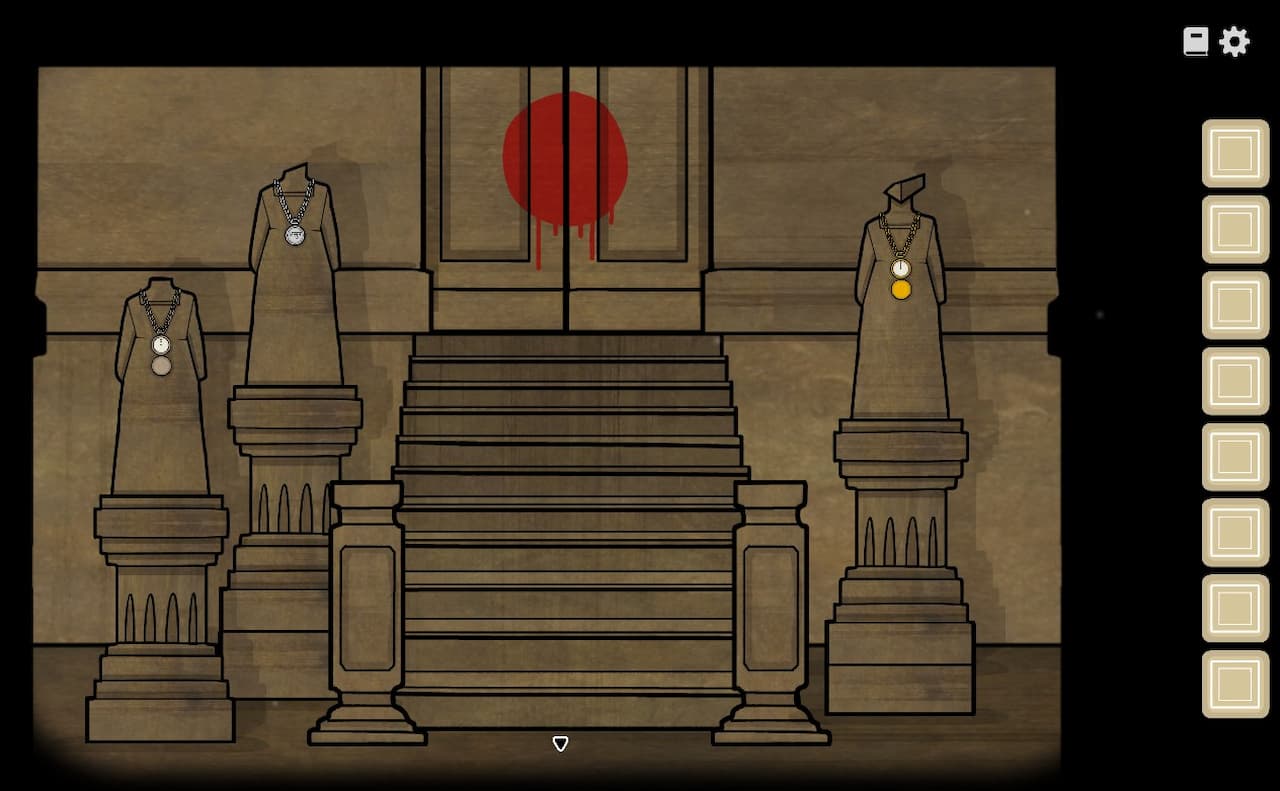
Main-story nighttime bottle arrangement๐Ÿ” Enlarge Clue
Day 2
Night cellar bottle positions
TASK // Night Time Duties

Use the timepiece portraits to position the bottles during Night Time Duties.

Day
Day 2
Location
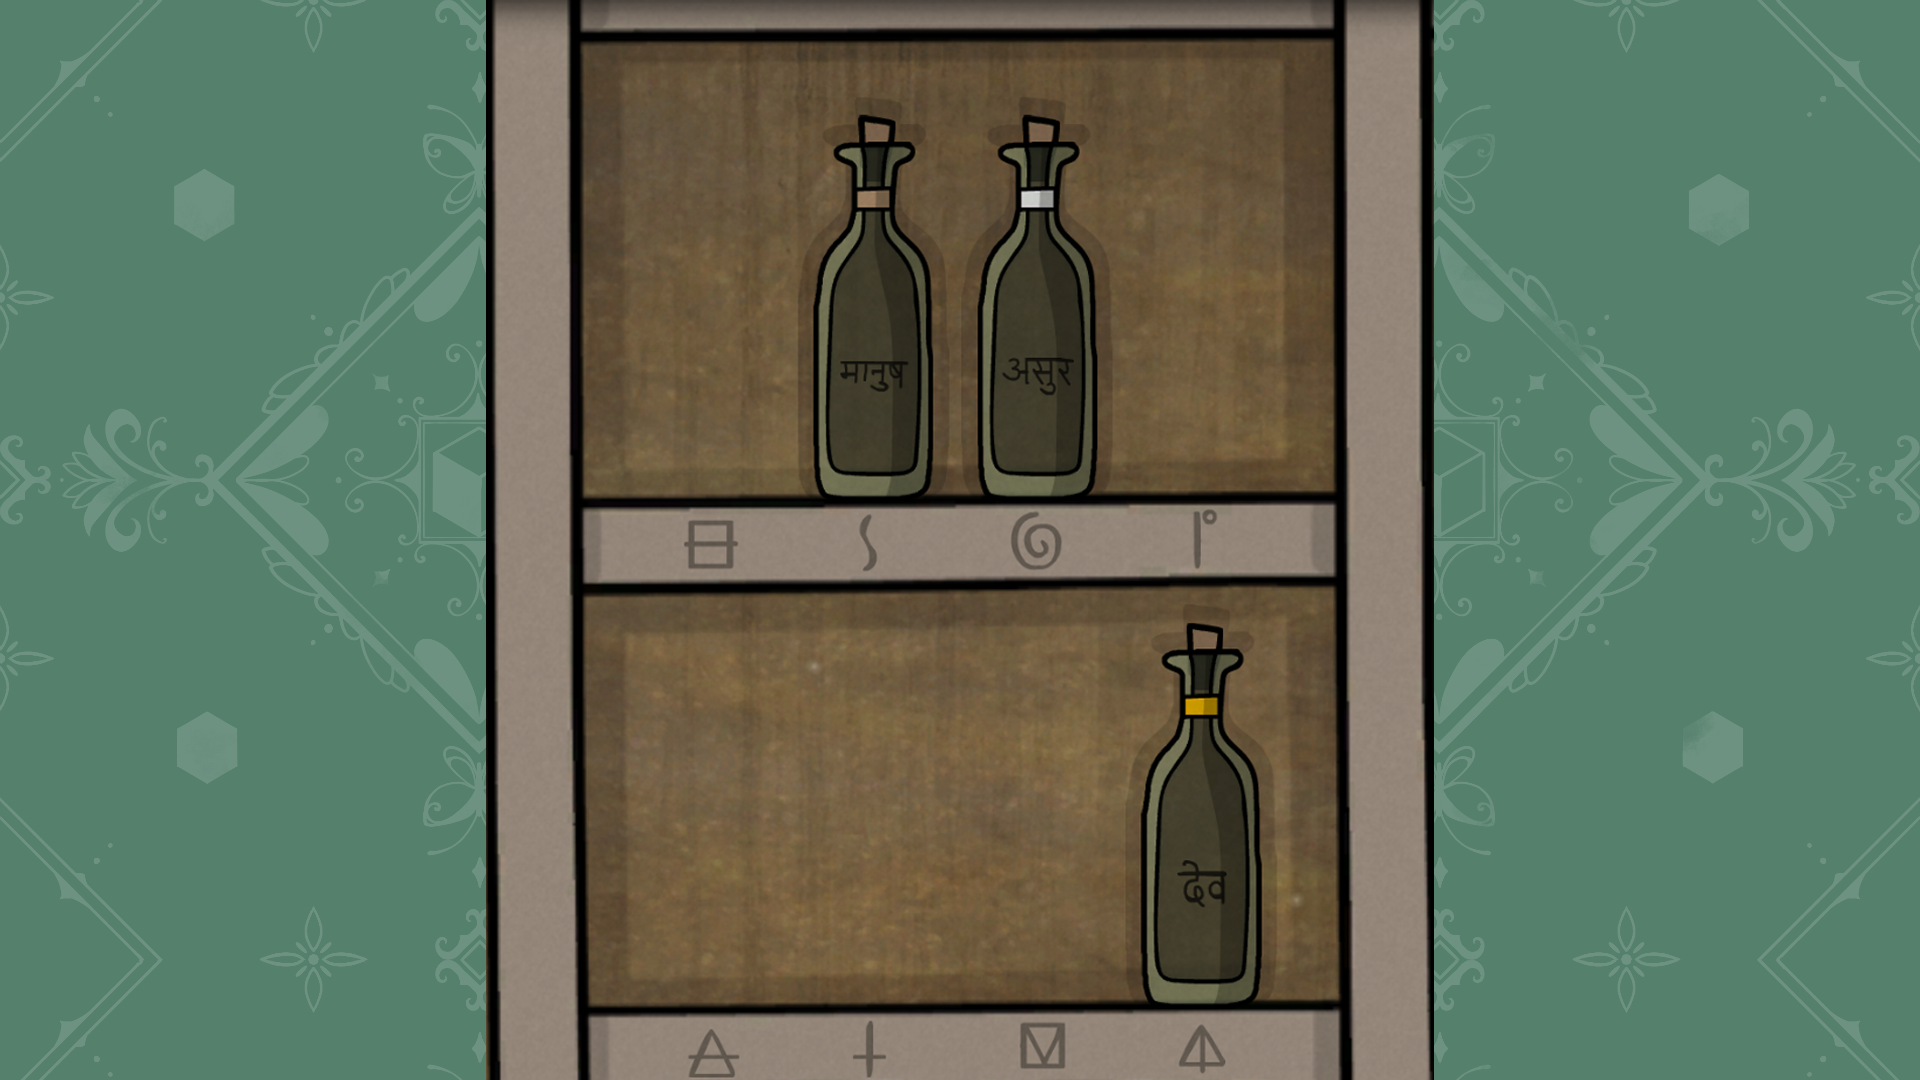
Night cellar bottle shelf
Prerequisites
Obtain all three timepieces and inspect each sibling portrait with its matching timepiece.
โœ‰ Solution

Place gold at S, silver at the triangle with a horizontal line, and bronze at the cross symbol.

Accepted: The barrel passage opens.

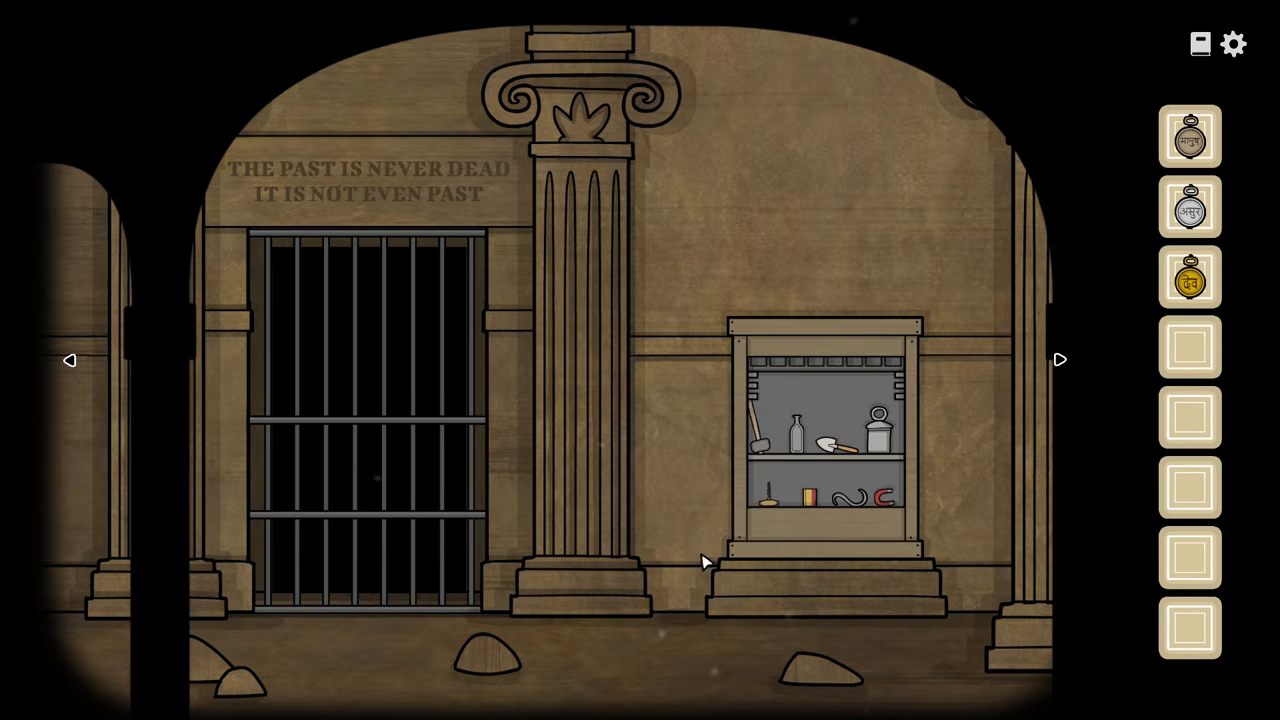
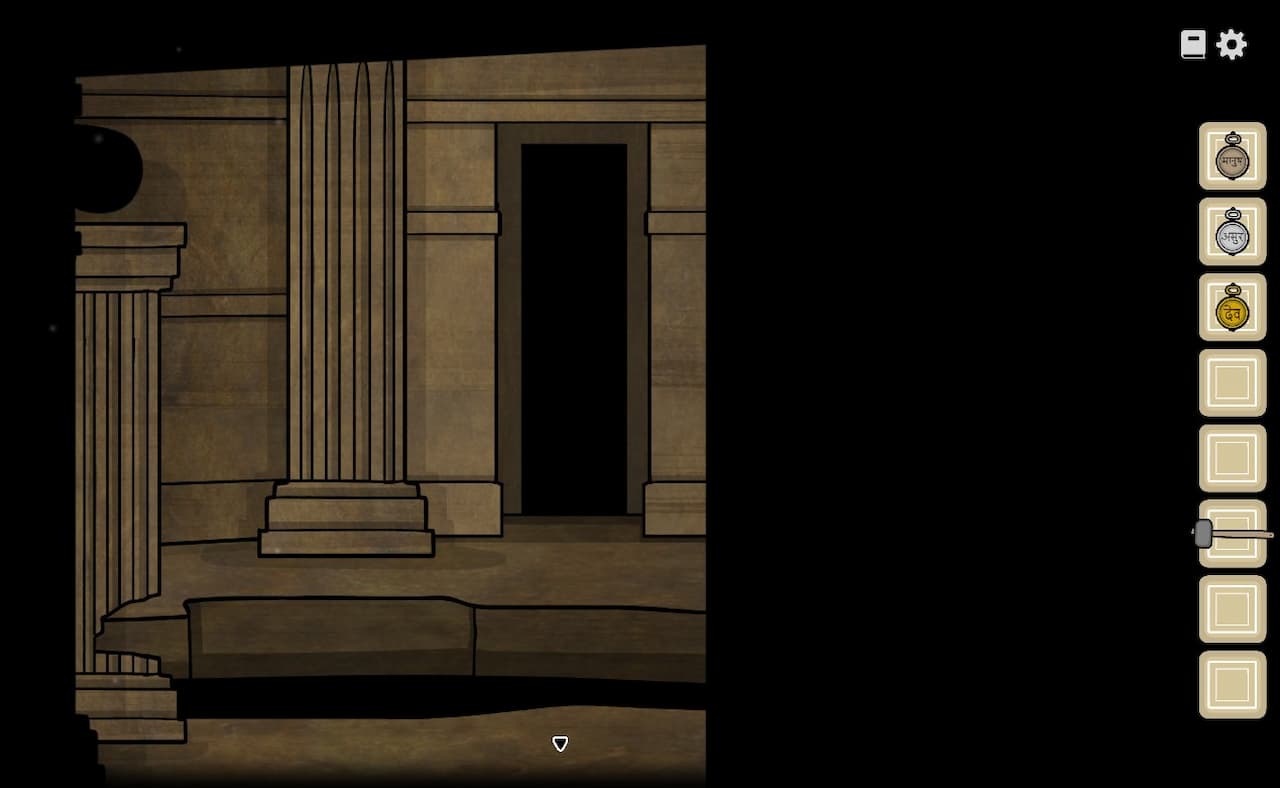
Cellar tool-selection room๐Ÿ” Enlarge Clue
Day 2
Left cellar passage tools
TASK // Inspecting the Cellar

Choose the left passage's tools and recover its clock clue.

Day
Day 2
Location
Left cellar passage
Prerequisites
Choose spade, magnet and matches at the tool shelf.
โœ‰ Solution

Take spade, magnet and matches; retrieve the key and buried box, obtain the torch and light the passage.

Accepted: The passage's eight-o'clock clue can be inspected.

Cellar tool-selection room๐Ÿ” Enlarge Clue
Day 2
Middle cellar passage tools
TASK // Inspecting the Cellar

Carry the current middle-passage tool kit and use oil to open both obstacles.

Day
Day 2
Location
Middle cellar passage
Prerequisites
Choose corkscrew, empty bottle and matches at the tool shelf.
โœ‰ Solution

Use corkscrew, bottle and matches: open the barrel, collect oil, ignite the barrel flow, then pour oil into the rock opening and ignite it.

Accepted: The passage's ten-o'clock clue can be inspected.

Right cellar passage column๐Ÿ” Enlarge Clue
Day 2
Right cellar passage tools
TASK // Inspecting the Cellar

Raise the right passage's gate with a suspended weight and break the damaged pillar.

Day
Day 2
Location
Right cellar passage
Prerequisites
Choose hook, weight and sledgehammer at the tool shelf.
โœ‰ Solution

Use hook, weight and sledgehammer: suspend the weight from the hooked ring to raise the gate, then break the damaged pillar.

Accepted: The final statue door becomes reachable.

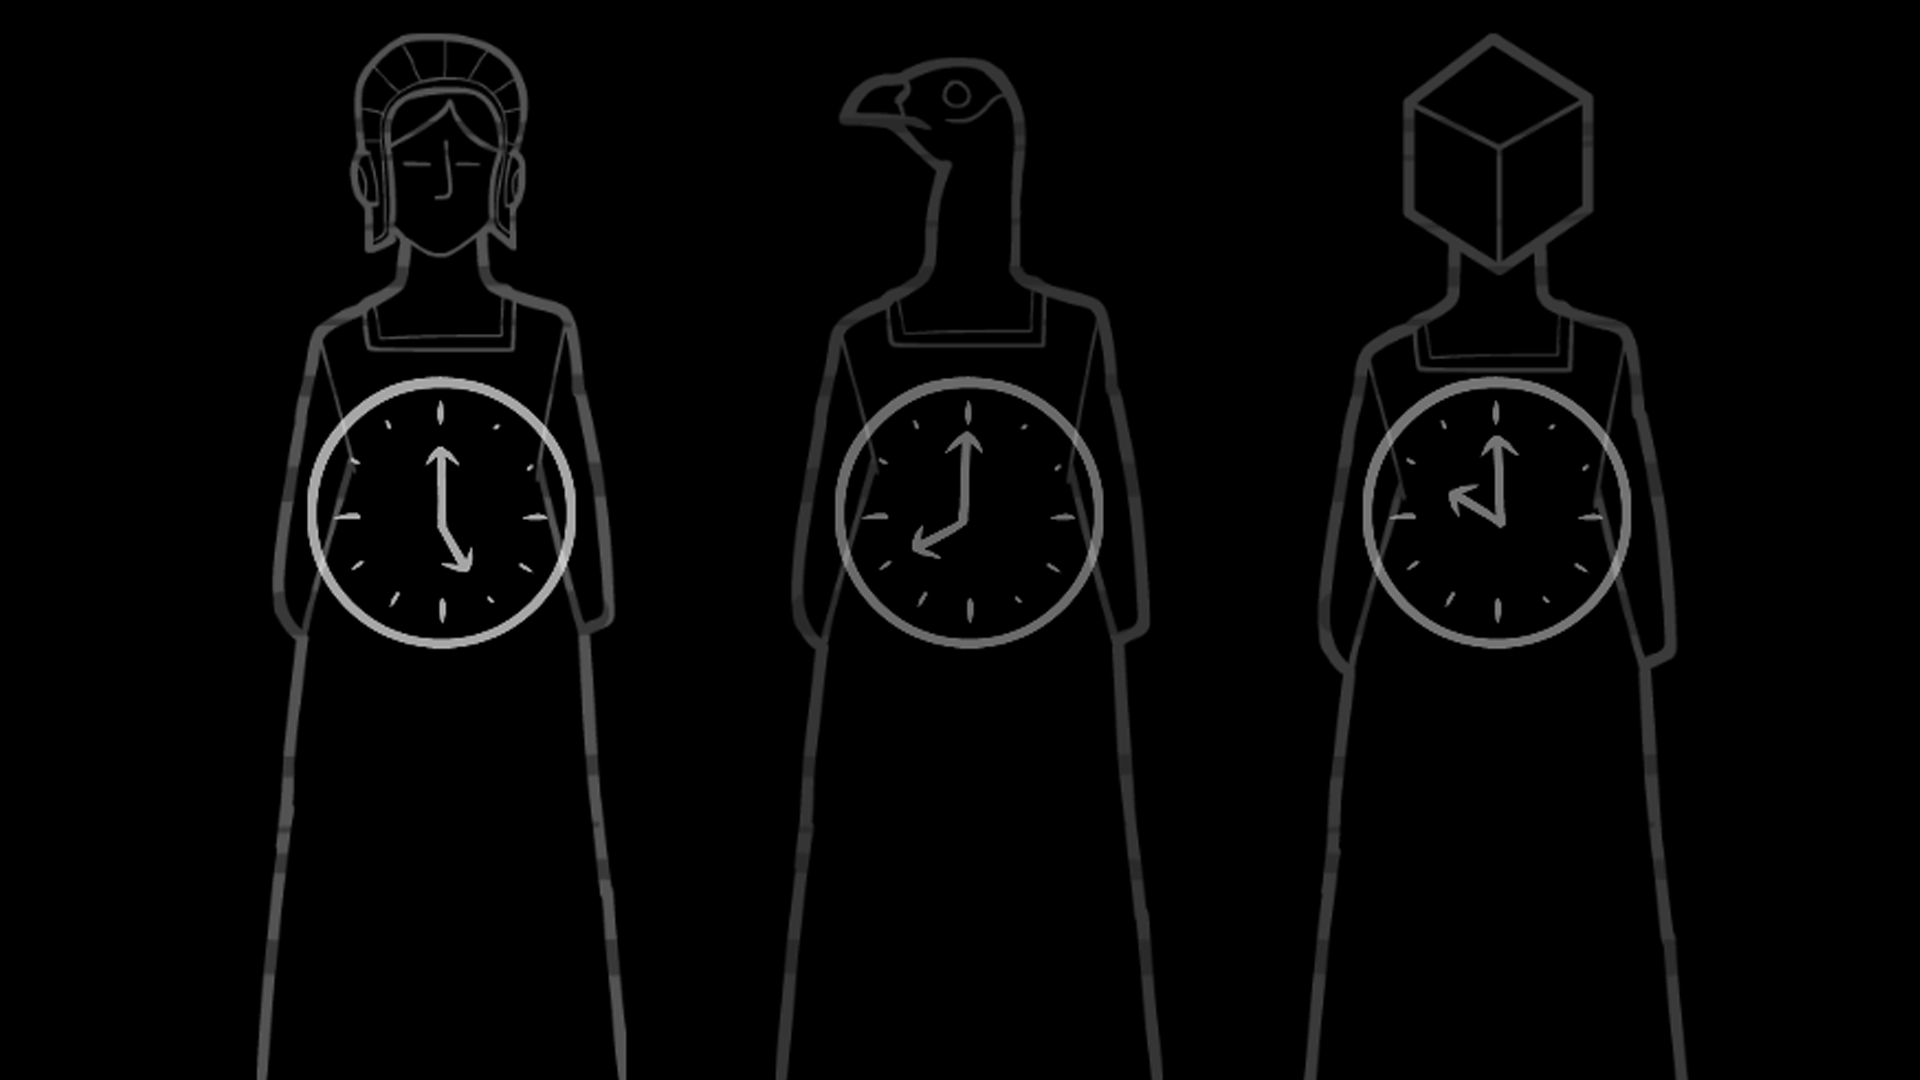
Accepted cellar clock door๐Ÿ” Enlarge Clue
Day 2
Cellar statue clock door
TASK // Inspecting the Cellar

Combine the three cellar clock clues at the statue door to recover the book.

Day
Day 2
Location
Cellar three-statue door
Prerequisites
Inspect all three clock clues and reach the final door with the timepieces.
โœ‰ Solution

Set the statues left to right to 5:00, 8:00 and 10:00 with the appropriate timepieces.

Accepted: The door opens to the book.

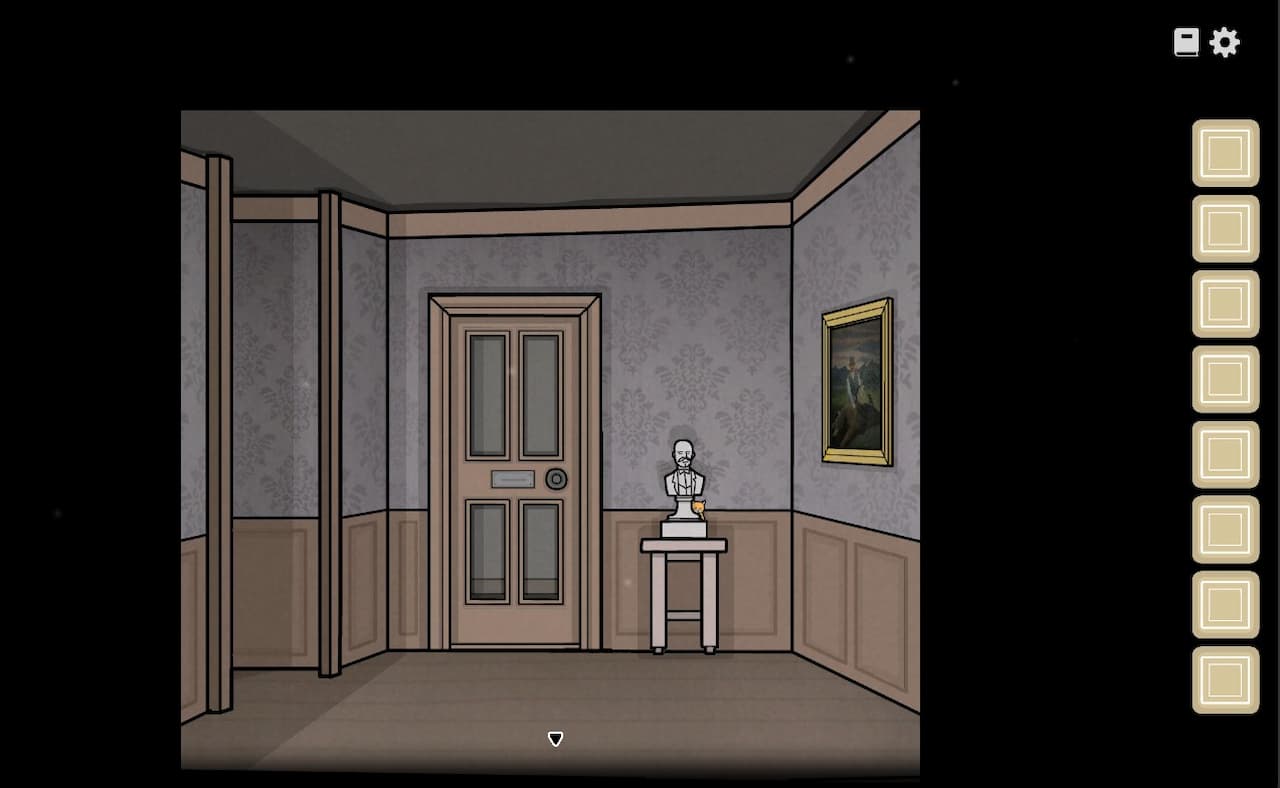
Rustie behind the bust๐Ÿ” Enlarge Clue
Day 3
Rustie's hiding places
TASK // Looking for the Cat

Follow Rustie's changing hiding places and recover Kate's note.

Day
Day 3
Location
Estate window, chair, bust and stove
Prerequisites
Talk to Kate and William; give William the hammer and collect the pebble.
โœ‰ Solution

Reveal the cat outside with the pebble, then follow it under the chair, behind the bust and into the stove after hearing William.

Accepted: Rustie returns to Kate and the note can be read.

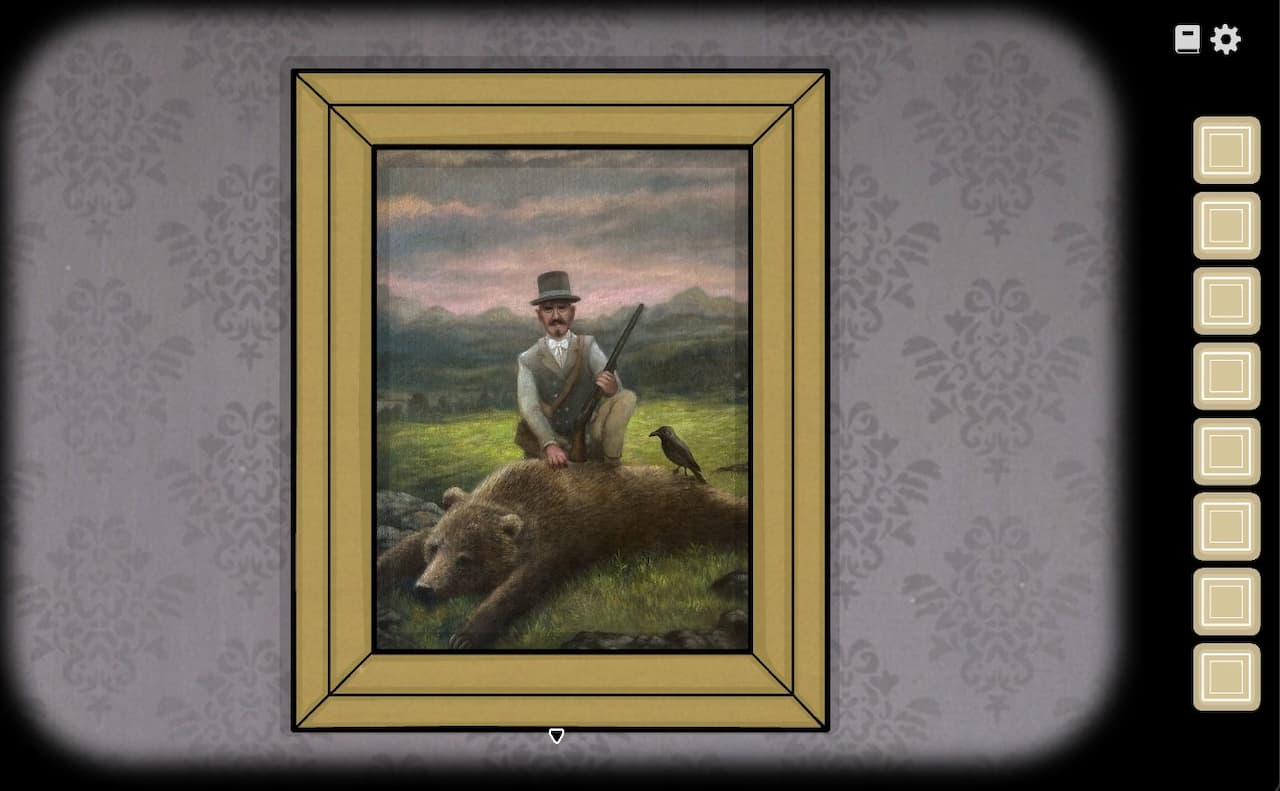
Hunting portrait's secret-laboratory clue๐Ÿ” Enlarge Clue
Day 3
Hidden laboratory painting
TASK // Looking for the Cat

Use Kate's note to open the hunting portrait's laboratory passage.

Day
Day 3
Location
Hunting painting beside Aldous's bust
Prerequisites
Find Rustie and read Kate's note.
โœ‰ Solution

Select hat, rifle, bear and crow in that order.

Accepted: The laboratory passage opens.

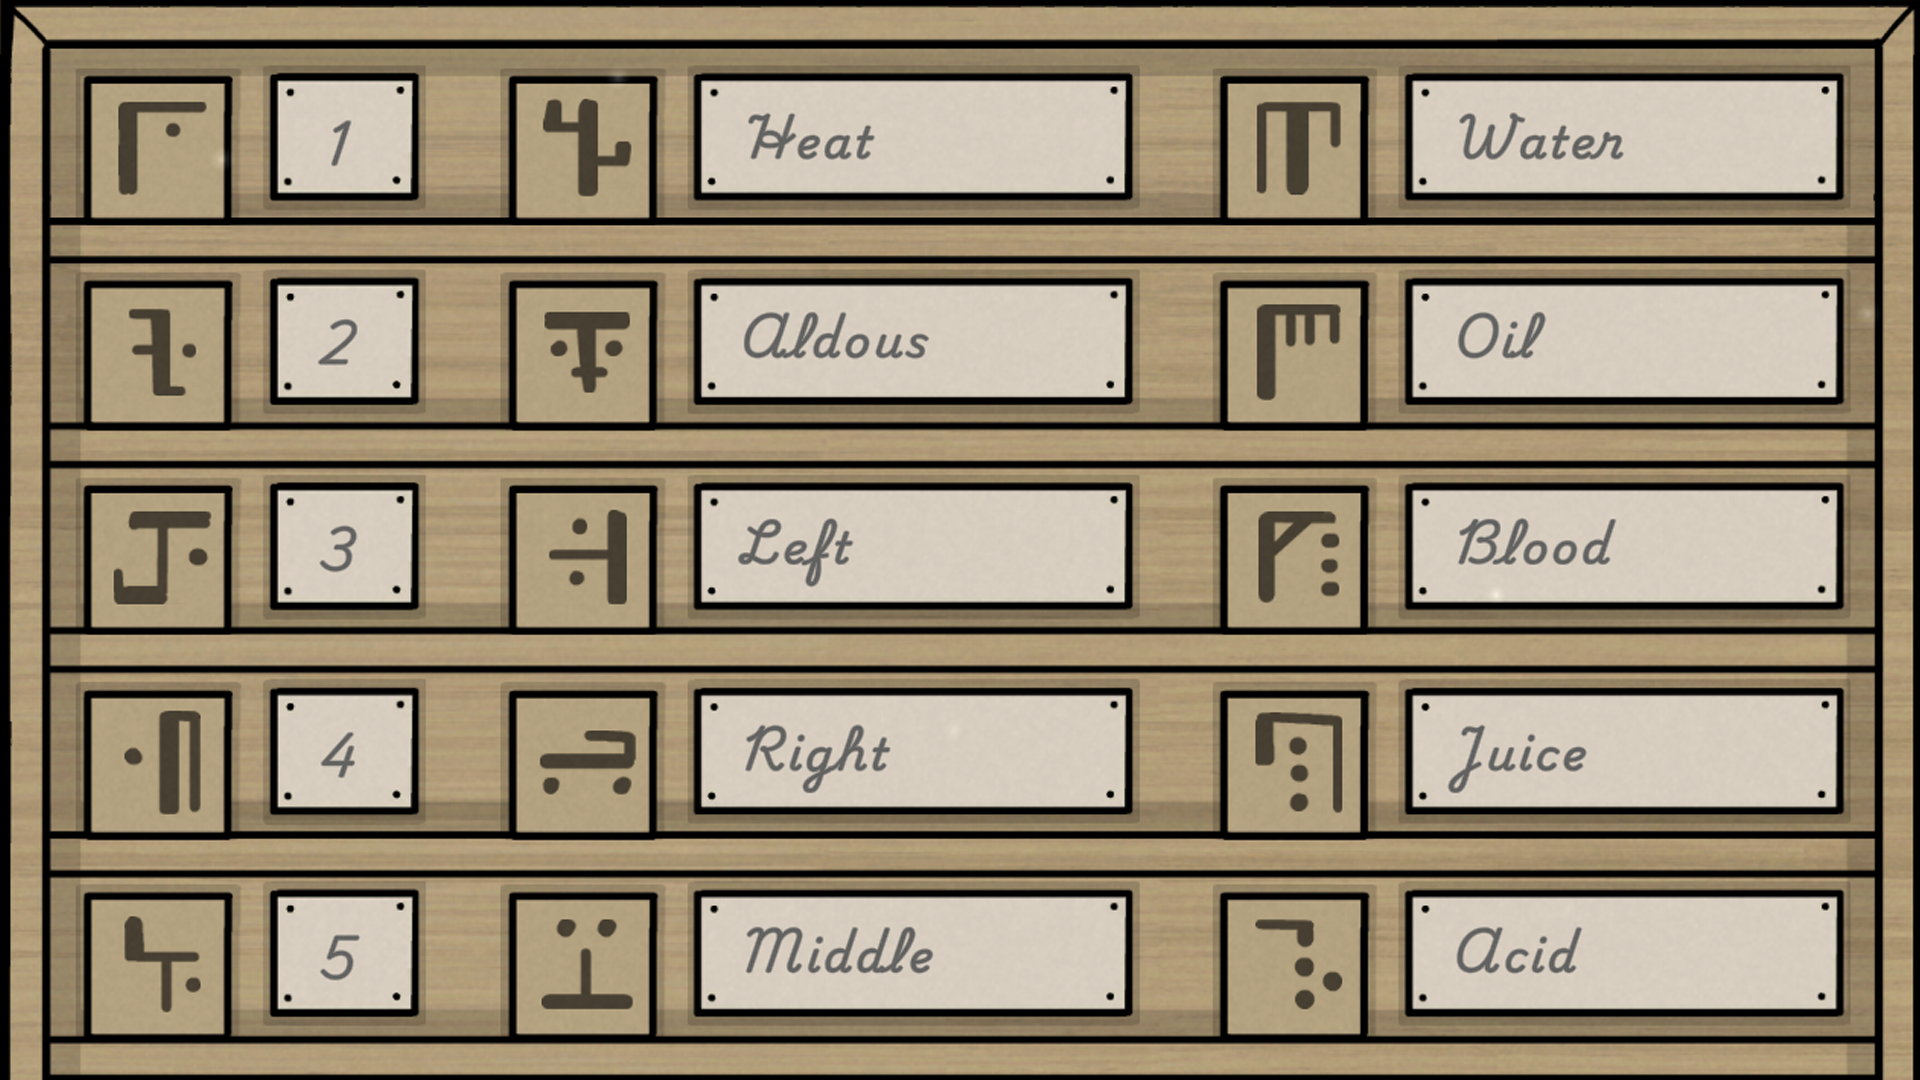
Decoded alchemy symbol board๐Ÿ” Enlarge Clue
Day 3
Alchemy symbol board
TASK // Assisting in Alchemy

Decode the laboratory board into numbers, directions, and liquid symbols.

Day
Day 3
Location
Alchemy study wall board
Prerequisites
Inspect the room's paintings, soldier, candle, grinder, parrot and locked boxes.
โœ‰ Solution

Sort the observed symbols into numbers, directions and liquids using the room's clues; use the retained solved board as the exact visual mapping.

Accepted: The symbol board is correctly interpreted for the recipe and locks.

Decoded alchemy symbol board๐Ÿ” Enlarge Clue
Day 3
Alchemy arrow box
TASK // Assisting in Alchemy

Translate the laboratory direction symbols to open the wooden box for matches.

Day
Day 3
Location
Alchemy study wooden arrow box
Prerequisites
Decode left and right symbols from the soldier and box clues.
โœ‰ Solution

Use left, left, right, right, left, right.

Accepted: Matches become available.

Decoded alchemy symbol board๐Ÿ” Enlarge Clue
Day 3
Alchemy cabinet code
TASK // Assisting in Alchemy

Decode the numeric symbols and open the pink cabinet for empty beakers.

Day
Day 3
Location
Alchemy study pink cabinet
Prerequisites
Decode the numeric symbols from the room's clues.
โœ‰ Solution

Use 2451 on the cabinet.

Accepted: The liquid beakers become available.

Decoded alchemy symbol board๐Ÿ” Enlarge Clue
Day 3
Distilling oil
TASK // Assisting in Alchemy

Apply the oil pump recipe and collect the distillation output in a beaker.

Day
Day 3
Location
Alchemy distillation pumps
Prerequisites
Collect an empty beaker from the cabinet and read the pump recipe.
โœ‰ Solution

Use two presses of the left pump and three of the middle pump, then collect the output.

Accepted: Oil is collected in a beaker.

Decoded alchemy symbol board๐Ÿ” Enlarge Clue
Day 3
Distilling acid
TASK // Assisting in Alchemy

Apply the acid pump recipe and collect it for the meat-and-blood chain.

Day
Day 3
Location
Alchemy distillation pumps
Prerequisites
Collect an empty beaker and decode the acid pump recipe.
โœ‰ Solution

Use four presses of the right pump and one of the left pump, then collect the output.

Accepted: Acid is collected in a beaker.

Decoded alchemy symbol board๐Ÿ” Enlarge Clue
Day 3
Alchemy blood and fruit juice
TASK // Assisting in Alchemy

Use acid, the grinder, and the plant to prepare blood and fruit juice.

Day
Day 3
Location
Alchemy grinder and plant
Prerequisites
Make acid, collect water and empty beakers, and decode the grinder/plant instructions.
โœ‰ Solution

Use acid on Aldous for meat and grind it four times for blood; grow fruit with four drops of water and one of blood, then grind the fruit four times for juice.

Accepted: The required blood and juice are collected.

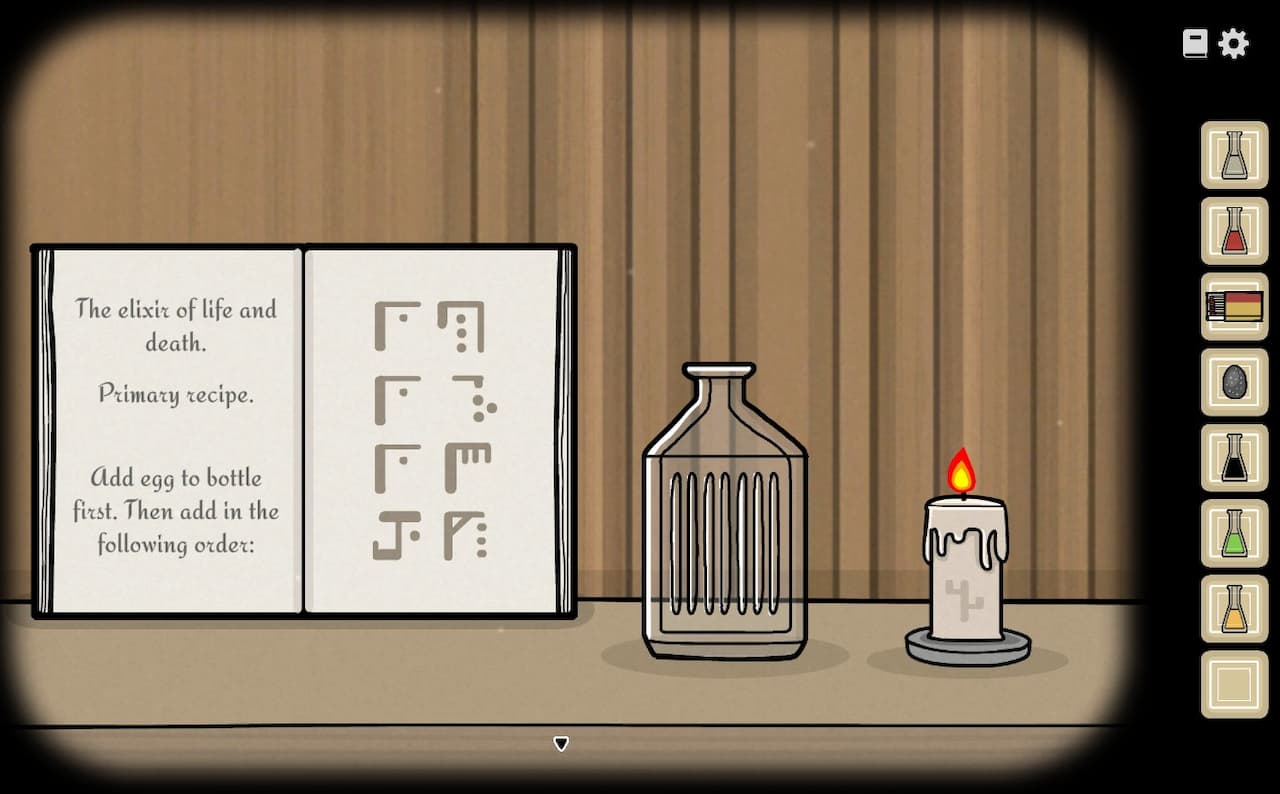
Elixir recipe in the book๐Ÿ” Enlarge Clue
Day 3
Elixir recipe
TASK // Assisting in Alchemy

Heat the book's ingredient sequence until the mixture becomes green.

Day
Day 3
Location
Alchemy recipe table
Prerequisites
Collect egg, juice, acid, oil, blood and matches; read the book recipe.
โœ‰ Solution

Obtain the parrot's egg after five water drops; add egg, one juice, one acid, one oil and three blood to the heated recipe vessel.

Accepted: The elixir turns green and can be collected.

Broken portrait in the repair task๐Ÿ” Enlarge Clue
Day 3
Unforeseen household repairs
TASK // Unforeseen Maintenance

Gather Rustie's adhesive and restore the house's damaged objects.

Day
Day 3
Location
Estate hallways and Servant's Room
Prerequisites
Collect Rustie's adhesive plus the damaged chair, statue, balcony and stove parts.
โœ‰ Solution

Use Rustie's adhesive and the collected chair, statue, balcony and stove parts to repair every damaged location.

Accepted: Kate accepts the repairs and sends the player to the kitchen.

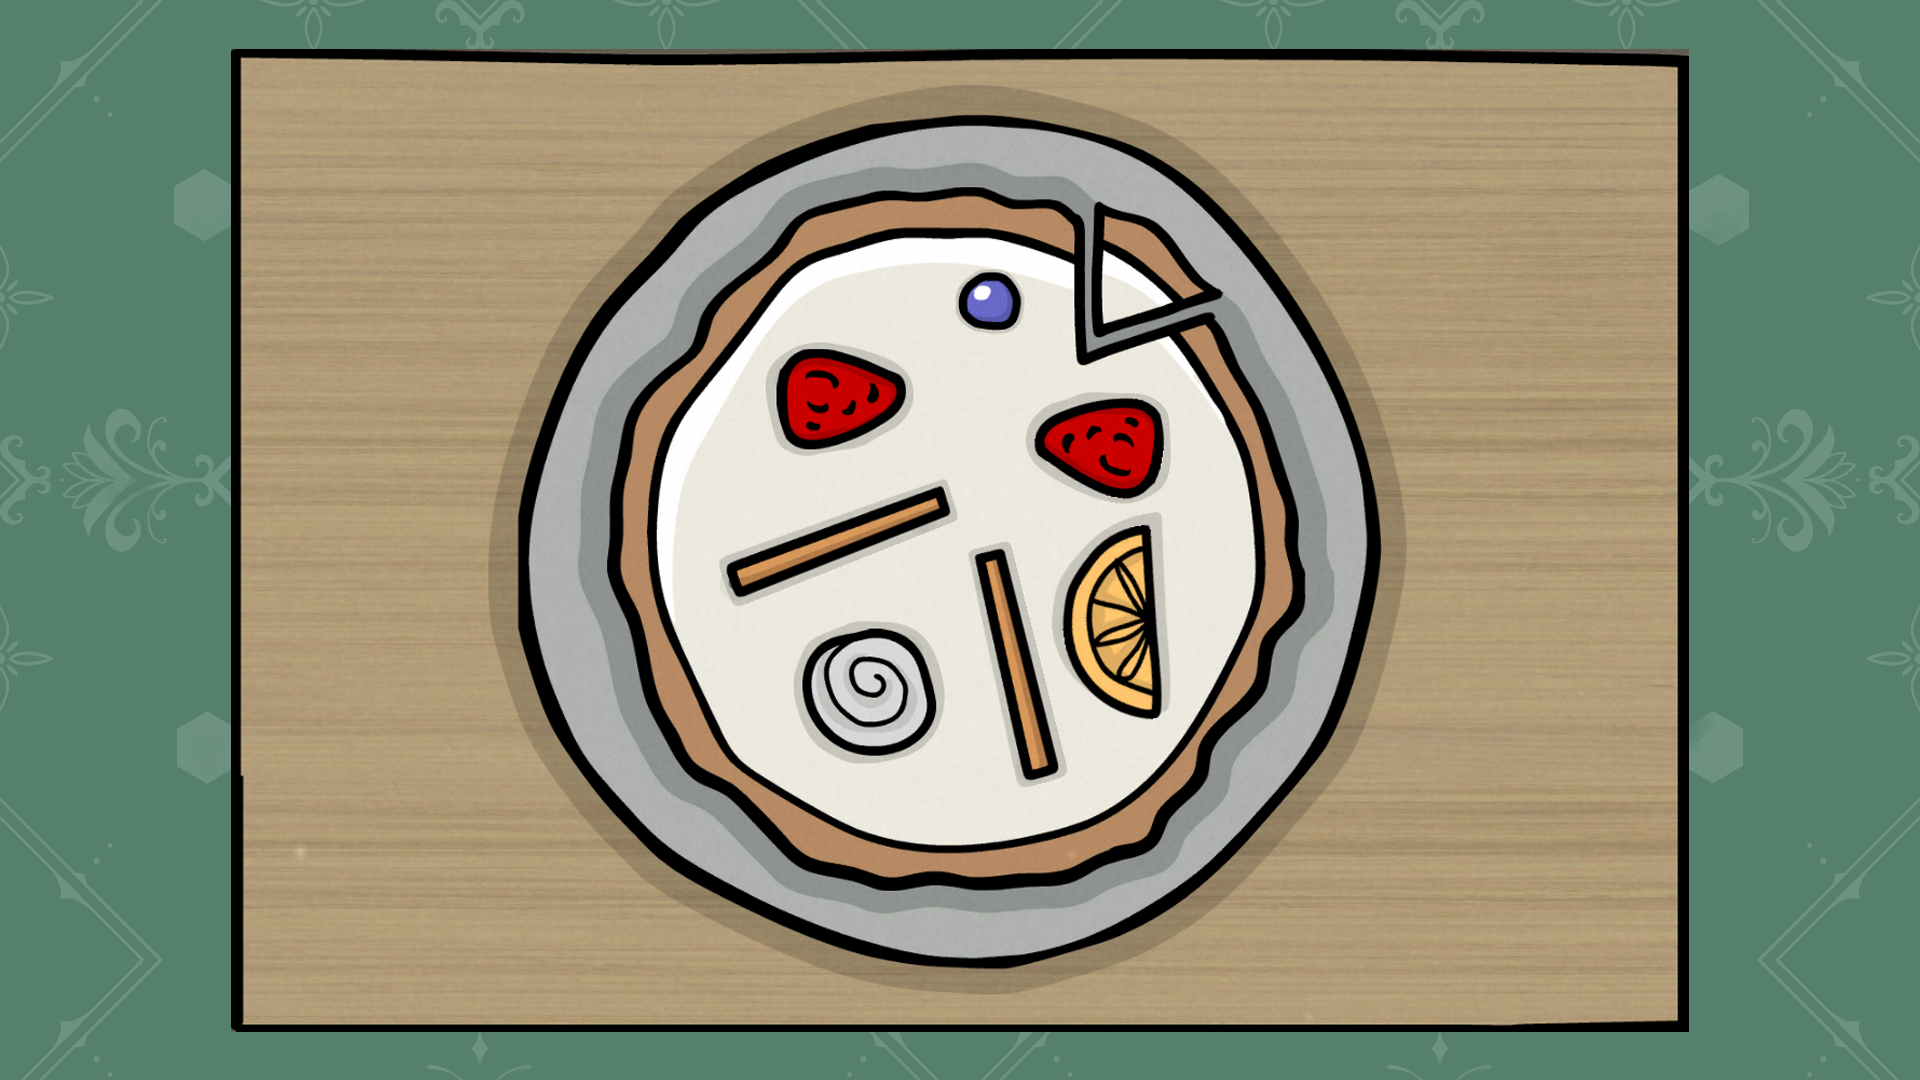
Accepted cake decoration placement๐Ÿ” Enlarge Clue
Day 3
Cake decoration placement
TASK // Preparing Dinner

Cover the cake decoration holes with the topping shapes to obtain a portion.

Day
Day 3
Location
Kitchen cake table
Prerequisites
Reach Preparing Dinner and inspect the decoration holes.
โœ‰ Solution

Position the toppings so every hole is covered; retain the accepted arrangement image for exact placement.

Accepted: A cake portion can be collected.

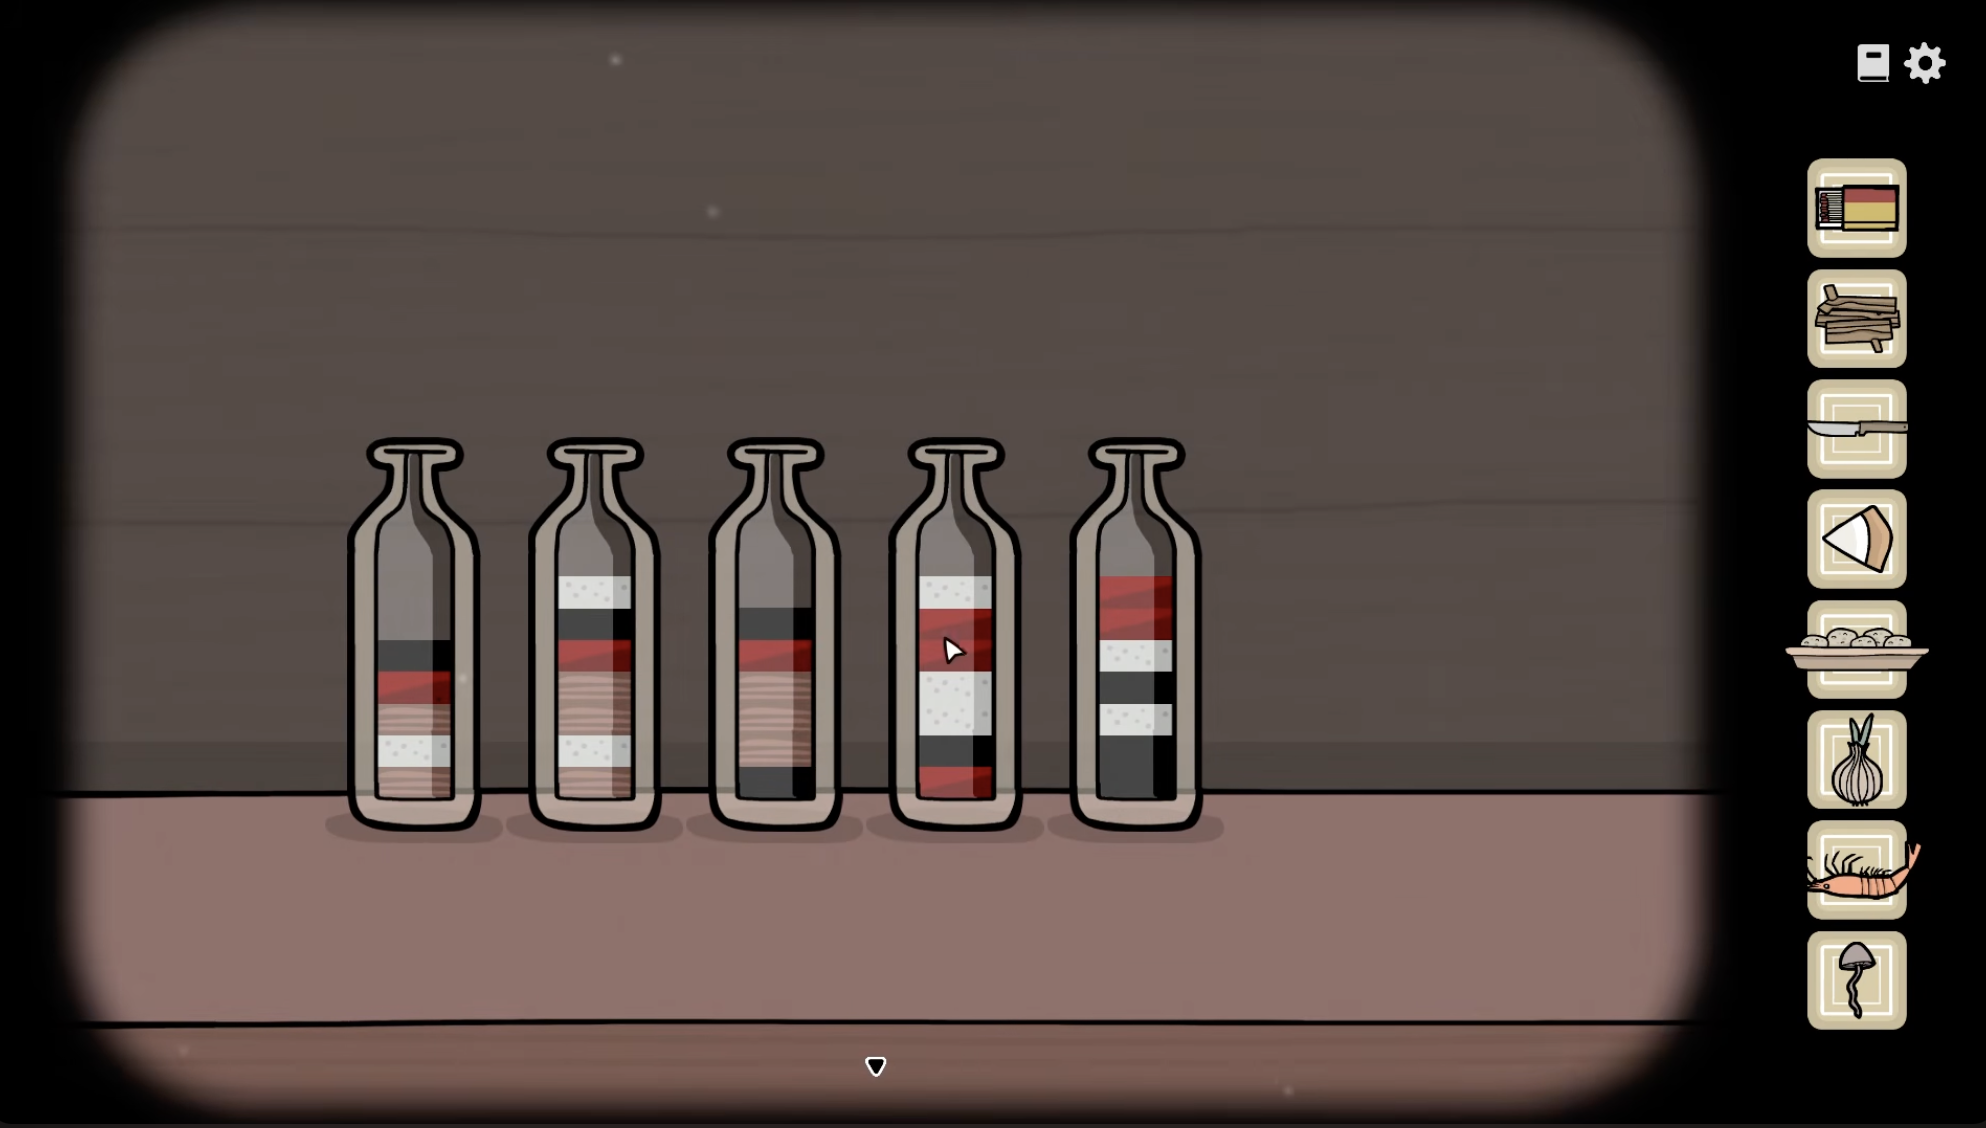
Kitchen colour-bottle sorting mechanism๐Ÿ” Enlarge Clue
Day 3
Kitchen oil-bottle sorting
TASK // Preparing Dinner

Separate the pantry's mixed liquids until each bottle contains one colour.

Day
Day 3
Location
Kitchen pantry
Prerequisites
Inspect the five mixed-colour liquid bottles.
โœ‰ Solution

Transfer liquid until every bottle contains only one colour.

Accepted: The oil bottle can be collected.

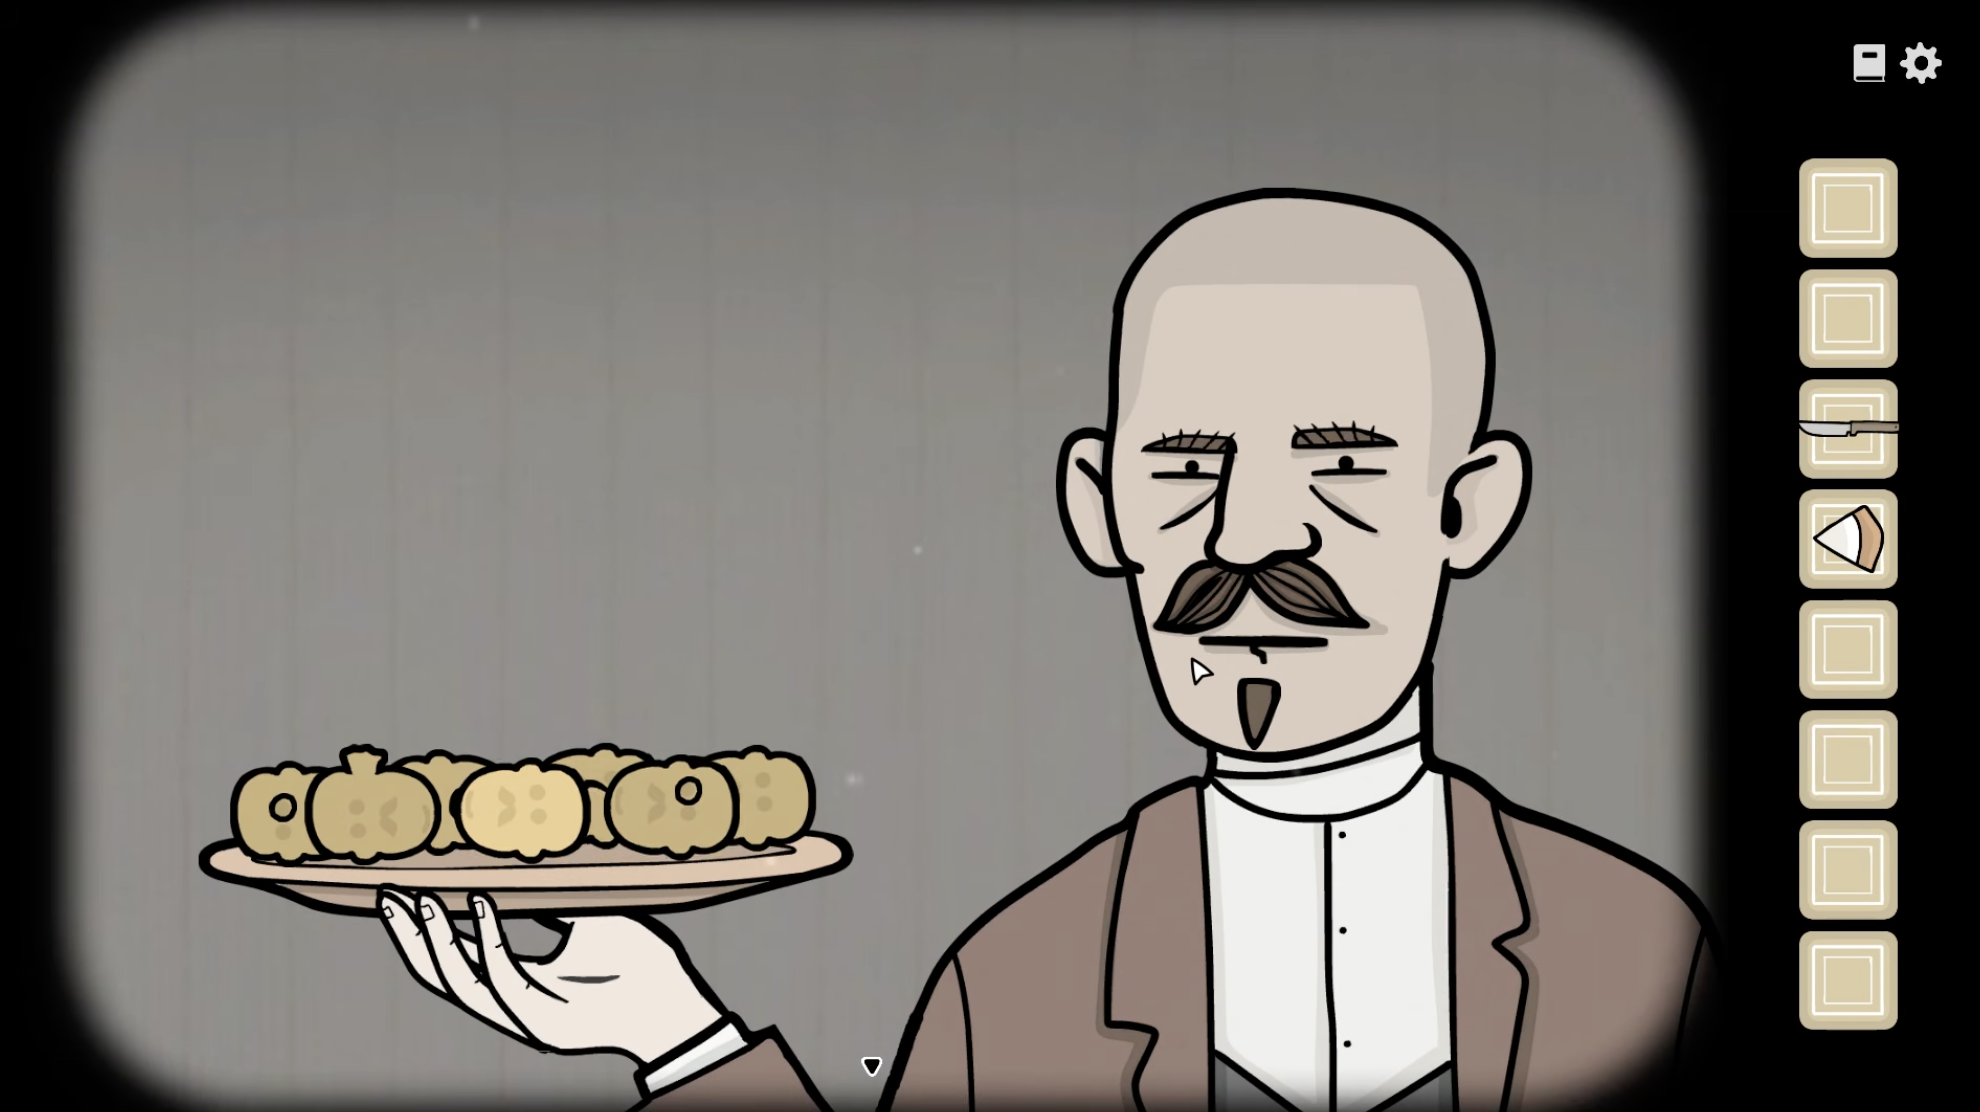
Aldous's potato-shape response๐Ÿ” Enlarge Clue
Day 3
Aldous's potato shapes
TASK // Preparing Dinner

Match each potato shape to Aldous's current facial change.

Day
Day 3
Location
Kitchen with Aldous
Prerequisites
Bake the potatoes and ring for Aldous after preparing the meal.
โœ‰ Solution

Match each potato's shape to the current change in Aldous's face.

Accepted: Aldous finishes the potato sequence and accepts the cake.

Soup-vision dialogue scene๐Ÿ” Enlarge Clue
Day 3
Soup vision sequence
TASK // Preparing Dinner

Follow the soup vision's spoken targets through its final Kate response.

Day
Day 3
Location
Kitchen soup-tasting vision
Prerequisites
Cook the soup, finish the potato/cake interactions and obtain the spoon.
โœ‰ Solution

Follow William's hat, coffee, bottle and book, then Alexandra, carriage, moon, basket, Aldous and Kate.

Accepted: The vision sequence concludes and Aldous finishes the task conversation.

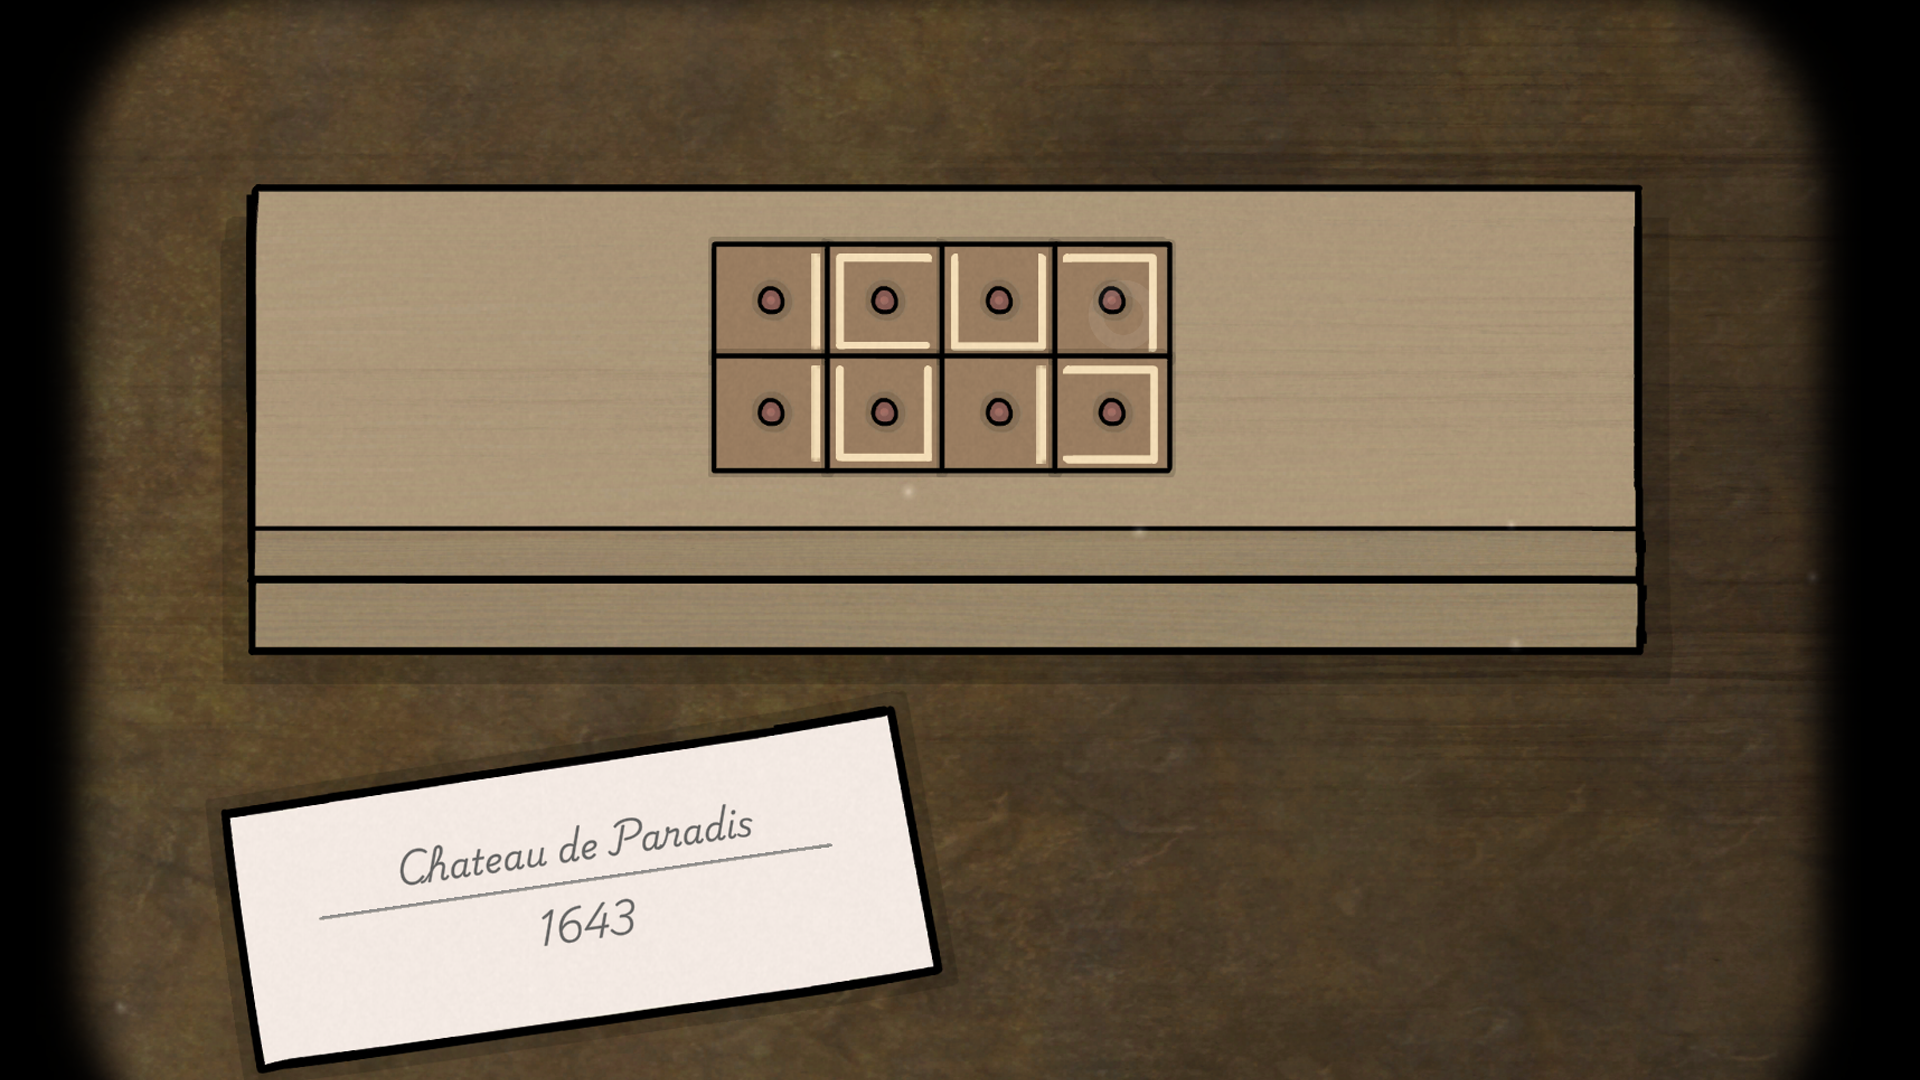
Dinner wine-box year 1643๐Ÿ” Enlarge Clue
Day 3
Cellar dinner wine-box pattern
TASK // Dressing up for Dinner

Form the cellar note's year with the dinner wine-box segments.

Day
Day 3
Location
Cellar floor wine box
Prerequisites
Reach Dressing up for Dinner and inspect the wine note.
โœ‰ Solution

Rotate the eight segments into the pictured 1643 arrangement; the retained actual completed-state image provides the segment positions.

Accepted: The wine bottle becomes available.

Dinner house-painting portrait context๐Ÿ” Enlarge Clue
Day 3
House painting portrait locations
TASK // Dressing up for Dinner

Restore the siblings to the house painting's correct positions before reading their dinner clues.

Day
Day 3
Location
Upstairs house painting
Prerequisites
Reach the dinner-dressing task and restore the siblings' portrait positions.
โœ‰ Solution

Restore every house portrait to its correct location using the upstairs house painting.

Accepted: The portrait clues for the bottle arrangement are restored.

Main-story dinner bottle arrangement๐Ÿ” Enlarge Clue
Day 3
Dinner cellar bottle positions
TASK // Dressing up for Dinner

Use the restored dinner portraits to position the cellar bottles and reveal the golden chest.

Day
Day 3
Location
Dinner-dressing cellar shelf
Prerequisites
Restore the portrait locations, then read their current symbols and timepiece colours.
โœ‰ Solution

In the restored dinner portrait state, place bronze at S, silver at the spiral and gold at the triangle with the vertical line. This is not the post-game dream variant.

Accepted: The golden chest appears with sacred cloth and water.

Dinner starter preference note๐Ÿ” Enlarge Clue
Day 3
Dinner course allocations
TASK // Serving Dinner

Distribute starters, mains, and dessert according to each guest's course note.

Day
Day 3
Location
Dining Room course plates
Prerequisites
Fill the glasses and collect each course from Kate; read the preference note for that course.
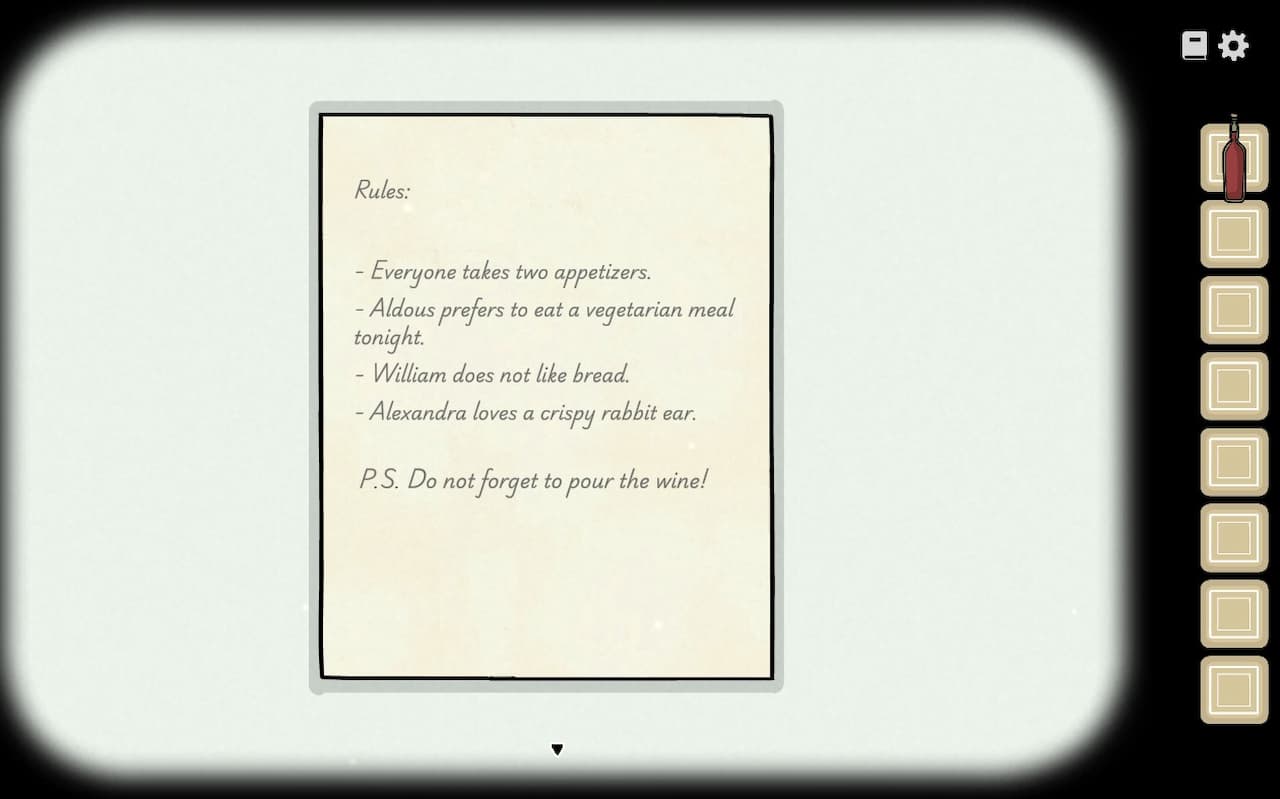
โœ‰ Solution

Match each course to its guest rules: starters are Aldous onion/broccoli, Alexandra ear/pรขtรฉ, William bacon/fish; mains are Aldous potato/broccoli, Alexandra two drumsticks/carrot, William potato/drumstick/carrot/broccoli; dessert is Aldous two cheese, Alexandra cake, William three pastries.

Accepted: Each guest accepts the successive courses.

William's falling-note mechanism๐Ÿ” Enlarge Clue
Day 3
William's singing notes
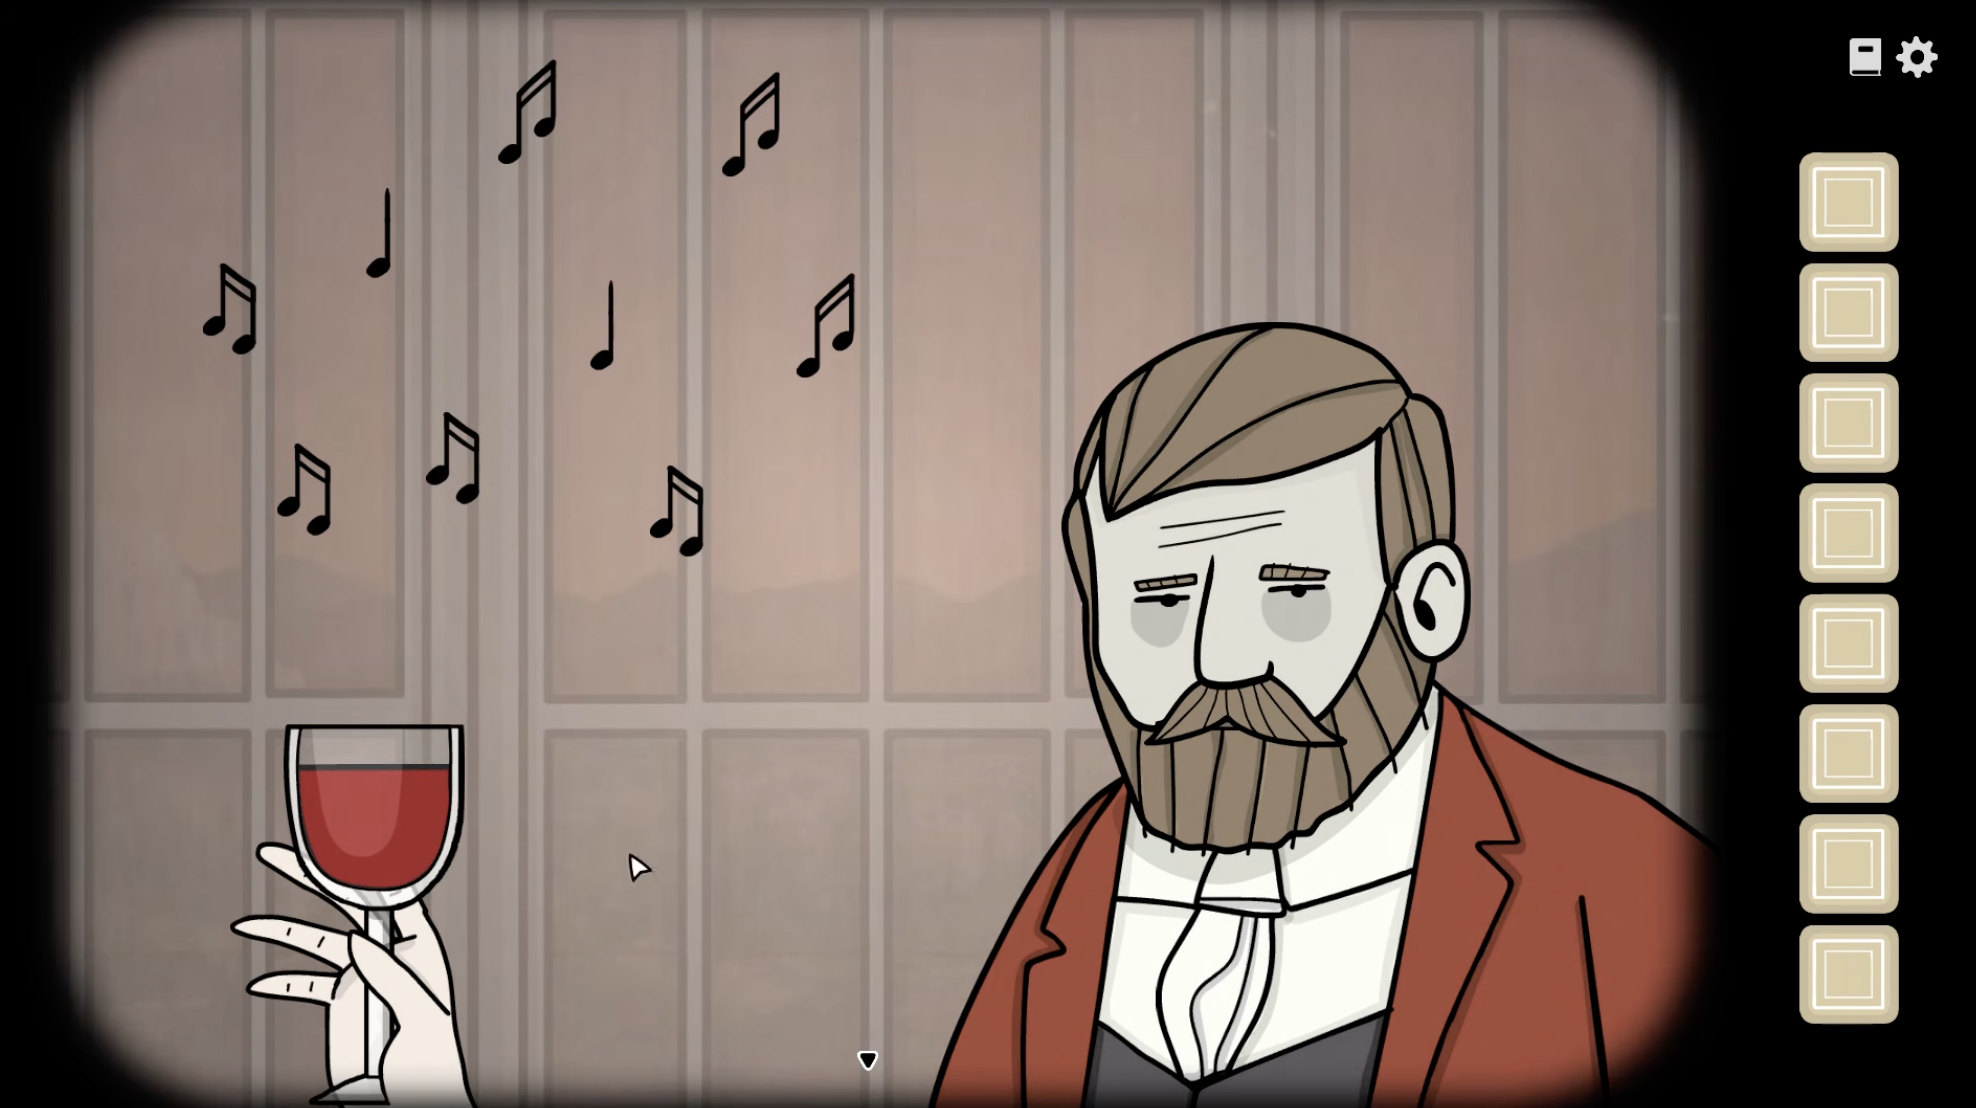
TASK // Serving Dinner

Move William's glass to catch the song's falling notes.

Day
Day 3
Location
Dining Room William's song
Prerequisites
Serve the starters and interact with William.
โœ‰ Solution

Catch every falling note in William's wine glass, adjusting to the actual falling paths rather than using a fixed sequence.

Accepted: William's song ends and dinner continues.

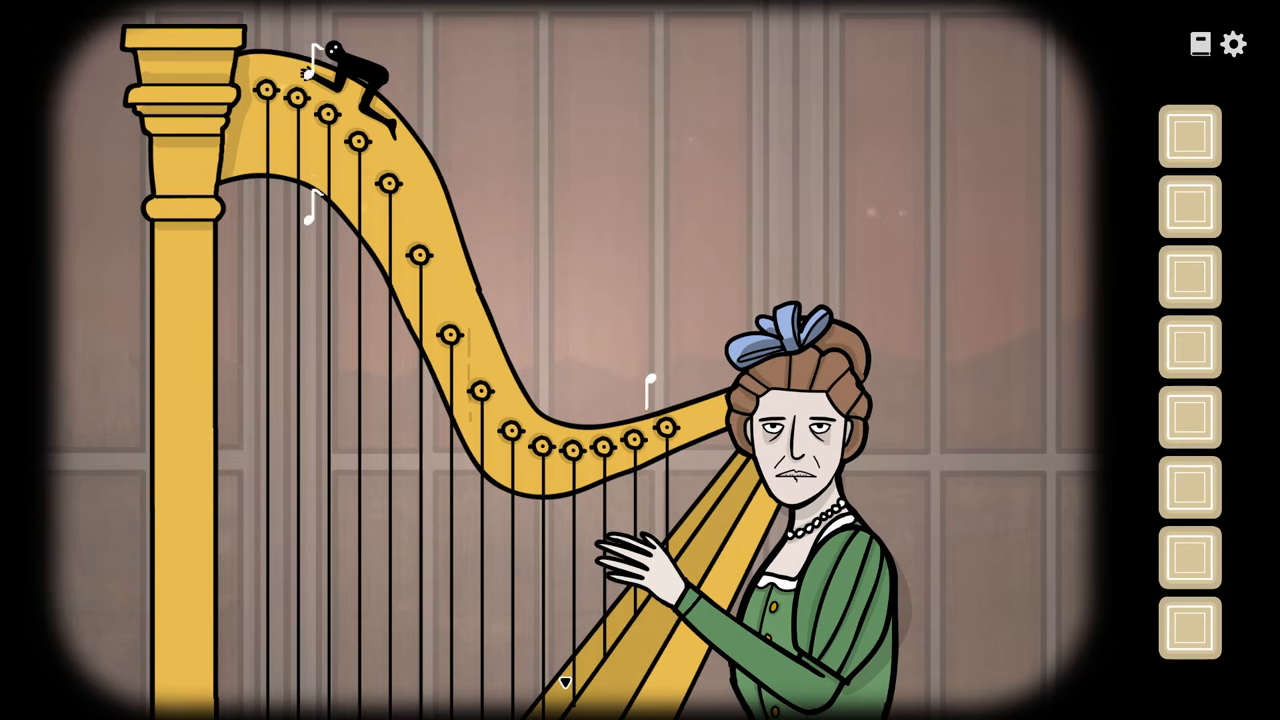
Alexandra's harp interaction๐Ÿ” Enlarge Clue
Day 3
Alexandra's harp sequence
TASK // Serving Dinner

Mirror Alexandra's four harp phrases using strings counted from your left.

Day
Day 3
Location
Dining Room Alexandra's harp
Prerequisites
Finish the main course and listen to Alexandra's mirrored-string instruction.
โœ‰ Solution

Strings numbered left to right: 1-1-1; 3-2-1; 1-5-1-3; 5-4-3-1-2.

Accepted: The harp responses are accepted and dessert can be served.

Hairpin at the departure lock๐Ÿ” Enlarge Clue
Day 3
Departure hairpin lock
TASK // The Departure

Exchange William's meat with Rustie for a hairpin, then release the cellar lock bolts.

Day
Day 3
Location
Departure locked cellar
Prerequisites
Obtain water, fork and cloth, remove the small piece of meat from William and exchange it with Rustie.
โœ‰ Solution

Trade William's small meat with Rustie for the hairpin, then aim at each lock bolt until it releases.

Accepted: The locked cellar door opens.

Departure's broken statue door๐Ÿ” Enlarge Clue
Day 3
Departure clock-door order
TASK // The Departure

Use the final cave numbers to reopen the three-statue door during departure.

Day
Day 3
Location
Final cave statue door
Prerequisites
Light the cave torch, use the plank and observe the woman, bird and cube numbers.
โœ‰ Solution

Use the cave numbers to set the statues left to right to 3:00, 8:00 and 5:00.

Accepted: The final cave door opens.

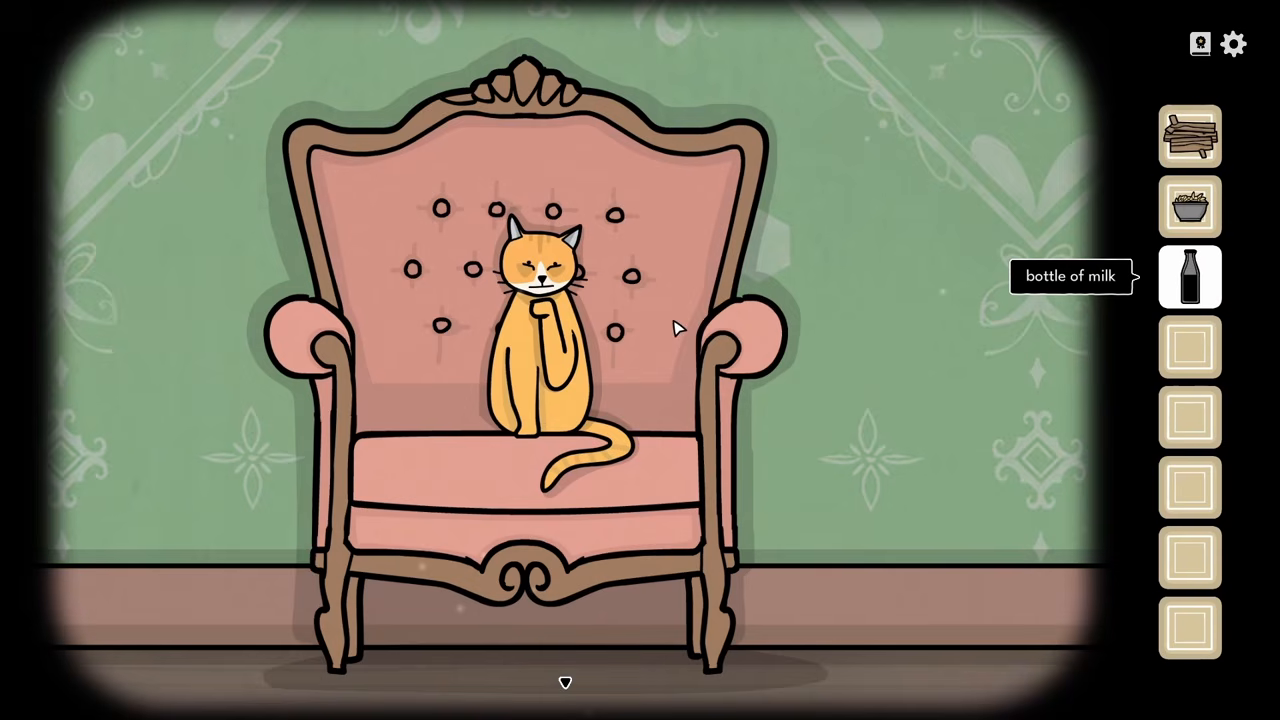
Rustie milk interaction๐Ÿ” Enlarge Clue
Day 1
Feeding Rustie milk
TASK // Preparing Breakfast

Give milk to Rustie while it is grooming to earn Feeding the Cat.

Day
Day 1
Location
Day 1 hallways, Rustie's chair
Prerequisites
Collect the milk while Rustie is still grooming; perform the milk action before giving the dead mouse.
โœ‰ Solution

While Rustie is still grooming on the chair, give it the milk before the dead-mouse step. This is the optional Feeding the Cat action, distinct from using the mouse to obtain matches.

Accepted: The optional achievement star appears.

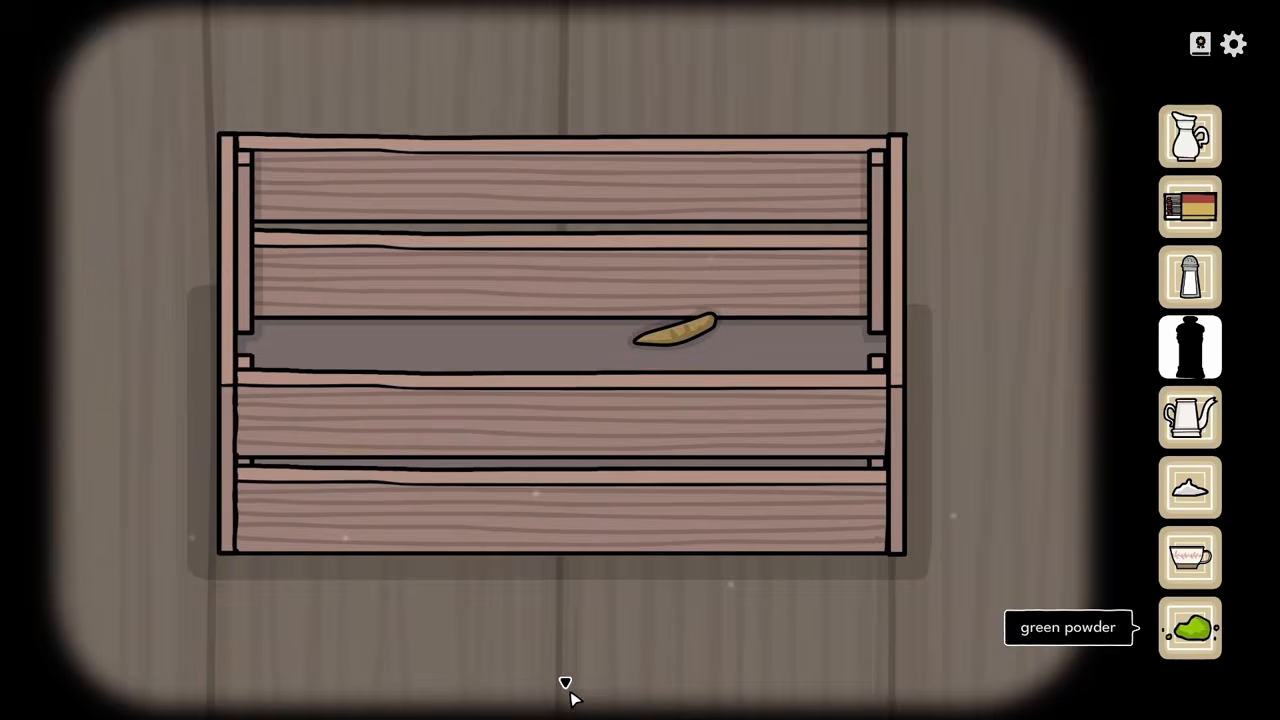
Collected green powder๐Ÿ” Enlarge Clue
Day 1
Serving Matcha Latte
TASK // Serving Tea

Give Rustie tea leaves, collect green powder, and use it in Alexandra's tea for the bonus achievement.

Day
Day 1
Location
Serving Tea hallways and crate
Prerequisites
Collect the tea leaves, give them to Rustie and retrieve the resulting green powder before completing Alexandra's tea.
โœ‰ Solution

Give the tea leaves to Rustie, collect the green powder from the hallway crate and add it to Alexandra's tea during Serving Tea.

Accepted: The optional Serving Matcha Latte achievement is earned.

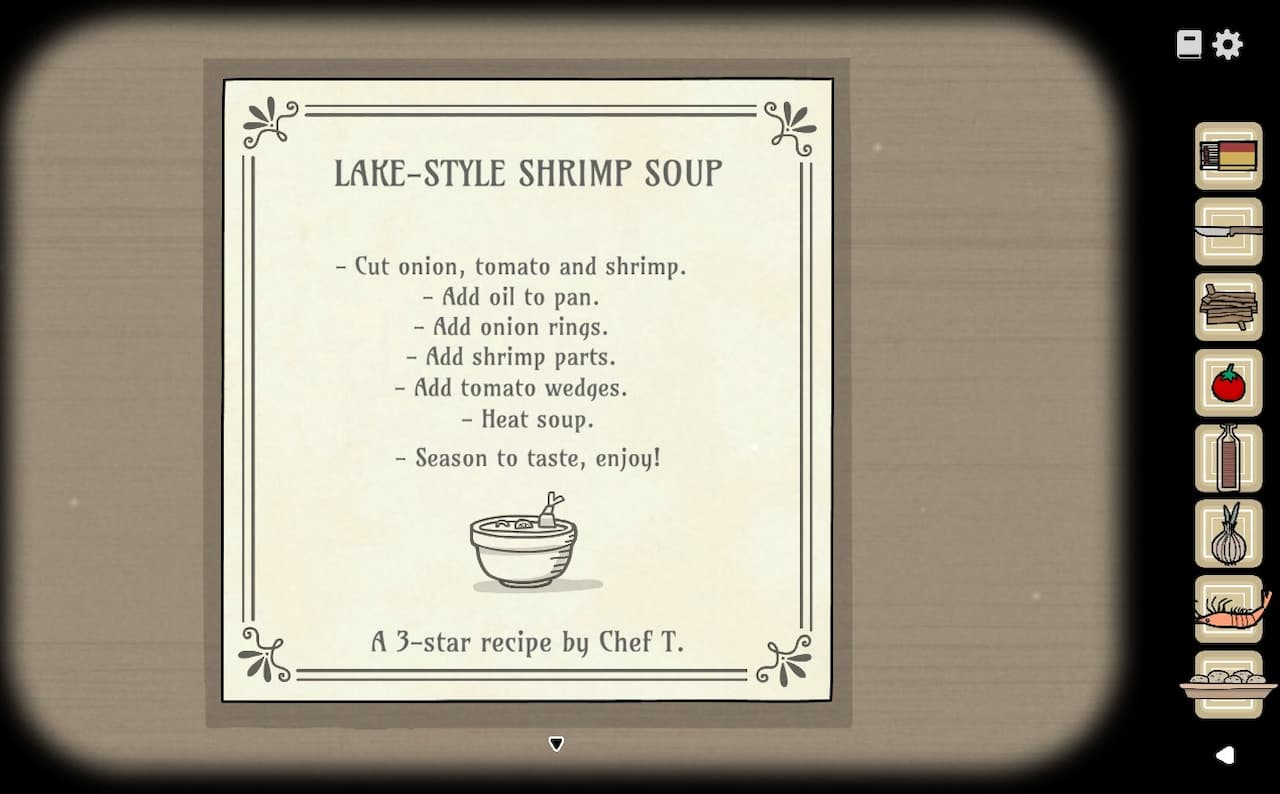
Dinner soup recipe note๐Ÿ” Enlarge Clue
Day 3
Dinner soup preparation
TASK // Preparing Dinner

Prepare the chopped dinner ingredients and cook the soup with William's mushroom.

Day
Day 3
Location
Kitchen stove and chopping board
Prerequisites
Obtain the knife, oil, tomato, onion, shrimp, William's mushroom, wood and matches.
โœ‰ Solution

Light the stove, chop tomato, onion and shrimp, then combine oil, chopped ingredients and William's mushroom in the pan according to the recipe.

Accepted: Cooked soup is available for the tasting sequence.

Hunting portrait's secret-laboratory clue๐Ÿ” Enlarge Clue
Day 3
Aldous's rifle-painting instruction
TASK // Dressing up for Dinner

Follow Aldous's dinner-dressing instruction to release his rifle from the hunting portrait.

Day
Day 3
Location
Hallway hunting portrait
Prerequisites
During Dressing up for Dinner, speak with Aldous and listen to his hat/crow/rifle instruction.
โœ‰ Solution

Tap the painting's hat twice, listen to the crow and select the rifle.

Accepted: The rifle is released for Aldous.

Use the room and parent task to distinguish repeated props. The arrival suitcase and bathroom case use different clues, while nighttime, dinner, and post-game bottles have different relationships. Open the matching answer for its hint and reveal choice; the secret letter chain has a separate spoiler-controlled destination.

Continue Investigation

Tin cup order SolutionEstate entrance key SolutionCooking the porridge SolutionAldous's alarm clock SolutionAldous's razor box SolutionCleaning Aldous's ear SolutionPorridge berry and insect puzzle SolutionAldous's exercise sequence SolutionPortrait candle-box code SolutionCandelabra lighting order SolutionCockroach board SolutionFlower PuzzlePorch stone-tablet box SolutionAlexandra's arrival suitcase code SolutionSuitcase luggage arrangement SolutionAlexandra's tea SolutionBroken teacup SolutionReunion painting sequence SolutionFly and tree directions SolutionReunion wine-box year SolutionBroken-bottle cigar-box pattern SolutionWilliam's mouth fire SolutionJames's lullaby SolutionWaking William during the reunion SolutionNight Watch anomalies SolutionAttic sorting tray SolutionAttic Vanderboom story box SolutionAttic constellation box SolutionAttic animal-statue box SolutionCoffee bean-box code SolutionWilliam's grandfather clock SolutionFamily portrait clock-box arrangement SolutionWilliam's toe-tickling sequence SolutionWilliam's rotating fish scroll SolutionWilliam's scroll story order SolutionBathroom-hall bloodstain directions SolutionBloodstain circle-count order SolutionServant-room bloodstain pairs SolutionHunting target prerequisites SolutionFive-senses shed code SolutionLaundry-line order SolutionBathroom tile groups SolutionBathroom soap-box sliding puzzle SolutionBone-comb preparation SolutionBath bubble chain SolutionBathroom suitcase code SolutionCellar BottlesLeft cellar passage tools SolutionMiddle cellar passage tools SolutionRight cellar passage tools SolutionCellar statue clock door SolutionRustie's hiding places SolutionHidden laboratory painting SolutionAlchemy symbol board SolutionAlchemy arrow box SolutionAlchemy cabinet code SolutionDistilling oil SolutionDistilling acid SolutionAlchemy blood and fruit juice SolutionElixir recipe SolutionUnforeseen household repairs SolutionCake decoration placement SolutionKitchen oil-bottle sorting SolutionAldous's potato shapes SolutionSoup vision sequence SolutionCellar dinner wine-box pattern SolutionHouse painting portrait locations SolutionDinner cellar bottle positions SolutionDinner course allocations SolutionWilliam's singing notes SolutionAlexandra's harp sequence SolutionDeparture hairpin lock SolutionDeparture clock-door order SolutionFeeding the CatMatcha LatteDinner soup preparation SolutionAldous's rifle-painting instruction SolutionWiki